![]()
Today’s InVue release is HUGE!!! It’s so huge that InVue turned the big 2.0! With three major new features and a host of smaller improvements, this is by far the biggest update to the InVue software ever. Best of all the first InVue update of 2016 is free to all existing InVue owners! Read on to find out what has changed in the latest and greatest release of InVue, because there is sure to be a new feature you’re going to love.
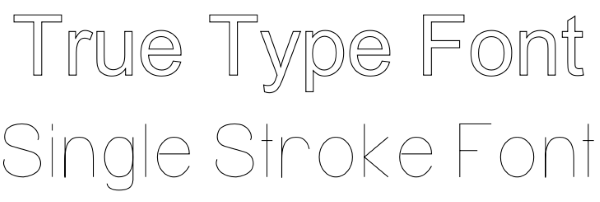
Single Stroke Fonts

One of the cool new features in this version of InVue is the added support for single stroke fonts. Single stroke fonts are fonts designed to be drawn, embossed, etc. instead of being designed for printing the way that traditional True Type Fonts are. With single stroke fonts you get a very unique look which often appears much more like natural hand writing (albeit substantially neater than I’m capable of). In addition, single stroke fonts are typically much faster for your machine to draw than traditional true type fonts.
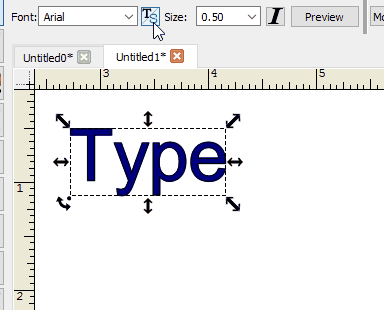
Clicking the font selection button makes it easy to find your single stroke fonts
To access the new new single stroke capability of InVue we’ve added a filter button to the font selection toolbar and preview window. By default all fonts will be listed in the font drop down box. First the true type fonts and then the single stroke fonts. By clicking on the filter button you can restrict the list to only true type fonts, and clicking on it again will restrict the list to only single stroke fonts.
We’ve included 4 awesome single stroke fonts to get you started. If you are interested in adding additional single stroke fonts we have several more available for sale at a very reasonable price in our online store. For those of you talented and dedicated enough, look for a class on making your own single stroke fonts in the coming months.
Snap Lines

Adding a basic snap line is simple. Just click on the ruler.
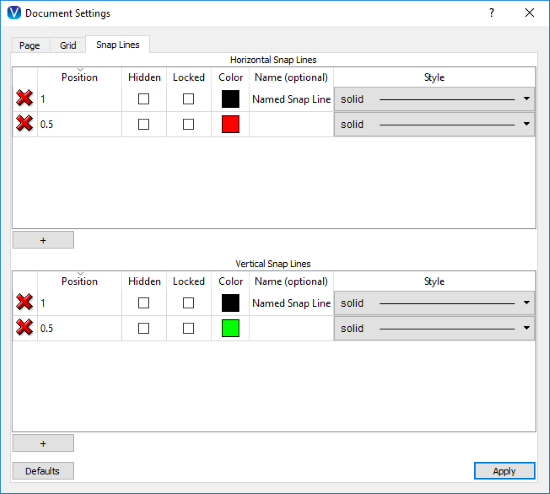
Snap lines have been one of the more requested and anticipated features for InVue. With this new version of InVue you don’t just get basic snap line support, oh no, these are premium grade snap lines. Sure you can just quick drop one down by clicking on the ruler, and hey, there’s nothing wrong with that. But what if you’d like to use a different color for one of your snap lines? No sweat.
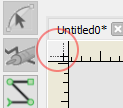
Click this button to access the snap lines settings.
Click on the new document settings button between the two rules and viola, snap line nirvana. There’s that familiar color box, making picking a new color for that line a snap (ba dum dum). Still, look at all the other options there! Hide individual snap lines that you aren’t using right now and lock snap lines in place so you don’t accidentally move them with the check boxes. Specify the exact location you’d like the snap line to be by changing the position value. But that’s not all! Name your snap lines so you know exactly what to use it for. Any assigned name will show up by the snap line in your document (so awesome, trust me). You can even change the style of your snap line to one of the many dash patterns from the style drop down.
Want to add a bunch of snap lines at once? Open up the Snap Lines tab of the Document Window (easily accessed by the little button between the rulers) and create all the new snap lines you need by clicking on the “+” button below the Horizontal or Vertical Snap Line lists.
The new snap line tab in the updated document window is your snap line customization headquarters.
Right clicking on the snap line arrow on the ruler brings up a number of options
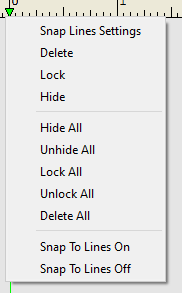
Of course you don’t have to go to the Snap Lines tab to do everything. Right clicking on the arrow for a snap line will give you the option to hide, lock, or delete a snap line. In addition you’ll have the option to act on all the snap lines to do things like hide all, show all, lock all, unlock all, and delete all. Of course there are times when you want to see that snap line but the snapping is not helping. The right click context menu from the ruler also has the options to enable or disable snapping. If you want to get really savvy, use the snap enable/disable hotkey “}” and turn snapping on and off with the press of a button or the “{” hotkey to toggle between showing and hiding all the snap lines. Notice that the snapping status for both the grid and snap lines are displayed down at the bottom of your InVue window in the status bar.
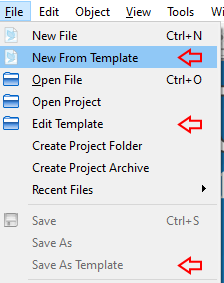
Document Templates
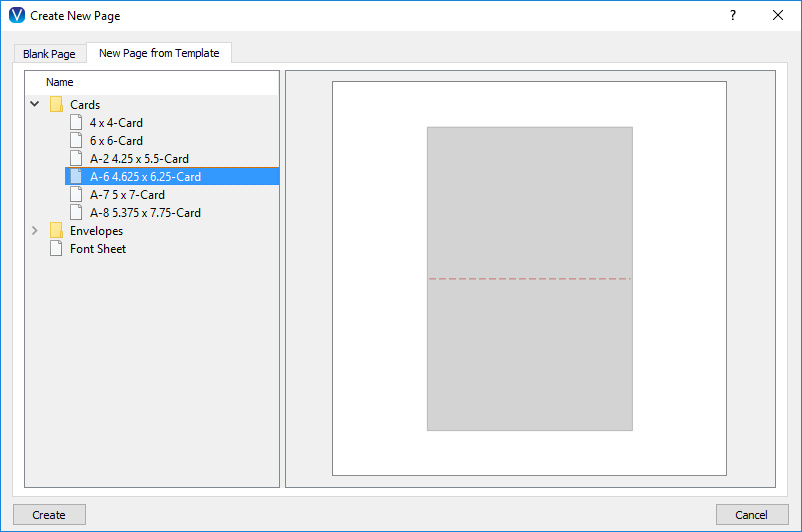
The New Page from Template tab in the New Document Window
This release of InVue also adds support for document templates. Document templates allow you to start a new document with some of the design work for your project already done. So, for example, if you want to create a new greeting card you can start a new document with the the greeting card base already there waiting for you to bring your creative powers to bare. Creating a new document from a template is a snap (yeah I’ve got snapping on the brain).
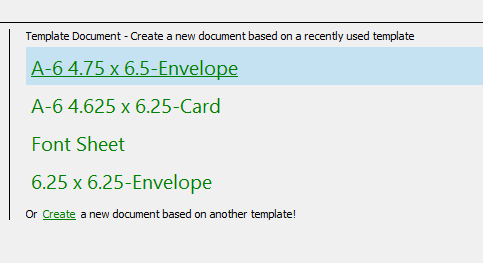
Your recently used templates will show up on the welcome screen or you can click in the “Create” link to access the New Page from Template tab.
The New Document window now has two tabs, one for blank pages and one for new pages from templates. We’ve also added a section to the Welcome screen that includes links for creating new documents based on recently used templates and a link to take you straight to the “New Page from Template” tab.
Creating your own templates is simple with the new template menu options
InVue 2.0 starts you off with a number of templates for cards and envelopes. Pazzles Craft Room members can also expect to see templates available here and there as part of the benefits that membership provides in the coming months. Of course a great deal of the power of templates lies in the ability for you to create your own templates. It’s really simple to do too! Just start a new document, set it up with steps you often find yourself doing when starting specific projects (including snap lines!), and then select Save as Template from the “File” menu. You can set up your own folder structure to organize your templates and they will show up just the way you put them in the New Document from Template window.
InVue 64bit Edition for Windows OS
InVue 2.0 now comes in a 64bit edition for Windows. Moving to a 64 bit edition of InVue provides performance improvements and makes InVue more powerful due to the increased amount of memory it has access to. In order to get the benefits of this upgrade, existing users with 64bit capable computers will need to uninstall their current version of InVue and install the new 64 bit edition of InVue found here: InVue Download for Windows. If you’re not sure whether or not your computer supports 64 bit programs no to worry, the InVue installer will install the appropriate version for your computer. Also, don’t worry about all your settings and documents, they will be the way you left them when you start up the 64 bit version.
Bezier Curve Editing
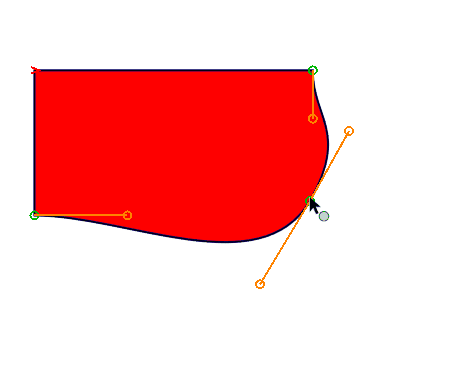
Now when you move a bezier control point, it’s curve handles will move as well, preserving the curve.
We’ve made an improvement to how the control points of bezier curves are moved. In the previous version of InVue, if you move a control point with one or two Bezier curve handles associated with it, those handles would stay in their original location. This can drastically alter the appearance of the curve you are working on; generally causing it to come to a point or divot. The new bezier curve control point editing is changed so that in addition to moving the control point, InVue also moves the Bezier control handle(s), treating the curve as a unit. We’ve found that this makes it much easier to modify your curves without losing the overall feel or causing curves to come to points or divots. Of course if you would like to move just the control point, you still have that option. Just hold down the Ctrl(Win)/Cmd(Mac) key and click and drag the control point.
New Hot Keys
We’ve added a number of new hotkeys with this update to make accessing many common features easier. One of the coolest new hotkeys is the new zoom to area hot key. To access it hold down the Alt key on your keyboard. You’ll notice that the cursor changes to a magnifying glass. You can now click and drag to select an area to zoom in on. Releasing the Alt key returns you to the tool you were previously using. Below is a list of the other new hot keys. You can also get a complete listing of all the hotkeys by picking Hotkeys from the Help menu in InVue:
| Zoom All | alt + a |
| Zoom Page | alt + p |
| Zoom Selected Objects | alt + s |
| Zoom to Area (Mouse) | alt + left mouse button drag |
| Move Selection Forward | . |
| Move Selection Backward | , |
| Move Selection to Front | > |
| Move Selection to Back | < |
| Snap Line Display (On/Off) | { |
| Snap Line Snapping (On/Off) | } |
New Cursors
Speaking of cursors, this version of InVue added 22 new cursors to help you keep track of which tool you’re using.
Lock/Unlock Improvements
Locking your selection in the middle, preserves the location, locking it to the back prevents anything from moving behind it.
InVue 2.0 improves upon the previous lock unlock functionality in a couple of important ways. First, the lock information is now saved out to the file so you can keep everything locked up tight. Secondly we’ve changed how locked items interact with Z order (how the shapes are stacked). Now, if you lock something in the middle of a stack, you will be able to move things in front of, or behind the locked item. However if you lock something to the very bottom (by moving it to the back and then locking it), the locked item will always be on the bottom. So, everything you send to the back will still be above the shape that you locked to the bottom.
Wireframe in the Text Preview Window
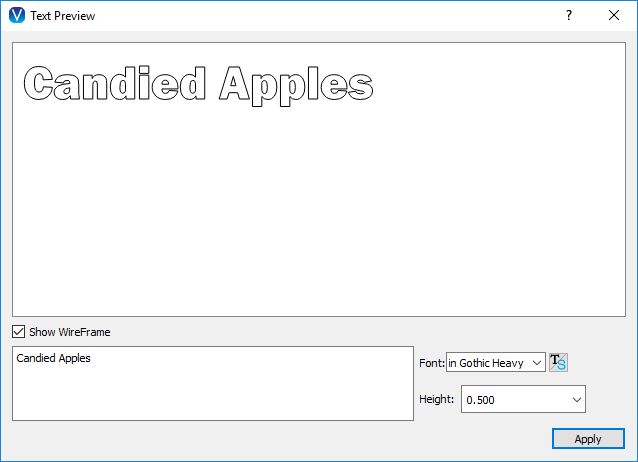
Get a better idea how the font you are considering will cut with the new wireframe checkbox in the text preview window.
There are also a number of bug fixes, tweaks, and under the hood improvements. If you would like to read the full update notes for 2.0 you can see them when updating your software or check out the forum post here. Thank you for choosing Pazzles and craft on!

Wow!! I am loving the snap lines!! The Vue software just gets better and better!
SO excited! Off to update right now!
I’m out of town, looking forward to getting home so I can try out all of these great new updates. I’m excited!
Thanks for these fantastic updates!