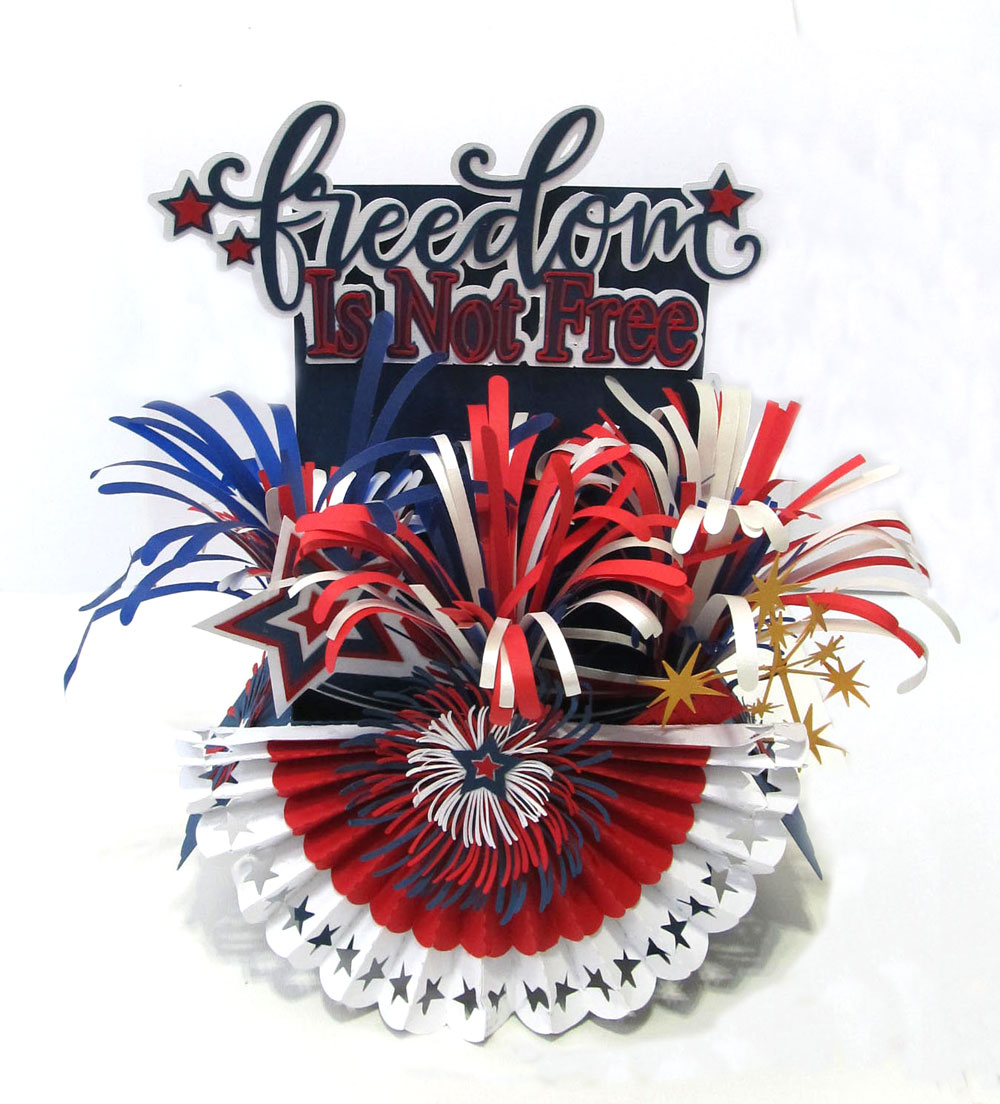
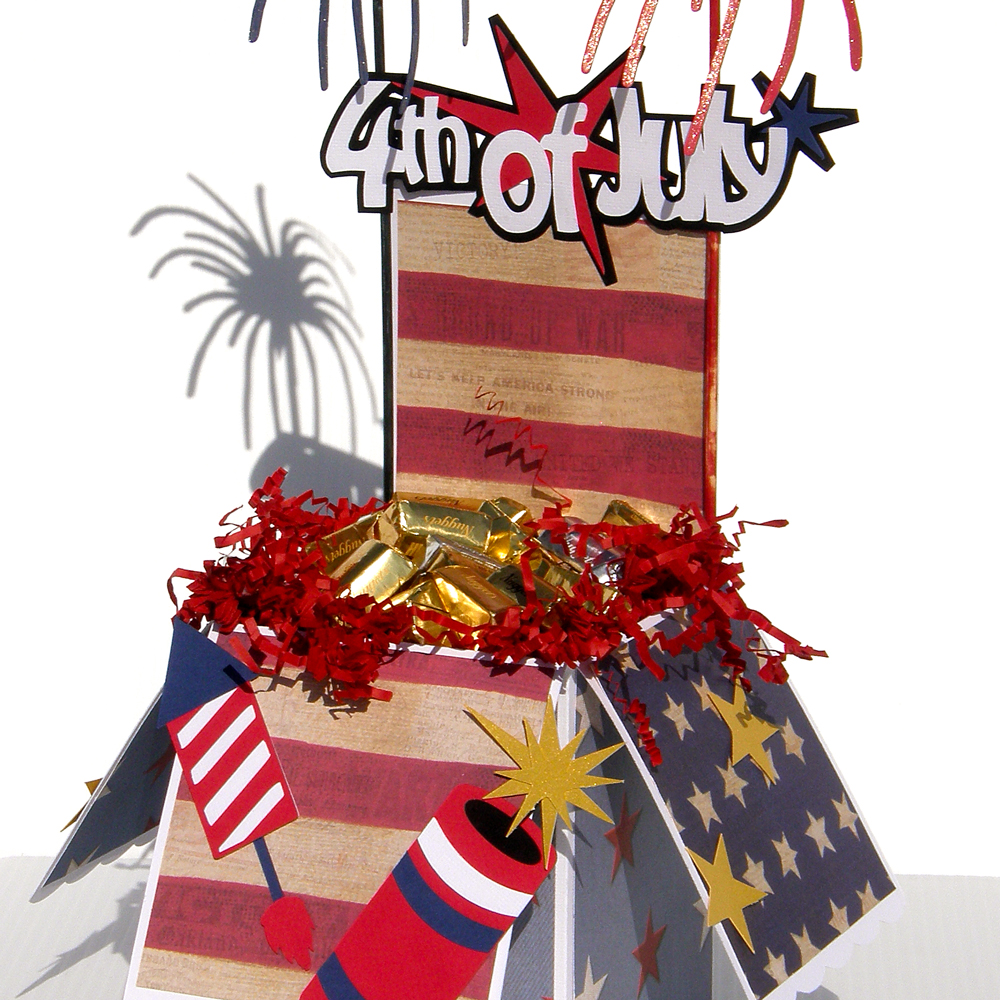
I wanted a nice centerpiece for my table for freedom celebrations such as Independence Day, Memorial Day, and Veteran’s Day that would have a WOW Factor, but would also make a strong statement in support of those who have given so much to gain and protect the freedoms we have. This design can be changed up and used for celebrations of all kinds, by selecting appropriate titles, colors, and images from the Pazzles Craft Room Library’s Holidays and Occasions sections. The colors of the festive rosettes and sparklers can reflect the nature of any special celebration.
In browsing through the patriotic cutting files in the Pazzles Craft Room Library, I first found the Freedom title from the Independence Word Set that got my creative juices flowing. I used the Times New Roman font to add the remaining text “Is Not Free” using the Text tools in the InVue software. To give the text a nice tri-color layered look, I first changed the text to a stencil using the Stencil Bridge tool. I added an outline of the stenciled text in red, selected the stencil and outline and used the Transparent Group to make a red frame. With the red frame selected, I used Outline again to create another larger layer on which to place the red frame. Arranging this text under the Freedom Title, and selecting all of the text layers, I added one more outline to create the white background layer for the title of the project. Red Stars made nice accents for the Freedom Title.
Initially I wanted to make a box card, similar to the Easter Popup Box Card, so I started with it, but I needed a larger design to fit my title. The resulting Large Box Card file is located in the Pazzles Craft Room Library. The box card is designed to fold flat for mailing. However, with the addition of the thick sparklers and swag, this centerpiece project will not fold flat. It stands a bit over 10” tall. To assemble the box card, glue the tab of one of the box pieces to the side of the other. While the box is still flat, glue on the mat pieces and other flat decorations. The swag will be glued to the flap that drops down in the front of the box. For the Freedom Centerpiece, I did not need the mat pieces included with the Large Box Card design. Since the swag is wider than the front piece, it is best to wait until the box is assembled to add it. But flat decorations for the side flaps and back panel may be added at this stage.
The narrow panels are for the inside of the box. Glue the remaining box tab to the back piece to form a box as shown below. Fold the panels on the score lines on one of the panels towards the front, and the score lines on the other will be folded towards the back. Line up the tops of the panels with the top edge of the box, with the folded back tabs flush against the box, and glue in place. You now have several platforms for adding designs; the back tall panel, two inside panels, and the inside edge of the front of the box. I love how these box cards look when they are overflowing with lovely designs. As long as the added pieces are flat, the decorated box will fold flat for mailing. You will need a large size envelope to fit the flat box and its decorations. Make a custom envelope to fit your finished project. See Klo’s Classroom videos posted Sept. 14, 2010, and December 3-5, 2010. Since this Freedom Centerpiece has thick pieces, and will not fold flat, I will not be needing an envelope.
I wanted to add a rosette or swag reflecting the project theme, and was excited to find the WPC file for a rosette with stars along the edge. The cut-out stars served as additional accents for the project. Perfect! I found the WPC cutting file for this design included with the video tutorial on how to assemble it, near the bottom of this page. The file includes the larger rosette pattern, as well as a smaller one to place over it in a contrasting color.
Since fireworks are a huge part of patriotic celebrations, I thought the Sparklers from the Patriotic Party Set were perfect. I cut these from light weight paper in red, white and blue. A single 8.5”x11” sheet in each color provided multiple sparklers. After cutting one set, I discovered that the negative remaining could be added to make additional pieces. Not wanting to waste the leftover paper, I reduced the size of the sparkler design to fit, and cut more sets. I stacked the three colors and rolled them together to form a tri-color sparkler. They were easy to curl to give the exploding effect of fireworks, using a glue stick. I used hot glue all around the bases of the three rolled sparklers and was able to adhere them between the inside box card panels, two in the back section, and one in the center of the front section.
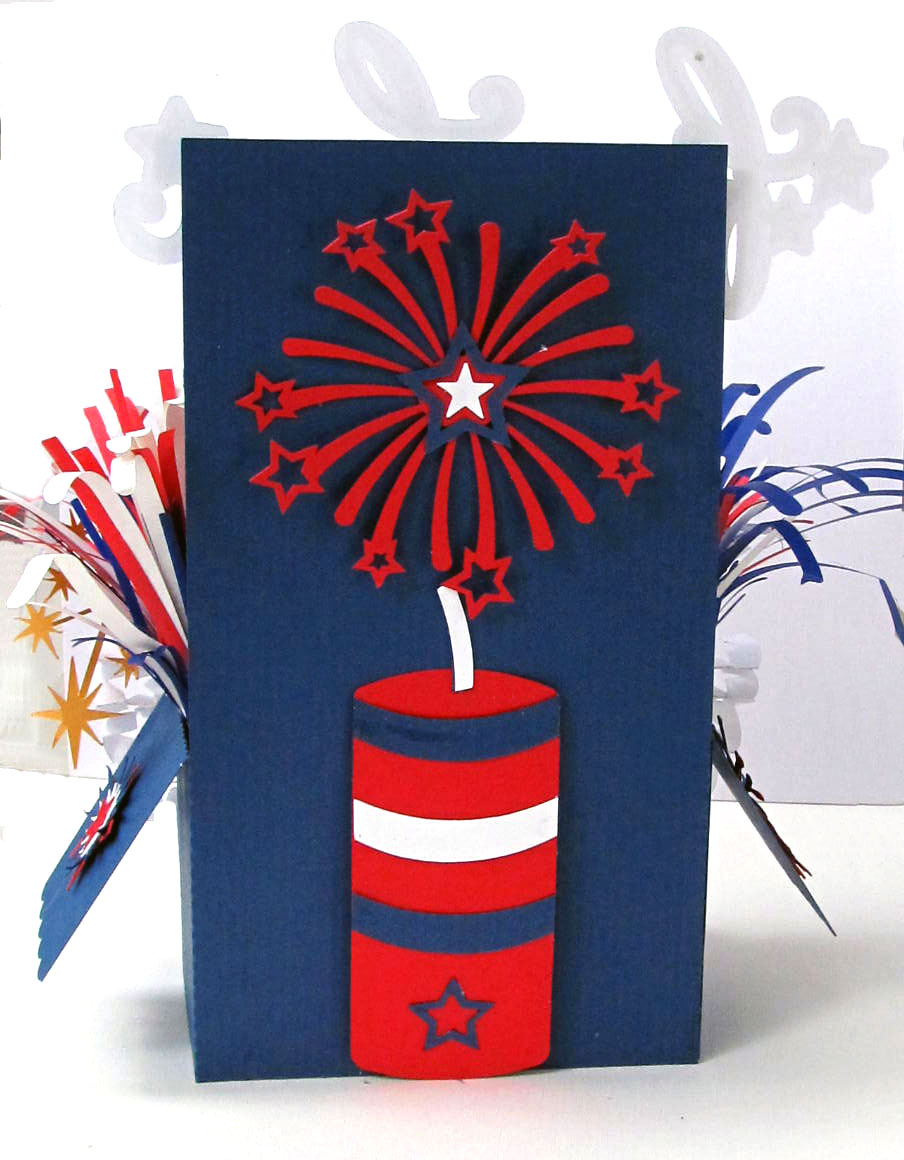
There are lots of designs to choose from in the Pazzles Craft Room Library to complete the decorations for this project. On the back, I decided to use a huge 4th Cracker, and the side flaps and center panel inside the box were decorated using the Shooting Star, Fire cracker, Fireworks, and Stars from the July 4th Set.
I hope you have as much fun assembling your centerpiece as I did!
~Julie
Supplies:
Neenah Classic columns paper (This paper is heavy, and nice and crispy, so it cuts exceptionally well!) I used Red and Patriot Blue.
Canvas Textured White paper from Core’dinations Black Tie Affair
Glue Sticks and Low Temp Hot Glue Gun from Walmart
For sparklers:
Neenah Stardream Pearlescent Quartz
BriteHue Red Text Weight Paper

Beautiful centerpiece Julie–love your wow factor–you did it!
I really would love to re-create your designs and I am a long standing Craft Room member. I would be willing to tackle this project but sadly I do not have enough information to try ( sizes and measurements) and make it on my own. Is it possible to write up more detailed directions and post it within the Craft Room? I know this would definitely be a learning experience for most of us.
Sweetaline, thanks for your comments. The only design elements that were resized from the originals as posted in the Craftroom were the Shooting Star, enlarged to a width of 7.8″, with height adjusted proportionally so that it would be similar in width to the “Freedom” title; and the Sparklers for the 3D fireworks were resized as follows: I cut one set from each of 3 colors in the original size, centering the strips on the page. I used the negative pieces as they came off the mat. I reduced the size of of sparklers to fit 8.5″ wide paper, so adjusted a set proportionally to 8.25″ wide. With a strip of paper remaining, I duplicated the shape and adjusted the width to 6.25″, and used the remaining negative piece. The sizes on these particular pieces are not really important. I just stacked and wrapped what I had available. I used the swag pieces sized as provided in the WPC file, although I think it would be better made about 1.5″ shorter to fit on the front flap more perfectly.
The Text “Is Not Free” is 1.5″ tall, and adjusted to a width of 5.125″ in order to fit across the width of the tall back piece.
I really like how I can lay out all the pieces on the screen, and get an idea how the pieces will fit together on the final project. Selecting a piece or set of pieces allows me to drag out the corner handle to a size that fits the available space.
You can select the patriotic pieces of your choice, and size them to your taste.
Thank you so much. I have a neighbor going through chemo and she needs a little cheering up!