I love making handmade cards and invitations to the point that I just cannot bring myself to use store-bought cards. However, when I need to make 10 or more invitations or cards I begin to question my sanity!! That is when using Print and Cut can save me from becoming a crazy woman. I can still have layers and texture but I don’t have to glue all the little pieces together.
Using a cutting file is one of the easiest ways to set up a print and cut project. You already have the cutting lines so there is no hand tracing around a print-only image. You also do not have to deal with a white rectangle background which is often present when using JPEG, BMP, or PNG images. Finally, you can change the color of the design to suit your needs instead of being stuck with whatever color the image came in.
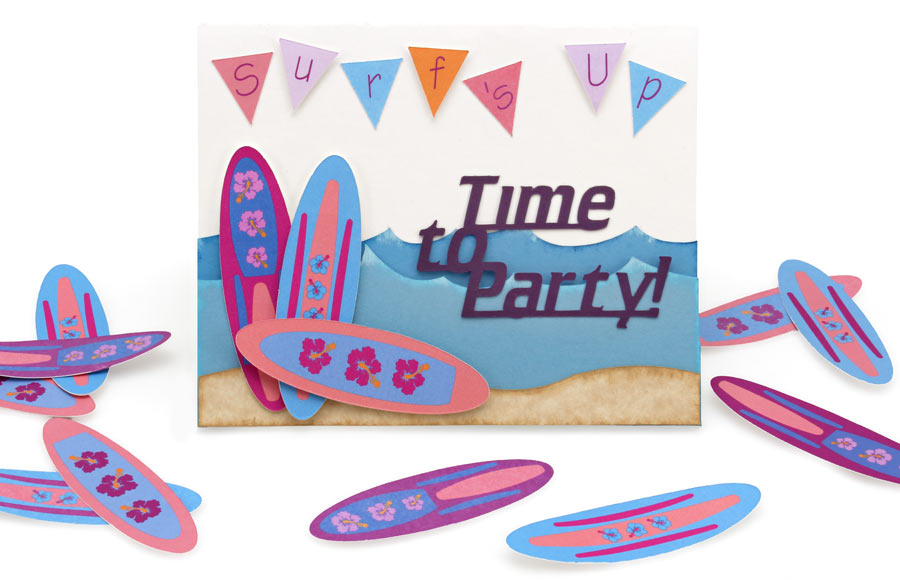
The card I made for today’s tutorial is for a summer pool party. I wanted something other than the traditional beach balls and sunglasses. Surfboards seemed like a fun alternative, so I went searching in the Craft Room Library and found one I really liked. It just spoke to me somehow and I used it to make two other coordinating surfboards as well.
If you have wanted to try Print and Cut I recommend you start with this method. After a few practice runs you will find that you can line up the blade to the registration square in one or two tries. (I had to make myself be less accurate in the video so that I could teach the process.) Once you get the hang of it you can try your hand at Print and Cut with other image types.
I have included the cutting file for the Surf’s Up card so you can give it a try right away. While you are welcome to use the surfboard cutting file, it would be fun to follow along with the video using a cutting file that you like.
I also want to give special thanks to Camilla here in the office. She is the Print and Cut queen and does amazing projects for her daughter’s softball team.
Have fun and learn something new today!!
~ Christine


Thanks for this wonderfully thorough video!
Thanks for sharing — fantastic ideas!
Thank you for this video! I am very new to Pazzles and Print and Cut is very important to me. I almost didn’t purchase the Pazzles because I was thinking I could not do Print & Cut with it. Another machine I was looking at was great at Print & Cut (based on reviews). However the Pazzles can do so much more than the other machine I was considering and still do Print & Cut! I can’t wait to try this with my machine!
I can’t wait to try this! I make all of the birthday party invitations for my family and this will make it easier. Thanks for the video, I can’t wait to try it!
I am having trouble seeing the video on my ipad. For some reason the ipad and all the other videos would not unlock themselves when the video down loaded. I really want to see this video as I make many invitations for all my friends parties and it would be good to be able to save time! Please help me
Deborah, I am watching the video on my iPad Mini right now. Did you choose the iPod/iPhone option?
Another thing I would suggest trying is to completely turn off and turn back on your iPad. That means holding down the on/off button until you see “slide to turn off”.
Hope that helps, if not call in to the office on Monday morning and talk to Dave.
Please tell me what to do if I vectorize a picture and my pazzles just give me n square and not the picture after the vectorizing
Adri,
If you go up to View and click on Wire Frame you can see whether or not anything is actually there when you get the black square. My guess is that there is something behind the black.
If there is you probably just need to take out the color. To do that, select the box and go to the Color Palette window. Click on the X under the B column. You may need to click more than once if the color does not go away.
The only other thing I can think of is that you imported in a png file and it actually came into the software with a black background.
Great tut Christine! Thank you for your time on this.
Not only did I learn some new things about cut and print, I learned new things about cutting! (select object)
Is there anyway to save the file as a Word file to print from another source? I don’t have a color printer at home but I can take the file (if it is in the Word format) elsewhere to print it. Is it possible? I am very new to this as I just ordered my machine and it hasn’t even arrived yet.