
-
» Home » Design Team » Design Team » Idea Book Slide Show -


Pirate's Gold
Pirate's Gold
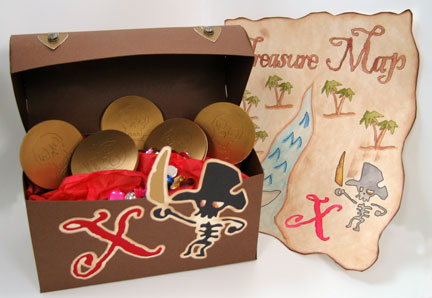
Pirate Treasure Chest and Map Party Decor
By Mary Kerr, http://www.anangelsart.com
Ahoy, Mateys! This fun pirate treasure chest box, faux gold doubloons and treasure map make fun favors or table decor for your little pirate’s next birthday or Halloween party. The finished size of the box is 2 7/8” deep x 4.75” tall x 5.75” wide, so it’s big enough for all kinds of pirate party booty!
Materials Needed:
(2) 12x12 Brown Cardstock; Paper Accents
(1) 8.5x11 Parchment Cardstock; Paper Accents
(1) 8.5x11 Metallic Gold Cardstock; Paper Accents
(1) 8.5x11 Thin Chipboard; Paper Accents
Scraps of Cardstock in Red and Black; Paper Accents
Precision Point Pens in Red, Brown, Blue and Black, .03;
American Crafts Dye Ink Pads or Watercolors in Red, Brown, Green, Black and Blue
Chalk Ink Pads in Creamy Brown and Dark Brown; Clearsnap
(4) Brads; Karen Foster Design
Small Watercolor Paintbrush; craft supply store Metallic Gold and Black Acrylic Paint and Foam Brushes; craft supply store
Pen Tool,
Engraving Tool
Palm Tree Cutting File; Pazzles
Images and text on this project came from “Flood” and “Ill October” Dingbat Fonts and “Black Adder” Font from the Internet
Load the parchment cardstock on your mat. Using the pen tool and the American Crafts pens, draw the following parts by selecting the cutting paths one by one using the pen colors listed:
Red path = red pen
Blue path = blue pen
Brown path = brown pen
Black path = black pen
Teal path = cutting line
Take out the pen tool and put the blade holder back into the machine, then select the teal path to cut out the map. With dye based inkpads or watercolors and the watercolor brush, color in your map using the photo as a guide. Ink the edges of the map with Creamy Brown Chalk Ink first, followed by the Dark
Brown Chalk Ink to give a more weathered look. Keep the parchment scraps for the other pieces. For the doubloons, load the mat with the metallic gold paper. Open the cutting file for the doubloons, and put the engraving tool in the machine. Engrave the skeleton heads onto the coins by changing the pressure to 100 (Pro) or 10 (Inspiration). Put the blade holder back into the machine and cut out the coins using the black cutting paths. Load the chipboard onto your mat (taping down the edges as needed with painter’s tape). Cut three coins from chipboard for each coin you wish to make. Keep your gold paper scraps for the next steps.
For the treasure chest, cut the following pieces from cardstock as follows using the Creative Cutter:
Treasure Chest box pieces (2 box bottoms and one trunk top), from brown cardstock (score on red box
paths using the engraving tool)
Pirate, from black cardstock
Letter X, from red cardstock
Shadows for pirate and letter X, from parchment cardstock scraps left over from the map
Pirate sword and Treasure Chest Accents, from gold cardstock scraps left over from the doubloons
Assemble the treasure chest box as follows. Fold the box bottom pieces along the scored lines. Adhere the two pieces together by adhering the tab for one piece to the inside straight side edge of the second piece, then repeat this with the other tab and the other straight side edge to create the box shape. Fold the shorter end bottom tabs in first, followed by the longer front and back bottom tabs and slip the tabs
into the slits to lock the box bottom. With the top of the box still flat, adhere the two gold chest accents to the top of the box using the photo as a guide. Next, fold the tabs in along the straight sides of the trunk top. Working slowly, adhere the tabs to the inside of the curved box top sides to create the curved top of the chest. Using the tip of a scissors or a piercing tool, make small holes through the box lid to insert the brad prongs through the metallic cardstock accents and the box lid. Apply adhesive to the long tab on the outside back of the chest lid, and adhere the tab to the inside back edge of the box for a neat appearance on the outside of the box.
Next you will assemble the treasure chest accents for the front of the box. Shade the edges of the parchment shadows for the letter X and the pirate with Creamy Brown Chalk Ink. Adhere the black pirate pieces an the metallic gold sword blade to the pirate shadow, and the red X to the shadow for the letter X. Add a dab of brown watercolor to the inside of the eyes on the pirate’s skull. Adhere these pieces to the front of the box as shown.
To make the doubloons, glue three chipboard coins together to make several thick chipboard coins. Mix
the gold paint with a dab of black acrylic paint to create an antique gold color. Using a foam brush, paint the edges of the stacked coins with the antique gold paint and allow to dry. Take a bit of black paint and rub it over the engraved skull designs on the gold cardstock coins. Allow the paint to dry for just a bit so it will settle in the grooves, then wipe off the excess paint. After a few more minutes, you can glue one gold cardstock coin to each side of each chipboard coin. For a centerpiece, fill the chest with red tissue paper and the cardstock doubloons, rhinestone jewels, faux strings of pearls or beads, etc. For party favors, try filling the boxes with foil covered chocolate coins, fun party trinkets, mardi gras beads and more! For a pirate themed game, put tissue paper in the bottom of the box to weight it down, then have party guests try to flip the doubloons into the box from a distance of 4-6 feet away. It’s harder than it looks!


-
Photo Details
-
See all User Photos0
Date: 9/11/09
-
-
-
