
-
» Home » Design Team » Design Team » Paper Lace Slide Show -


Summer Mini Book
Summer Paper Lace Mini Book
Designed by Mary Kerr, www.anangelsart.com
Materials Needed:
(1) Sheet Each: 12”x12” Core’dinations™ Cardstock
• Sunflower
• Rosemary
• Montego Bay
• Fuschia Fizz
(1) Sheet 12”x12” Tan Cardstock, Paper Accents
(1) Sheet 12”x12” Sunny Doodles Patterned Paper, Doodlebug Design™
(4) Beach Eclectic Brads, Making Memories™
(2) Yards Plymouth Yarn™, Athena
(1) Letter Size Transparency
Small Rub-On Letters (Top Line Creations™)
Star Dust Stickles™
Craf-T Chalks (Assorted Colors)
Sharpie Permanent Pens (Assorted Colors)
Sandpaper for distressing
Mini Glue Dots™
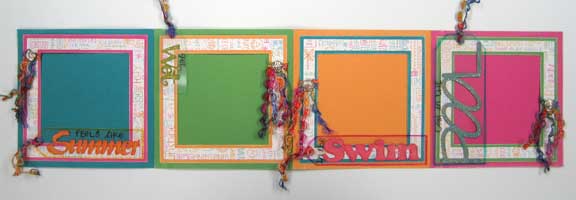
Cut and score one page and cut one outer frame from each color of Core’dinations
cardstock.
Cut four inner frames from patterned paper.
Cut one Summer Paper Lace from tan cardstock.
Cut one tag in each size from transparency film.
Distress the edges of each page and each outer frame with sandpaper to reveal the
colored paper core. Adhere the patterned paper frame to the front of each outer frame.
Adhere the pages end to end with the tab on the right side of each page. Accordion fold
the pages along the scored lines. Trim off the tab from the last page. Cut the top left 6”x6”
corner from the Summer Paper Lace sheet. Shade each of the words with different colored
chalks to coordinate with the cardstock and patterned paper colors. Line the individual words
with colored pens. Adhere the cut and chalked piece to the front of the book and trim off any
edges as shown with a scissors.
Cut (8) pieces of yarn, 6” long each. Tie two strands around the sides of each frame as
shown. Using a piercing tool, pierce a hole through the fibers and the frame and insert one
beach brad to secure the fibers to the frames. Adhere one frame around three sides to each
base page of the mini book, leaving the top sides open to insert photos.
Edge each of the transparency tags with a different colored Sharpie pen. From the
remaining Summer Paper Lace, cut the words Pool, Wet, Summer and Swim, making sure
that the words you cut will fit onto the transparent tags. Shade each word with chalks and line
with pen details. Adhere one word to each tag with adhesive that will stick to plastic. Cut four
additional 6” pieces of yarn and attach to the tags in a bookmark style. Attach each of the
tags to the pages as shown using Mini Glue Dots that have been cut in half to fit behind the
diecut words on the front of the tags so the adhesive doesn’t show. Take care not to adhere
the tags to the inside of each frame!
Apply Star Dust Stickles to the words on the tags and allow them to dry completely. Apply
Star Dust Stickles to the words on the cover and allow to dry completely.
Trim four photos down to 4”x4” squares, slip one photo behind each of the frames.


-
Photo Details
-
See all User Photos0
Date: 9/11/09
-
-
-
