
-
» Home » Design Team » Design Team » Idea Book Slide Show -

 View Larger Image
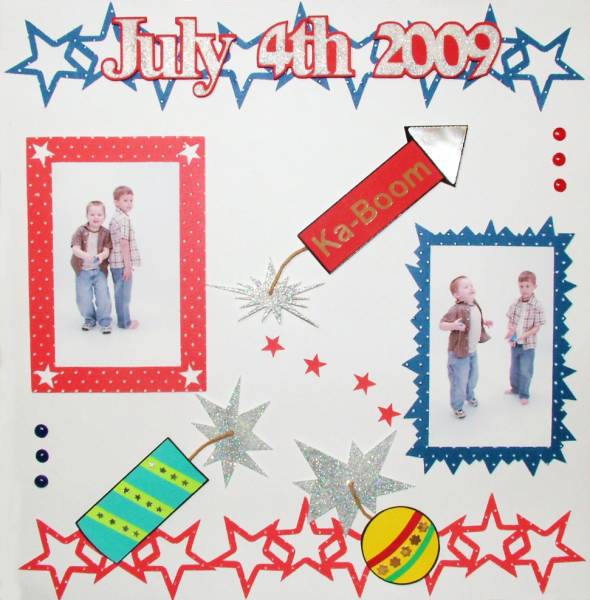
4th of July
4th of July
by Pamela Conner
For my project, I decided to make a “July 4th Scrapbook Layout”. I chose this project after going through the Pazzles Idea Book and deciding to use the “Multiply” feature to make my own borders for the layout. I also decided to make my own “Paper Piecing” firecrackers for this layout and during that process I also decided to use “Vinyl” to make the “Ka-Boom” lettering for the rocket that I designed. For those of you that are fairly new to the Pazzles machines, this idea book will teach you so much about many of the features of the Pazzles machines. Just going through the book and doing the different projects will teach you so much!!!
One thing I want to point out regarding this project is that almost everything for this project was created using my Pazzles “Inspiration Creative Cutter” and in today’s economy that really means a lot. Even the “brads” on this layout were made by me using a hole punch, cardstock and “Crystal Lacquer”. I punched four tiny circles for each brad, glued them together and covered them with the Crystal Lacquer and after they dried I covered them with clear nail polish to give an extra shine!!! I would also like to point out that the cardstock using for the “star borders” and “photo frames” was run through my Cuttlebug using the “Swiss Dots” embossing folder and then I sanded the cardstock with a nail buffer to give it a polka dot look! I used the negative stars from the red star photo frame to make a star trail from the rocket. The cone on the rocket was cut from craft foil using my PI.
Supplies List
Papers: Bazzills (Red for July 4th text mat and the body of the rocket), Paperbilities “Basic
White” (background), Colorbok Deluxe Textured Cardstock (red and blue for borders and
Frames) and I used some scrap papers from my “scrap drawer” for the firecrackers.
Ink: VersaMark “Watermark”
Embossing Powder: “Star Dust Transparent” by Stamp-n-Stuff (for glitter)
Paperbilities “Paper Wire” (for the firecracker fuses)
Pazzles Vinyl
Cuttlebug and “Swiss Dots” Embossing folder
Sulyn Industries “Mini Spangles” (tiny stars on firecracker)
Spellbinder “Premium Craft Foil (cone on rocket and “flowers” on round firecracker)
Sakura “Crystal Lacquer”
The adorable little boys in the photos are my grandsons Aiden (7) and Brady (4)…they are my heart!!!


-
Photo Details
-
See all User Photos0
Date: 9/11/09
-
-
-

-
Comments