
-
» Home » Design Team » Design Team » Inked Up Slide Show -

 View Larger Image
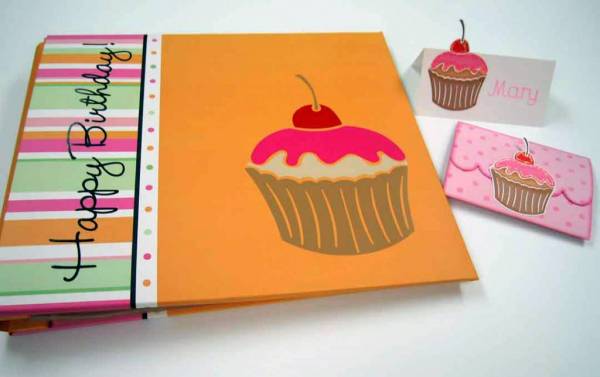
Happy Birthday Cupcake
Happy Birthday Cupcake Scrapbook
Designed by Mary Kerr, www.anangelsart.com
Materials Needed:
Pazzles® Vinyl Sheets in Brown, Tan, Black, Pink and Red
Pazzles® Transfer Tape Sheet (included in vinyl packs)
Pazzles® Inked Up Image CD (cupcake)
12”x12” Scrapbook (albums with laminated covers work best, sample is from TLC)
Cut the pieces for the cupcake design from vinyl sheets as follows:
Cupcake Bottom and Cherry Stem from Brown
Cupcake from Tan
Frosting from Pink
Cherry from Red
Happy Birthday Words from Black
Weed the excess vinyl from around each shape, as well as any excess material from the interior of the cupcake bottom shape.
Using the transfer tape sheet, transfer the cupcake pieces to the lower right front corner of the album starting with the bottom of the cupcake first and working your way up.
Transfer the black lettering to spell out “Happy Birthday!” vertically from bottom to top on
the left side of the album cover to complete the design.
Cupcake Trifold Card or Invitation
Designed by Mary Kerr, www.anangelsart.com
Materials Needed:
8.5”x11 or 12”x12” Paper Accents Cardstock in the following colors:
White, Caramel, Tan, Rose Pink, Red and Clove Brown
12”x12” Pink Dotted Pizazzill Cardstock, Creative Imaginations
Opaque White Marker (American Crafts or other that will fit in the pen tool)
Craf-T Chalks and Applicators
Ranger® Stickles™ Glitter Glue in Diamond or Icicle
Pazzles® Engraving Tool (for scoring)
Pazzles® Inked Up Design CD (cupcake)
Load pink dotted Pizazzill cardstock with the design side face up onto your mat first. Using the engraving tool in your cutter first, score the purple horizontal image lines on the base card with the scalloped edge. Switch out the engraving tool for the cutting blade, then cut the black image lines to cut out the base trifold card.
Cut the other pieces of the cupcake design as follows:
White Cupcake Mat from White
Cupcake Bottom from Caramel
Cupcake from Tan
Frosting from Rose Pink
Cherry from Red
Cherry Stem from Clove Brown
Fold the base card on the horizontal scored lines to create a trifold card. Shade the outer edges of the base card with pink chalk, then shade the cupcake diecut pieces with chalks that match the paper color for each piece. Add a tiny white highlight with the opaque white pen to the cherry on the right side. Adhere the pieces of the cupcake to the white matting piece starting at the top with the cherry and stem, continuing down with the frosting, the cupcake, and the cupcake bottom. Fold the base card with the straight panel folded up and the scalloped edge folded down over the top. Adhere the completed cupcake paper piecing to the base card across the bottom back of the design taking care not to get the scalloped edge of the card caught in the adhesive. You should be able to slip the scalloped edge of the card up from behind the cupcake to open the card. Accent the cherry and frosting pieces with Stickles™ glitter glue and allow to dry.
Cupcake Place Card
Designed by Mary Kerr, www.anangelsart.com
Materials Needed:
8.5”x11 or 12”x12” Paper Accents Cardstock in the following colors:
White, Caramel, Tan, Rose Pink, Red and Clove Brown
Pink Marker and Opaque White Marker (American Crafts or other that will fit in the pen tool)
Craf-T Chalks and Applicators
Ranger® Stickles™ Glitter Glue in Diamond or Icicle
Pazzles® Pen Tool or Fat Marker Tool
Pazzles® Engraving Tool (for scoring)
Pazzles® Inked Up Design CD (cupcake)
Load white cardstock onto your mat first. Using the engraving tool in your cutter first, score the purple horizontal image lines on the base place card. Switch out the engraving tool for the pen tool with a pink marker inserted. Draw the name onto the place card using the blue image lines on the design. Switch out the pen tool for the cutting blade, then cut the black image lines to cut out the base place card.
Cut the other pieces of the cupcake design as follows:
Cupcake Bottom from Caramel
Cupcake from Tan
Frosting from Rose Pink
Cherry from Red
Cherry Stem from Clove Brown
Fold the base place card on the horizontal scored line, noting that the cherry section of the place card will be cut out and will stick up over the top of the card. Shade the cupcake diecut pieces with chalks that match the paper color for each piece. Add a tiny white highlight with the opaque white pen to the cherry on the right side. Adhere the pieces of the cupcake starting at the top with the cherry and stem, continuing down with the frosting, the cupcake, and the cupcake bottom. Accent the cherry and frosting pieces with Stickles™ glitter glue and allow to dry


-
Photo Details
-
See all User Photos0
Date: 9/11/09
-
-
-

-
Comments
-
TatumC
TatumMary, how neat to see your images on someones project! I designed this cupcake for the Inked Up CD. I love that you gave this image life. Which just goes to show how inspiration strikes different people with different images. When you create an image you never know how it will be used. I always love everything you make, but this was truly a 'sweet treat' for me to see today. *hugs #1 10/29/09 11:40am
What cheerful colors. I love the cupcake. #2 1/27/10 10:22pm

angie
This is such a good idea. Love it!! http://angie-scrappinmemories.blogspot.com/ #3 7/9/10 5:38pm
-