
-
» Home » Design Team » Design Team » White Wash Paper Slide Show -


 View Larger Image
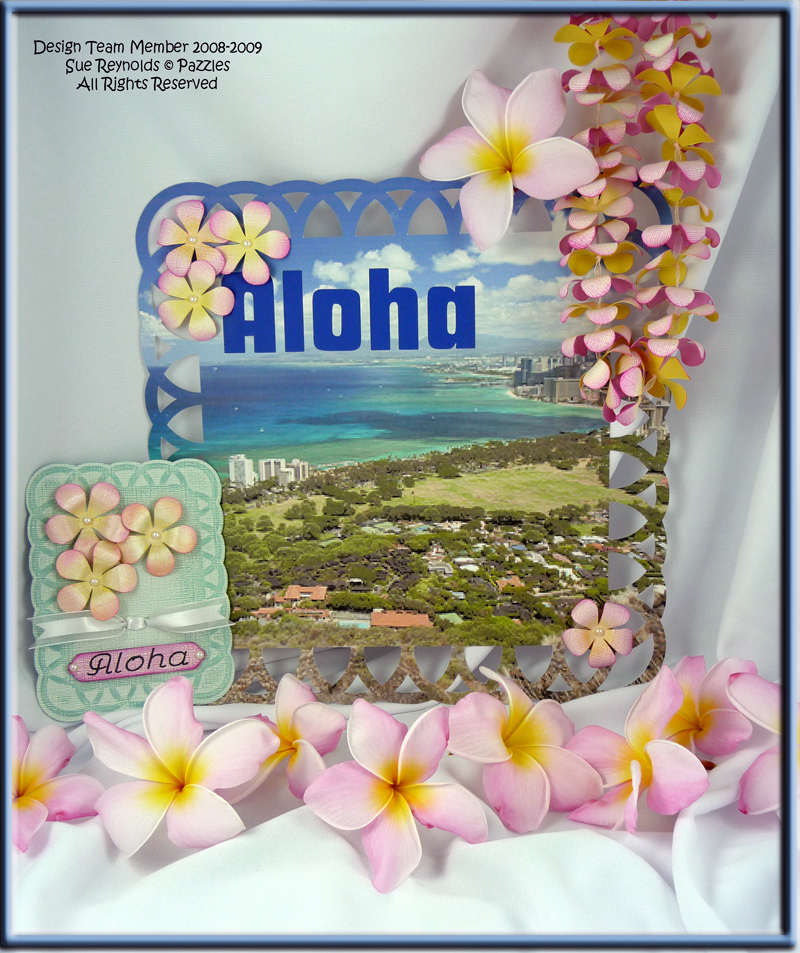
Aloha
Aloha
by Sue Reynolds
I started by designing & cutting an acrylic embossing plate. Using the outline feature in the Pazzles software I then created an outline of the embossing plate, then cut a piece of light teal Whitewash Paper with the outline of the embossing plate. Taking the cut outlined paper I then put the paper and the acrylic embossing plate together and used a Big Shot® to emboss the design onto the cut outlined paper. Once the design was embossed into the Whitewash Paper, I then used sand paper to reveal my embossed design on the Whitewashed side of the paper. I used this as the base for my card. I then designed a plumeria flower to cut out of a piece of yellow Whitewash Paper. Sanding the flowers revealed the yellow below and inking the edges with a little Melon Mambo Stampin’ Up ink created a more realistic effect. I also “washed” the flowers with an iridescent Luminarte oyster color to give it a bit of shimmer. After cutting out the tag for the card I carefully removed the tag leaving the mat with the paper in the Pazzles Inspiration machine. I then sanded and inked the edges of the tag, then putting it back in the cut out I had removed it from, I then used a Uniball gel pen to write Aloha on the tag.
Having cut out some extra plumeria flowers I created a paper flower lei using the yellow and light pink Whitewash paper. Sanding the flowers brought out the subtle colors that are in a real plumeria. I then used a small organdy ribbon to string the flowers into a pretty plumeria lei.
That led to a 12x12 scrapbook page using a design that resembled the original embossing plate I made. Printing a 12x12 photo of Waikiki, I then cut out a lattice/lace edge on the 12x12 printed photo. Also cutting out the letters ALOHA from the photo and backing the word with blue cardstock. Now I took the last of the Whitewash Paper plumeria flowers and put them on 2 of the lattice corners. Instead of a scrapbook page you could use this 12x12 in a photo shadow box to showcase your photo and add some sand and pebbles and hang the plumeria lei on the corner of the shadowbox that is now hung on a wall.
Core’dinations© Whitewash Paper
Clearscraps Acrylic for embossing plate
Big Shot® for embossing paper
Nail file for sanding embossed image
Uniball® Gel Impact pen
White cabochon pearls
Stampin’ Up® Melon Mambo and YoYo Yellow dye inks
Stampin’ Up® Whisper White and Brilliant Blue Papers
Stampin’ Up Satin & organdy ribbons


-
Photo Details
-
See all User Photos0
Date: 9/16/09
-
-
-

-
Comments
-

melin
MelinMelin Visit My Blog: http://www.MyPaperCrafting.com #1 12/22/09 3:28am
melin
MelinSue, this is just beautiful! I love it. Such detail. Thank you for explaining it. Fantastic work! :D Melin Visit My Blog: http://www.MyPaperCrafting.com #2 12/22/09 3:29am
#3 9/27/10 3:44pm
I absolutely LOVE this!! #4 9/27/10 3:46pm
-