
-
» Home » Design Team » Design Team » Boxes and Bags Slide Show -

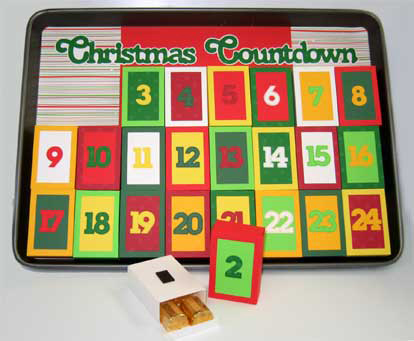

Christmas Countdown
Christmas Countdown Advent Calendar
By Mary Kerr, www.anangelsart.com
Materials Needed:
(16) 12x12 Cardstock in Assorted Colors, 2 of each
(2) 4x12 Patterned Paper Strips
(1) 12x12 Red Cardstock
(24) Magnets (or a 24” Strip of Magnetic Tape)
(1) 12x17 Metal Jellyroll Pan
(24) Assorted Small Treats or Trinkets
Adhesive
Colored fine point markers
Begin by cutting 24 boxes and the numbers, three from each color of cardstock. Each set of boxes and
numbers should fit on one piece of 12x12 cardstock.
From the other sheet of each cardstock color, cut the following pieces:
All colors, cut three top panels.
Green dot, cut the top layer of the title.
White cardstock, cut the title mat.
Once all of the pieces have been cut, you can go ahead and assemble the boxes so they open at the
top. Assort the colors for the boxes, top panels and numbers to create a mix of combinations.
Line the outside edges of each number with a coordinating fine point pen if desired. Adhere the top
panels to the front of each box. With the boxes vertically oriented and the open ends at the top, adhere
the numbers to the front of each colored panel.
Adhere a magnet to the back side of each box. The magnets need to be strong enough to hold some
weight when the boxes are filled with treats.
Measure the inside of your jellyroll pan to get the exact dimensions, then trim the red cardstock and
patterned paper strips to fit. The sample pan was 11.75”x17”. Glue the pieces to the inside of the pan
with the red cardstock centered in the middle and the two strips of patterned paper on each side. Position
your boxes inside the pan in three rows of eight.
Adhere the green title to the white title mat. Line the outside edges of the green letters with a fine point
pen if desired. Adhere the title inside the pan at the top, centered from left to right as shown in the photo.
Fill each box with treats. Open one box per day from December 1st up through Christmas Eve


-
Photo Details
-
See all User Photos0
Date: 9/10/09
-
-
-

-
Comments