
Embossing is the name of the game for today’s 15 minute project. I grabbed an embossing tool to play with and the ideas started coming. If you are unfamiliar with the Pazzles Embossing Tool, head over to the videos and watch the Embossing Video for a general introduction. You will need a Pazzles Embossing Tool and an Embossing Mat for this project.
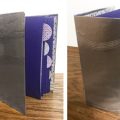
For the vellum tag pocket I began by opening the Pocket Tag-Snowflake file found in Decorative>Charms and Tags. I selected just the snowflake and then Shape>Engraving>Inside. This allows me to fill the shape for embossing. (Watch the video for more detailed information.) After I had my snowflake filled I placed my embossing tool into the machine with the smaller end facing down. The embossing tool comes with two sizes of stylus ends and I found the smaller of the two works best for vellum. (Of course, you should always do a test piece first because vellum thickness can vary.) I placed my vellum onto the embossing mat and selected 3 passes in the Cut Project window. This makes the impression nice and deep. Once the snowflake was embossed, I replaced the cutting blade and cut the pocket file around it. I did this without removing my vellum from the embossing mat, and without unloading/loading my paper again so that everything lined up perfectly. I adhered it all together and added a sentiment tag and a patterned paper wrapper.
To make the cardstock snowflakes I used my engraving filled snowflake and added a small border around it using the Transformation>Outline tool. I embossed the snowflake using the larger embossing tip, again making 3 passes and then switched to my cutting blade and cut around the snowflake. Once again I did not remove my paper from the Embossing Mat, nor did I unload/load my paper so that it would all match up. Because the paper is slightly textured. the embossing tool rubs the texture off and gives it a nice smooth sheen which constrasts from the edges for a cool effect.
For the cardstock tag I simply cut the Pocket Tag-Snowflake pocket as it appears in the cutting file. I cut a second pocket piece just slightly smaller in vellum so that it would slip inside the cardstock pocket. I used the same method to create the embossed cardstock snowflake.
The instructions for this project seem long and lengthy simply because I tried to describe the embossing process, however once you are familiar with the technique and tool, you can create these pocket tags rather quickly. The best way to become familiar with embossing is to simply load a piece of paper into the machine and begin playing around with the tool and settings.
~Michelle
(Due to the holidays we are switching the blog schedule up a bit. You will see the newest collection projects featured on Wednesday this week)
Supplies:
Pink Paislee City Sidewalks Collection
Vellum
The Twinery Twine (Cappuccino)
Very pretty. I like the fact that you used red because most designs out there are either white, yellow, or blue. Maybe it is just me…but that is what I’ve noticed…this is a nice change. Wish that I could use snowflakes….but I could adapt this and use starfish for beach photos. 🙂
Love this project can not wait to try it out.
Love this cute project. I have using the embossing tool more now that I’ve got a handle on it.
Love this idea!! Now I have to put the embossing tool on my ‘wishlist’!
I Love this Project. Thank You.