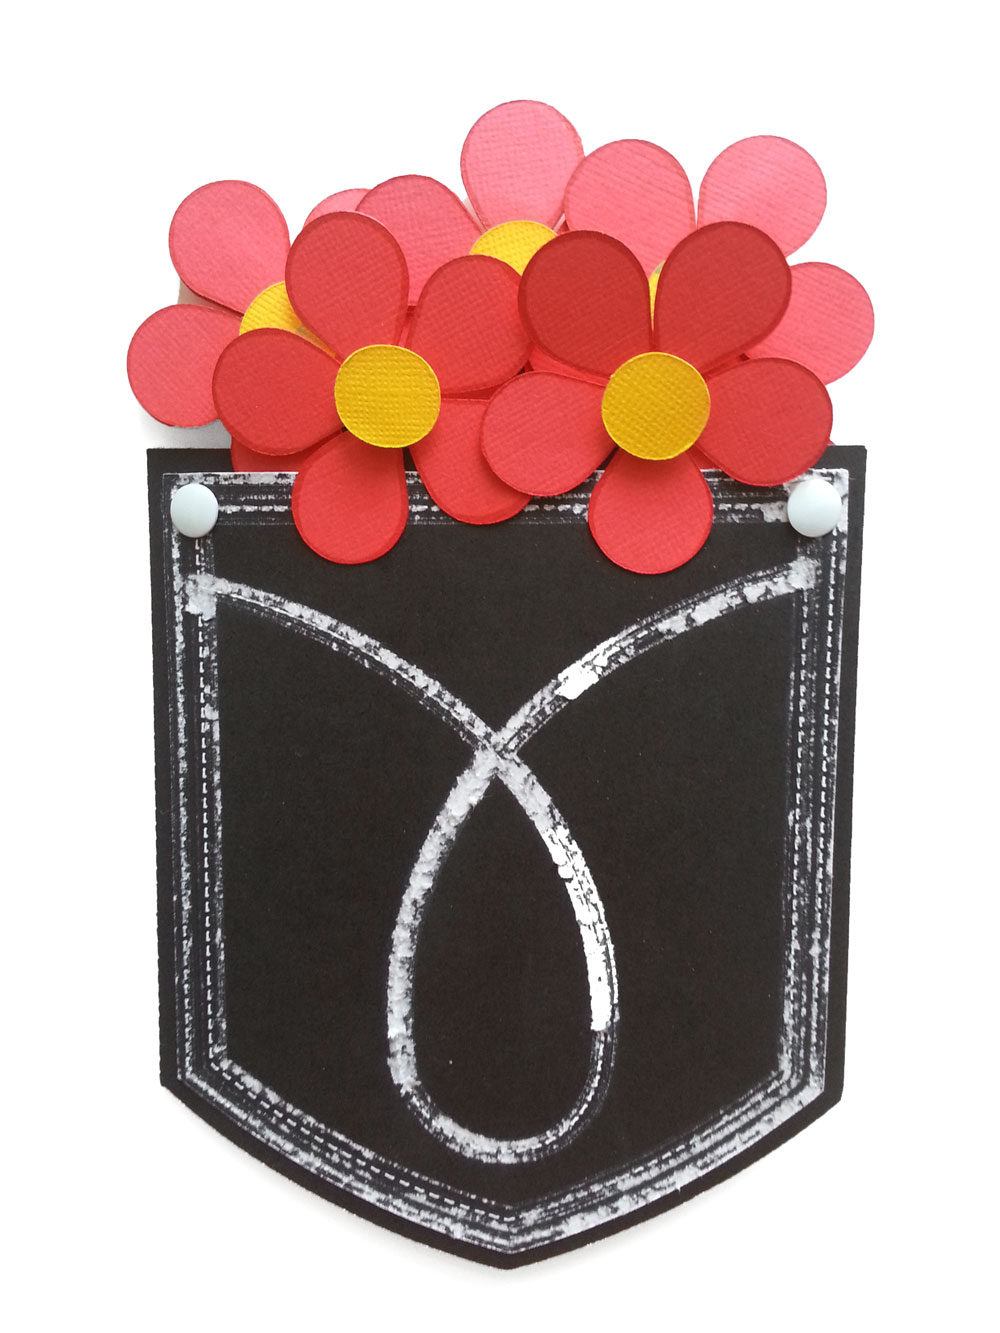
My Design Team assignment for this month was to make a project using the Pazzles Distressing Tool. I’ve had my Distressing Tool awhile but only just now discovered how fun it is! The basic ideas that came into my head when deciding what project to do were either vintage themed or denim themed, but you don’t have to limit the possibilities to that. I’ve been enjoying seeing all the spring flowers pop out, especially the itty bitty ones, and they made me think of a pocket full of posies which is part of a nursery rhyme I used to sing with my kids when they were very little. Thus, a search through the Pazzles Craft Room Library later and the Pocket Full of Posies Shaped Card came to fruition. I found the Star Pocket Card, Creamy Flower, Single Rose and Journaling Tags files in the Pazzles Craft Room Library.
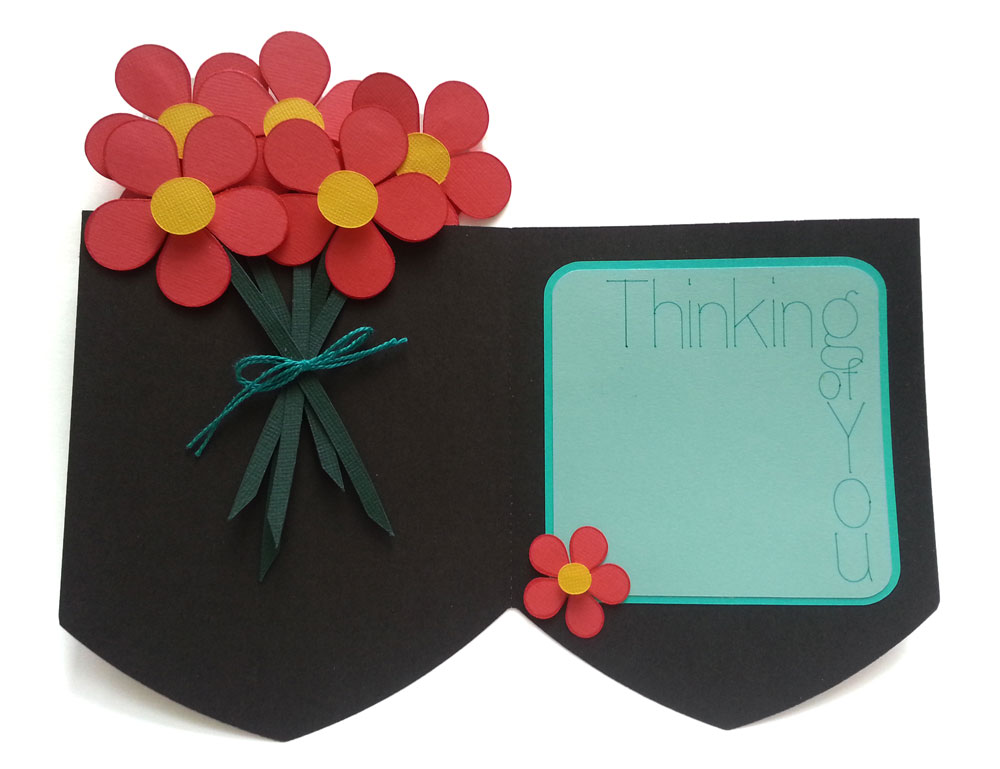
I ungrouped the Creamy Flower and erased the leaves. I duplicated the single Creamy Flower (petals and center) so that I had five which seemed to fit nicely in the pocket. I grouped, duplicated and flipped them vertically so that if the paper choice were textured on one side, they could have texture on both sides and fit together properly when assembled. The flowers will show from both sides of the front of the card, and a tied bunch are actually removable for another use. I duplicated one Creamy Flower (petals and center) and dragged the corner handle to resize it smaller to accent the inside sentiment.
I ungrouped the Single Rose file and erased the rose and the leaves and added a line to close the top of the stem. I then resized it to fit with the Creamy Flower. After modifying the Star Pocket Card as described below, I duplicated and resized the modified Creamy Flower/Single Rose stem to fit a group of five in the jeans pocket. Then I duplicated the bunch and separated them into stems, centers and petals so that I would have ten petals and centers and 10 stems. I cut two extra Creamy Flower (petals and centers – not paired as for the others which are double-sided) for the stationary flowers on the front of the card.
I ungrouped the Star Pocket Card file and removed the star and the top and bottom “stitches” from the magenta pocket. Then I separated the solid line pocket shape (mustard yellow) from the mixed line (solid and kiss-cut) pocket shape (magenta). On the mustard yellow pocket I then used Edit: Multiply Object to multiply it once with 0.02 horizontal spacing to the left so there would be room for the card crease, and added a vertical kiss-cut line directly centered between the two pockets as the fold line, holding down the shift key to make it straight. I then added a rectangle overlapping the fold line and both pocket (mustard yellow) elements (to bridge the gap) and then welded the two pockets and rectangle together to create the card base. Then I grouped the card base with the kiss cut fold line and increased the size to 105% using the Condense feature. Then, on the pocket (magenta), I used the eraser tool and removed the tabs (with the stitch designs) by selecting only the corners of the tabs with the Eraser Tool and also erased the top and bottom “stitch lines” to create the card front. I selected the outer lines of the pocket and made them all solid so that it would cut out the pocket as a separate piece for the front of the card. Using the Join Two Points Tool I connected any lines that were left unconnected in the process of removing the tabs.
Side NOTE: You can do a quick check that you’ve joined all the points of a shape by selecting the shape and looking at the Color Menu; if the Brush color is selected but your shape isn’t filled, there’s an Open Path somewhere, which turning on Show Open Paths or Construction Points will help you find; then you can use the Move Point Tool and click on Join Two Points and then select around the Open Path and the software will automatically close it for you.
To the (magenta) pocket I added two (blue) Inline Kiss Cut lines with the Outline/Inline Tool, one at .06 and one at .22 to simulate the double stitching on jeans pocket seams. On these Kiss Cut lines, I used the Outline/Inline Tool and made 6 outlines and 6 inlines (created in red) at thickness 0.01 for the distressing tool to “fade” the jeans pocket. I used the Pen Tool and a white Sakura Gelly Roll 08 pen to draw the Kiss Cut lines to look like faux stitching. At the pocket corners I attached some white thumb tacks, inserting them at the corner of the inner kiss cut line, and bent the body flat and flush with the paper using the flat end of my awl (it also would work with a bottle cap, thimble, etc. just be careful!).
For the inside sentiment area I used the larger square tag from the Journaling Tags file. First, I resized the tag to fit on the inside right of my card and then I used the Outline tool to add 0.10 space beyond the outer lines of the tag. I used the Pen Tool to draw the sentiment (made with Pazzles font Calypso Medium Rhinestone) on Recollections Blue Ombre card stock- the medium green tone) using a Studio G Fineliner .4 teal pen. I cut out the shape on the outline; I cut out the outlined shape on the darkest green from the same cardstock collection. I assembled the layers and added the smaller Creamy Flower (petals and center) to the bottom left corner and then glued it onto the inside right of the card.
I used white core black cardstock for the front pocket and for the card base. In the Cutting Window I selected only the solid red out/in lines of the pocket (magenta) using the Distressing Tool in the machine. Without removing the mat, I switched out the Distressing Tool with the Pen Tool and my white Gelly Roll 08 pen and set the Media Type to Pen Tool and selected only the two blue kiss cut lines.
I cut the flower petals from WorldWin Treasures Racer Red cardstock and edged them with a Sharpie Fine Point Permanent Marker; I cut the centers from a similar scrap of yellow cardstock I had on hand. I cut the stems from WorldWin Treasures Sherwood Green cardstock. I assembled the flowers by first matching up the stems (differentiated in the file with lighter and darker green, then gluing them together with Scotch Permanent Glue Stick and then matching up the red petals and gluing them with the stems in between the front and back pieces. I attached the yellow centers to the red petals with EK Tools ⅛ inch thick 3-D DOTS. I gathered my bouquet of five complete flowers and arranged it so it would look nice on the inside of the card and tied the stems together with Prism Craft Thread. For the upper three flowers, I added centers on both sides because they would show from the card front. I added the two single-sided flowers to the card front (lining them up with where the lower/front two flowers in the bouquet were mirrored inside the card) and wedged the bottoms of the top three flowers from the bouquet in between the pocket and the card base so the bouquet is removable.
~Renee

Pazzles font Calypso Medium Rhinestone
Sakura Gelly Roll 08 pen – white
Scotch Permanent Glue Stick
WorldWin Treasures Cardstock – Racer Red
WorldWin Treasures Cardstock – Sherwood Green
White Core Black Smooth Cardstock (Core’dinations Black Magic Collection also works well)
EK Tools ⅛ inch thick 3-D DOTS
Studio G Fineliner .4 teal pen
Sharpie Fine Permanent Marker – red
White Metal Thumb Tacks
Recollections Blue Ombre card stock (darkest and medium greens of the three)
Prism Craft Thread – Teal
Pazzles Distressing Tool
Pen Tool

I have had the distressing tool since Pazzles first came out with it many years ago, and have NEVER used it! What a great idea to use it with a pocket design. Thanks for sharing your project!
I just got the distressing tool, have not used it yet but you have inspired me to give it a try! I love your posy pocket card!
Thanks for the compliments! I’m glad to have piqued your interest in the distressing tool! I hope you will share your projects in the Pazzles Albums -http://www.pazzles.net/gallery/
Great idea! Love the pocket. A good Inspiration to use that tool
Love the way you used the distress tool on your project!!! Makes me want to get that tool out and use it!!! Fabulous!
Thank you melin and lachavez68 – it was fun to put together!
This is adorable! I love the use of the distressing tool and the added detail of the brads. Very cute!