
The season of giving thanks is upon us! Now is the time to start decorating your home. A good way to do this is by decorating a wreath. Use your Pazzles to make designing and cutting easier.
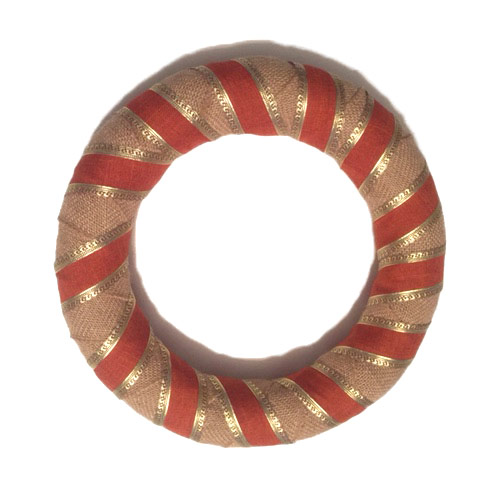
Take the 6” Burlap ribbon and wrap around the wreath. Once you have completely wrapped, hot glue the ends. Now take the 1 ½” ribbon and wrap around the wreath, leaving at least a 1” gap between the looping.
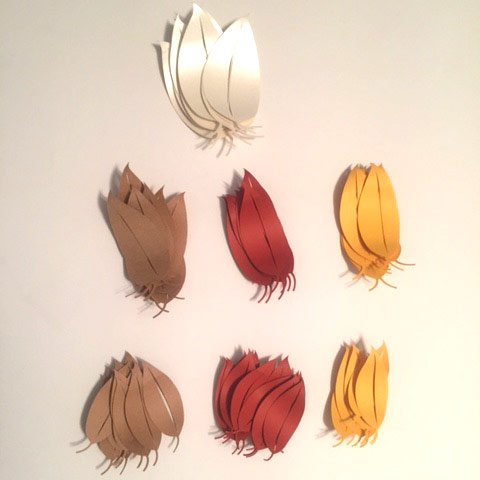
Using the Fall Leaf cutting file from the Pazzles Library, create two different sizes. The first 1.5″ x 3.5″ and the second one 1.5″ x 2.5″ and cut these out using the Pazzles Inspiration Vue. Once cutout, you will blend the alcohol ink onto the blending stamp, then pounce onto the leaves. Now arrange them in a circular pattern, bottom layer will be the larger leaf and the top layer will be the smaller leaf. Once they are arranged you will hot glue them together. Cut the balsa wood and apply to the Pazzles cutting mat. Cut out the letters Give Thanks using Berlin Sans FB font from dafont.com. Hot glue the letters to the wreath and finally take the 1” burlap ribbon and wrap around the top portion to create a loop, which will be used to hang the wreath. Finally, hot glue the loop closed and now you have a fabulous home décor wreath for Thanksgiving.
~Shelissa

Supplies:
12” Foam Floral Wreath (Michaels Craft Store)
6” Burlap Ribbon (Michaels Craft Store)
1 ½” Fall Orange Ribbon (Hobby Lobby)
1” Burlap Ribbon (Michaels Craft Store)
1/16 “Balsa Wood
Glue Gun
Ranger Tim Holtz Adirondack (Ginger, Watermelon, Sunshine Yellow and Silver)
Ranger Tim Holtz Alcohol ink applicator stamp handle and felt

Very nice project! Great idea to use Balsa wood for the lettering.