When I was a girl I played with paper dolls. When our daughter was young, instead of using paper dolls, she played with die-cut vinyl pieces called Colorforms. Today we can cut our own shapes from vinyl cling material and create designs for placing on our windows, smooth surfaces, or for using in building creative designs on a vinyl covered board, much as our children did.
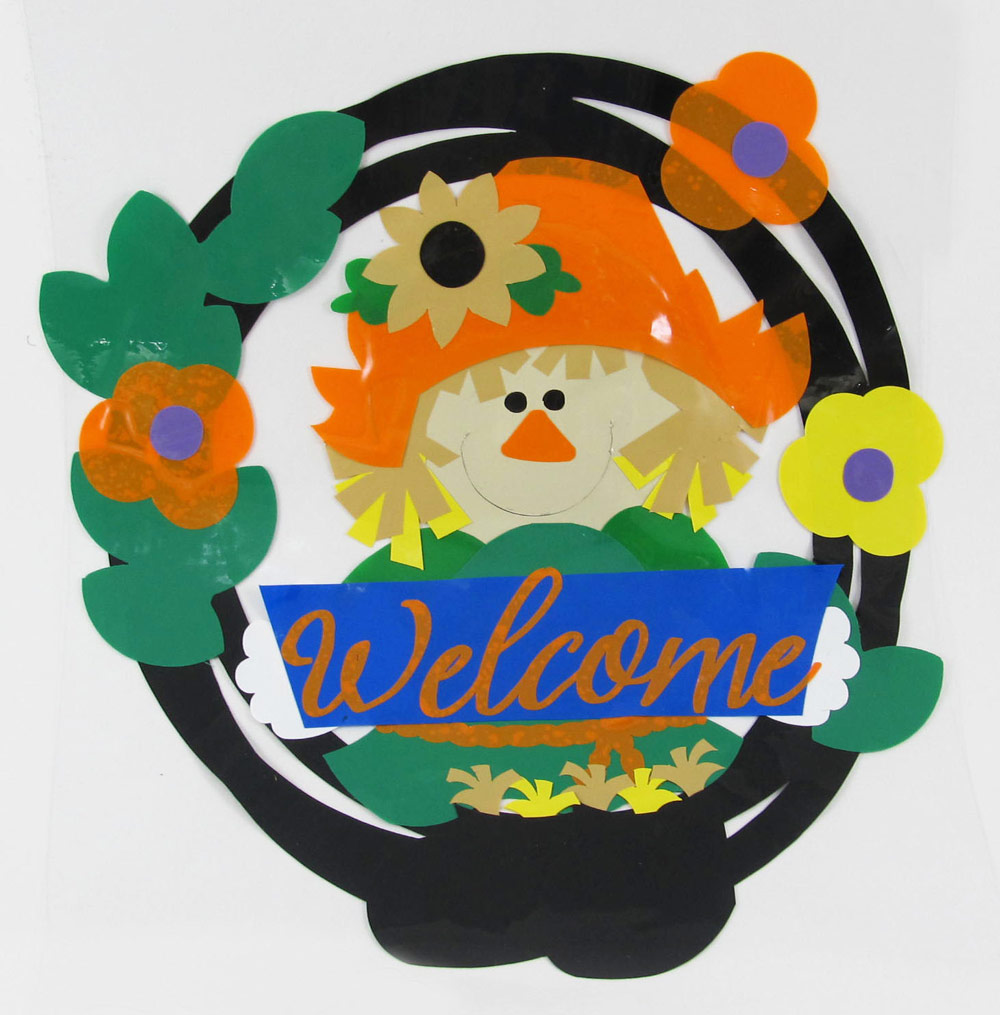
Today, I had the opportunity to play with Pazzles Vinyl Cling material to make a cute fall decoration for my sliding glass door. I found a nice Scarecrow design and a Grapevine Wreath in the Pazzles Craft Room to adapt for this project. Since the vinyl I was using was 9” wide, I resized the wreath to about 9” wide. Then I selected parts of the Scarecrow with pumpkin design that I needed. I wanted the scarecrow to be sitting on the edge of the wreath instead of standing, so I transformed the britches portion of the design into a banner. I resized the scarecrow pieces to fit nicely inside of the wreath. I typed the text using the InVue software, with the Brightside Typeface, and thickened it by shadowing at .02”.
I love the colors of the original designs I selected, but I did not have every color I needed in my package of vinyl cling, so I changed the colors of the pieces on the screen to match the vinyl cling I was able to find. I couldn’t find any beige vinyl cling for the face, so I cut it out of regular vinyl, and placed it over a solid piece of black vinyl cling cut in the shape of the face. Cutting the eye openings in this piece allowed the black vinyl behind the beige to show through. That worked fine for this project. Regular vinyl is sticky on the back, so it sticks fine to the vinyl cling. However, vinyl cling will not stick to regular vinyl. A dot of repositionable glue on the back of the vinyl cling helps it to adhere to regular vinyl.
I learned through this project that not all vinyl cling material is created equally. I discovered that some brands are a lot thinner than others. I really like working with Pazzles Vinyl Cling because it is heavier, and not as transparent as others. I also noticed that I needed to use a greater blade extension and more pressure for cutting this heavier material. Doing test cuts saves a lot of time and reduces waste!
After cutting all of my pieces, I used a sheet of clear vinyl cling to assemble the layers of my project. No glue or adhesive is required for assembling a layered project such as this with vinyl cling. That is what makes playing with this media so much fun for children and crafters alike. Pieces may be rearranged at will. The message on the banner can be changed. Alternative colors and decorative pieces may be used for the next season. This media leaves no residue on the window or surface used, making it very easy to take down. I’ve included the files for this project below.
I challenge you to have some fun with vinyl cling!
A Craft Room Membership is required to access additional content. Please Join Now or
Login!
~Julie

Cute.
Good job Julie. I’ve never cut window cling on my Pazzles. I may have to try that in December for snowflakes.
I have a pack of pazzles window cling but have be scared to use it! Will have to have a go. Thank you for the inspiration
Julie … love the idea … tried to download the cutting file instructions in WPC format …. how do I get the instructions downloaded in a format I can read and print!? is there a way to read and print the instructions in ADOBE READER?
Sorry kinda new with all this …. Thanks for your help! Barbara
Very cute!
The instructions are in the blog post above.There is no separate instruction file. In the cutting panel, select only the line colors you need for the vinyl color you are using. After cutting the pieces from one color vinyl, select the line colors for the next color of vinyl you are using. Once you have all pieces cut, place the wreath piece on a clear piece of window cling, followed by face, nose, eyes, hair, green pieces, shoes, flowers on the wreath, hands, hat, hat brim, flower on hat, sign, and text. I wanted my scarecrow to look the same both on the inside and outside of my window, so I cut two of everything except the wreath, shoes. I applied the second set to the back side of the front pieces, then applied them all to the clear piece. I pressed the clear sheet on the clean window and smoothed it out. Hope this helps. Let me know if you have any additional questions. Thanks!