Happy Thanksgiving everyone! I love combining files from the Pazzles Craft Room to create new things, especially when the end result has not just one nifty feature, but two! This one is so easy and is a greeting card with a built-in festive sign your recipient can display to add to the warm fuzzies encompassed in this blessed celebration of gratitude and cooperation.
I used the Rip Strip: Full Card from the Pazzles Craft Room Library and some festive papers. From the file I used the gray-outlined/medium-pink filled piece that folds in the portrait direction which contains the rip strip scallops (hereafter the “scallop piece”), the teal guide piece (hereafter the “teal piece”), the white flag piece (cut off at about an inch and ⅜ from the tips – hereafter the “flag piece”) and the “square pink piece”.
This card has three sandwiched layers:
- The card base, formed from the “scallop piece” of the file,
- The easel piece, formed from the modified “square pink piece” of the file
- The upper inside, formed from the “modified teal piece” from the file (and the “original teal piece” if using single-sided paper).
To form the card base, I used the Recollections Kraft Paper 12×12. From the file, I used the “scallop piece” (gray-outlined/medium-pink filled piece) including the scallops and kiss-cut line. For the inside sentiment, which is drawn on the blank side of the fold (the side opposite the scallops), I added the words “for you” in OCalypso Medium Rhinestone font and positioned them about an inch above the kiss-cut fold line upside down so that when the card is cut out and folded they are right side up. I drew the sentiment with a Brown PaperMate InkJoy 1.0 M pen using the Pen Tool before cutting out the piece and folding it on the kiss-cut line.
To form the easel piece which is revealed when the rip strip is pulled, I created a kiss-cut fold line at the bottom of the “square pink piece”, then multiplied the “square pink piece” vertically by using the multiply tool with no space in the downward direction, and then merged the two squares. The easel piece was cut from the Recollections Kraft Paper and folded on the kiss-cut line.
To form the upper inside, I modified the “teal piece” from the file. To make the rip strip and easel function properly together, I duplicated the original “teal piece” and shrunk it in the vertical direction to about 2 inches tall and positioned it overlapping the top of the original “teal piece” so that they could be welded. Before welding, I created a kiss-cut line at the top of the original “teal piece” so it can fold with the card base. I cut this “modified teal piece” out of the Die Cuts With a View paper – 12x 12 Retro Stripe Red. Since this paper is one-sided, I cut an “original teal piece” shape from the file from this same paper and adhered it to the back of the “modified teal piece” so that it covers the plain side of the paper and looks nice from the inside sentiment area of the card.
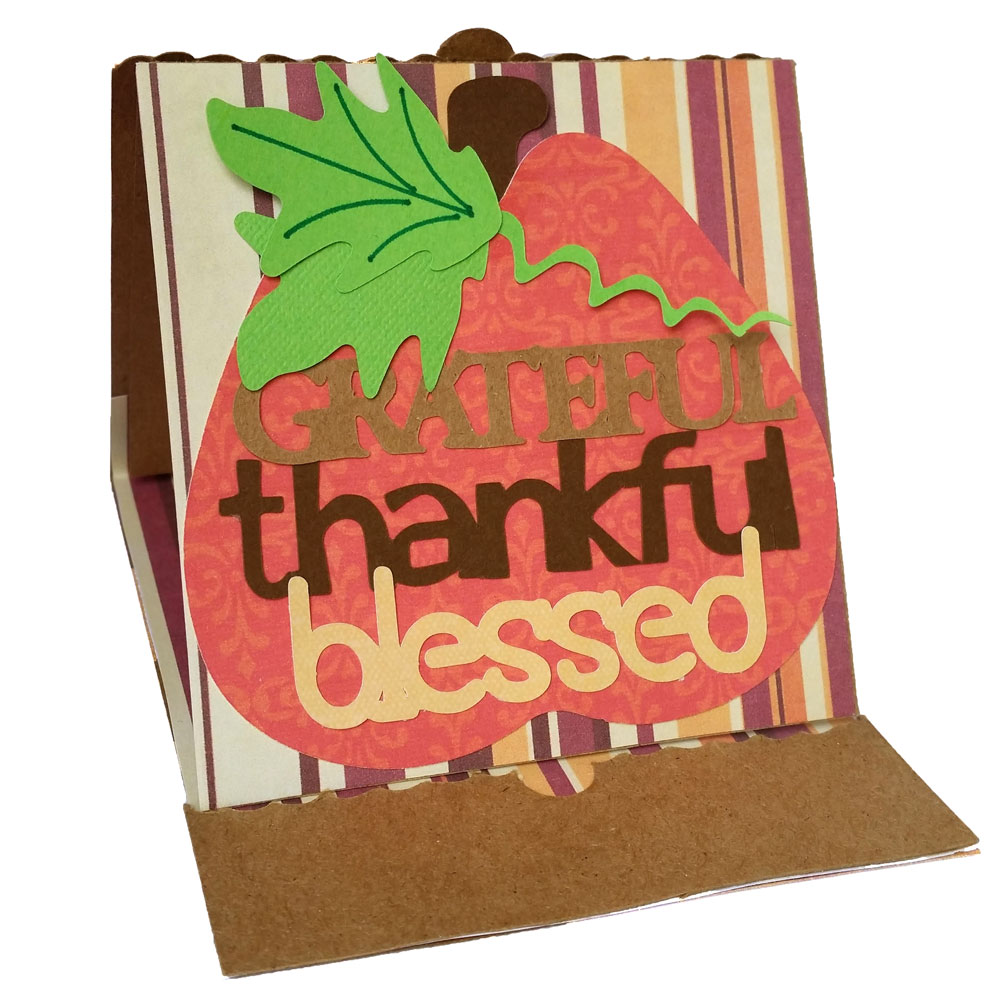
To decorate the easel piece I used the “square pink piece” from the file, cut it out of the Die Cuts With a View paper – 12x 12 Retro Stripe Red and adhered it to the easel piece. The easel was further decorated with a pumpkin and titles made from fonts listed below. For the pumpkin shape I used the outline from the pumpkin in the Wire Pumpkin Squat file, sizing it with it’s leaves and vine to fit the easel portion of the card. I cut two leaves and the vine for the pumpkin on the easel from green cardstock scraps I had and drew the veins on one leaf (before cutting) with my green PaperMate Flair M pen using the Pen Tool. I cut the stem from a brown cardstock scrap. I assembled these pumpkin, leaf, stem and vine pieces on the easel piece adhering them with Scotch Permanent Glue Stick.
Continuing with the easel piece, I used some fonts listed below to create the words “GRATEFUL”, “thankful” and “blessed” for the easel sign. I used the Visual Text Spacing function to squeeze the letters of the words together so that they were overlapping. I then welded the letters of each word so they could be cut as one piece. The font for GRATEFUL was too thin to cut well so I outlined it at 0.02 after welding it and cut only the outline and the inner parts. I cut these words out of Recollections Kraft Paper (“GRATEFUL”), brown cardstock scrap (“thankful”) and yellow cardstock scrap (“blessed”) and adhered them on top of the pumpkin with Scotch Permanent Glue Stick.
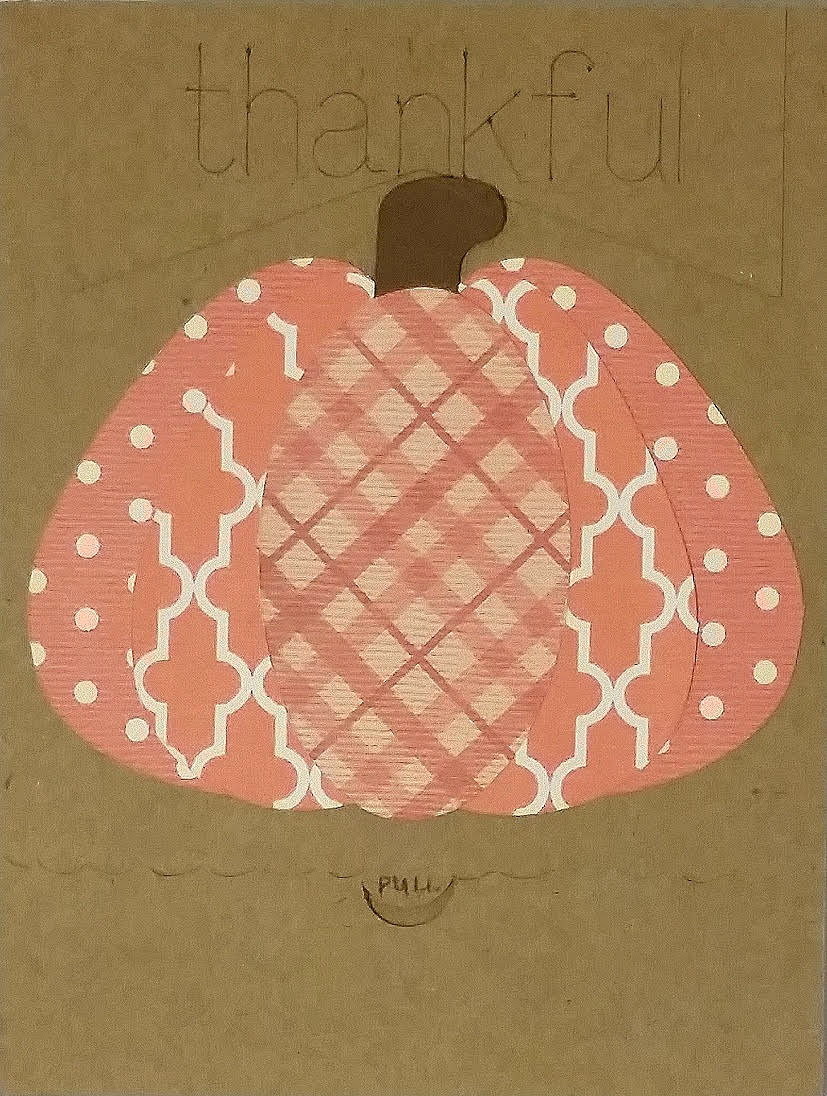
To decorate the card front , I made a duplicate of the outline of the Wire Pumpkin Squat (resized as above) and shrunk it in the vertical direction to make a squattier pumpkin. I duplicated that squattier pumpkin and shrunk it horizontally to create a second layer of the pumpkin to give it depth and borrowed an oval from the pumpkin in the Autumn Word Art file for the front layer of the pumpkin. I modified the “flag piece” from the Rip Strip: Full Card as mentioned above and drew “thankful” with the Brown PaperMate InkJoy 1.0 M pen before cutting the piece out of Recollections Kraft Paper 12×12. I adhered the squattier layered pumpkin, its stem (cut from brown scrap cardstock) and the “thankful” flag to the card front.
To assemble the card I connected the three layers by lining up the fold of the upper inside piece (Retro Stripe Red paper) with the fold of the card base and adhering the shorter piece to the scallop side of the card base with the colored side of the paper facing the inside/plain side of the card front. Lining up the fold of the easel piece with the scallops on the inside of the card front (card base), I adhered the bottom of the hidden easel piece (the plain part without the pumpkin) overlapping the upper inside piece (the easel will be upside down in relation to the front of the card). Folding the easel piece in and closing the entire card to help it line up, I then adhered the shorter edge of the scallop (on the card base) to the edge of the upper inside piece to seal the easel piece inside. I covered the layered pieces (which now form the card front/upper inside of the card) with the “original teal piece” cut from the Die Cuts With a View paper – 12x 12 Retro Stripe Red.
After you assemble and sign your card you can choose from many envelopes in the Pazzles Craft Room or use any envelope that is designed for 4” x 6” cards. Have fun making this card to show your appreciation for someone special.
Once the recipient rips the strip, they then have a message of thanksgiving on an easel that they can display.
Happy Thanksgiving!
~Renee
Fonts:
A771-Roman font “GRATEFUL”
Abierta font “thankful” (easel/sign behind rip strip)
Speedball No1 NF font “blessed”
OCalypso Medium Rhinestone font “thankful” (card front) and “for you” (interior sentiment)
Supplies:
Brown PaperMate InkJoy 1.0 M pen
Green PaperMate Flair M pen
Scotch Permanent Glue Stick
Recollections Kraft Paper 12×12
Core’dinations paper – Orange Small Dot 12×12
Core’dinations paper – Orange Plaid 12×12
Core’dinations Patterned Cardstock – Brights 8.5×11
Die Cuts With a View paper – 12x 12 Retro Stripe Red
Brown,Green and yellow cardstock scraps

Lovely Card!