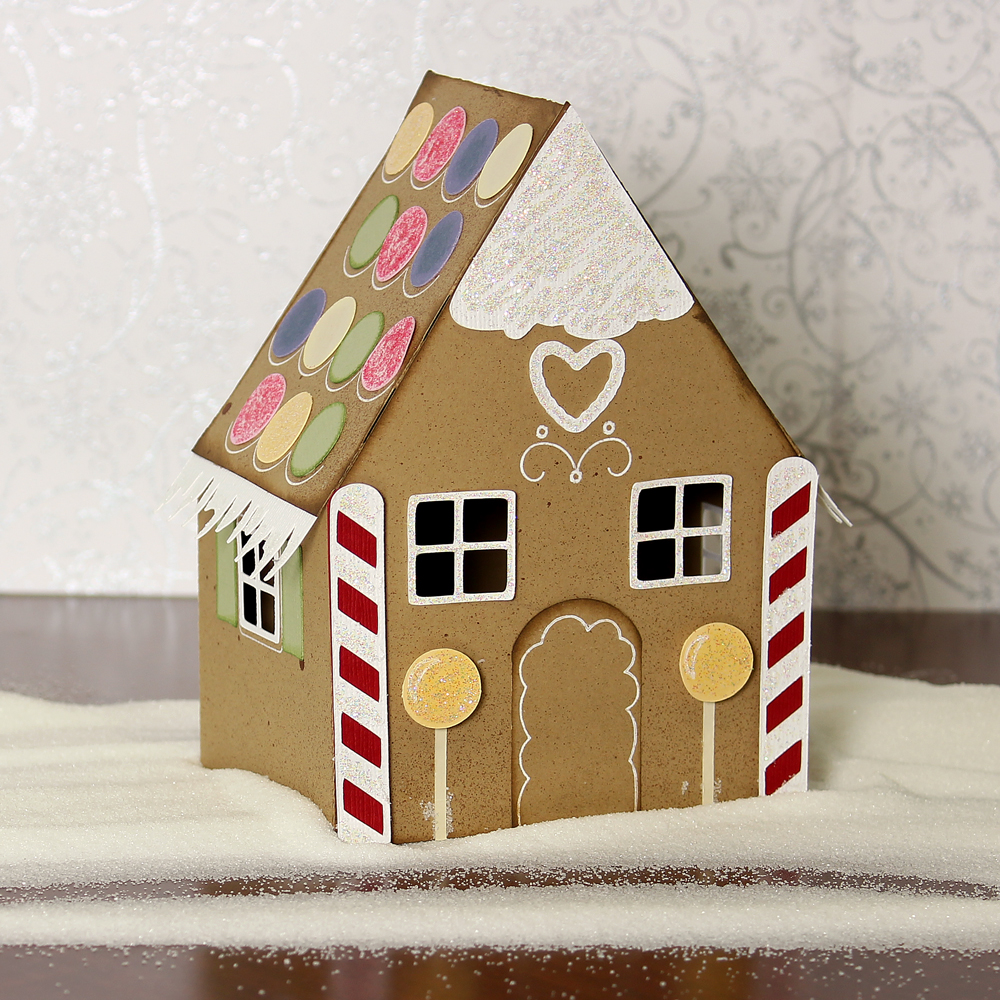
 Does your house have the smells of Christmas? Gingerbread, spice tea, rum balls and sugar cookies are some of my favorite holiday scents. This house shaped box is the perfect holder for some of those yummy Christmas goodies. Add to the fun by hiding some cute photos of the kids or special messages to the recipient behind the windows.
I am not above asking for boxes when I see them at a restaurant. When I saw this cute whimsical box, I knew I needed to try to recreate it. After I was finished, it just begged to be turned into a Gingerbread house and the windows seemed like the perfect accent.
The windows weren’t hard to make but I thought you might like to know how I did it. So, I have included a short 4 minute tutorial on making fold out windows. Be sure to watch it because I use a tool that is often overlooked but very handy at times! The candy knobs on the windows were attached using small pop dots. Then I wrapped embroidery floss around them to hold the windows closed until it is time for the “reveal”. Of course, I added lots of sparkle with glitter glu e too!
The box is quite large and is cut from 2 sheets of 12 x 12 cardstock. This is a great size for cookies. You can resize it to make the box smaller for a candy gift and cut it in one piece. Or if you want it to hold a loaf of nut bread you can lengthen it as well. Watch my second tutorial video to learn how to resize any box. You will learn how to break a box into 2 pieces if you want to make it larger, or lengthen the sides without changing the height.
The box has two flaps that tuck in at the top to make the roof. It fits nice and snug so there is no need for gluing. Although you might ha ve to let the person getting the gift know how to open it. 🙂
The Gingerbread Box pattern is also included so have fun thinking of ways to fill the box!!
Chris
Click here for cutting file for Gingerbread Box


I learn a little something on the making a window video. The add middle point button, all this time I been using guide lines. Thank for 411 it will be handy for me.
And great video on the boxes also.
Brenda
These are cute….we could even make a village of them with puff paint snow!
The resizing video is fabulous. Would love more of these valuable discussions on using the software.
Josette
These two videos are VERY USEFUL. I had no idea how to do this and this was sooo very clear. And thanks for the wonderful cut files too!!!
I just love your video’s,you make them so clear and easy to follow, even for a beginner Thanks so much