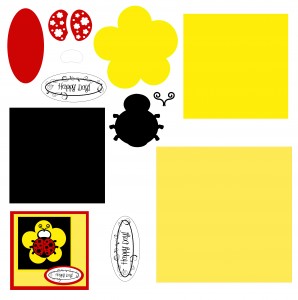
 Are you like me; long on ideas but short on memory? I love creating designs with my Inspiration Studio software even if I won’t use them right away. I am a bit obsessive about saving them for future use. My problem is that I don’t “exactly” remember sometimes how they were supposed to go together!!
This can be a real problem when you get everything cut out and are ready to assemble. For a while I saved my projects as a completed design. In other words, I would layer everything together to make the completed design.
This works great for seeing what it is supposed to look like but is a real pain when cutting the pieces out. Sometimes pieces that needed to be cut out of the same color were layered on top of each other. I would have to move everything apart before cutting. Often I would forget and have a mess to clean off the cutting mat before I could try again.
Then, I got smarter by saving my files with both the separated pieces and the combined pieces like the picture above. I still had to be careful not to cut pieces from the example though and more than once I managed to cut more pieces than I wanted.
Now, I have managed to get really SMART! It is such a good idea that I don’t know why I didn’t think of it sooner. When I want to save an example of how the pieces should be assembled, I use the Convert To Image function. (You can find Convert to Image under the Image menu at the top of the workspace.) I convert the assembled design to a JPEG right on my cutting page. I don’t have to worry about cutting out those extra lines anymore! Convert to Image is so much faster than Exporting the file and then re-Importing it onto the page. The whole conversion process happens in seconds right on the work page.
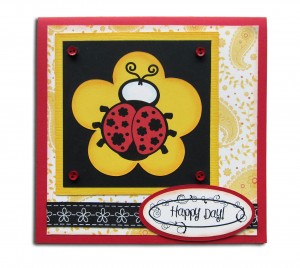
Convert to Image has obvious benefits for Print and Cut too. I have been creating all kinds of flourishes after Amanda showed us how a few weeks ago. The most recent one I made was so pretty in the line format that I didn’t want to thicken it at all. While I couldn’t cut it out, I could draw it or (ta-da!) Print it and Cut it out. I used Convert To Image to change it to a printable image, and in this case I actually cut the oval out by hand.
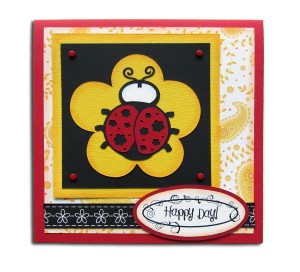
My ladybug card just seemed to morph from there. I realized that I could also use Convert To Image to transform the ladybug into a Print and Cut file too, if I didn’t have the time or inclination to piece it together. I converted the ladybug to a print file and used our Print and Cut method to cut it out. It was done lickety- split. I made the card both ways just to see what they would look like. I really like both of them.
I am amazed every day by what this software can do! Watch my video below to learn how to use Convert To Image. It is another one of those un-known, under–valued and often forgotten tools that you will never want to be without!
Chris


These videos are so helpful. I just need a memory larger than a gnats! Thank you
When I have done this in the pas. I just changed to out line on the sample project to another color. When cutting out the project I made sure I didn’t cut that color out. It was just for a guide line. Same thinking almost.
You’re right Brenda, it is thinking along the same lines. 🙂 That worked ok for me UNLESS I also had other cutting lines on the same page. Then those pesky printing-but-not-cutting lines would get me in trouble quite often!
Absolutely LOVE this! I am having my daughters 1st birthday next month and doing ladybugs as a theme… perfect timing!!! 😀
Clever!
Thank you for another great tutorial Chris!!