This project is all about Flag Day. I enjoy seeing the many creative possibilities that come from Pazzles files, the incredibly powerful Inspiration and InVue software and repurposing things to be creatively thrifty. I am grateful to live in a country where my creative juices are allowed to flow and bless others, for those who have fought in big and small ways to afford me this blessing and for our flag with its rich history and symbolism representing this great land.
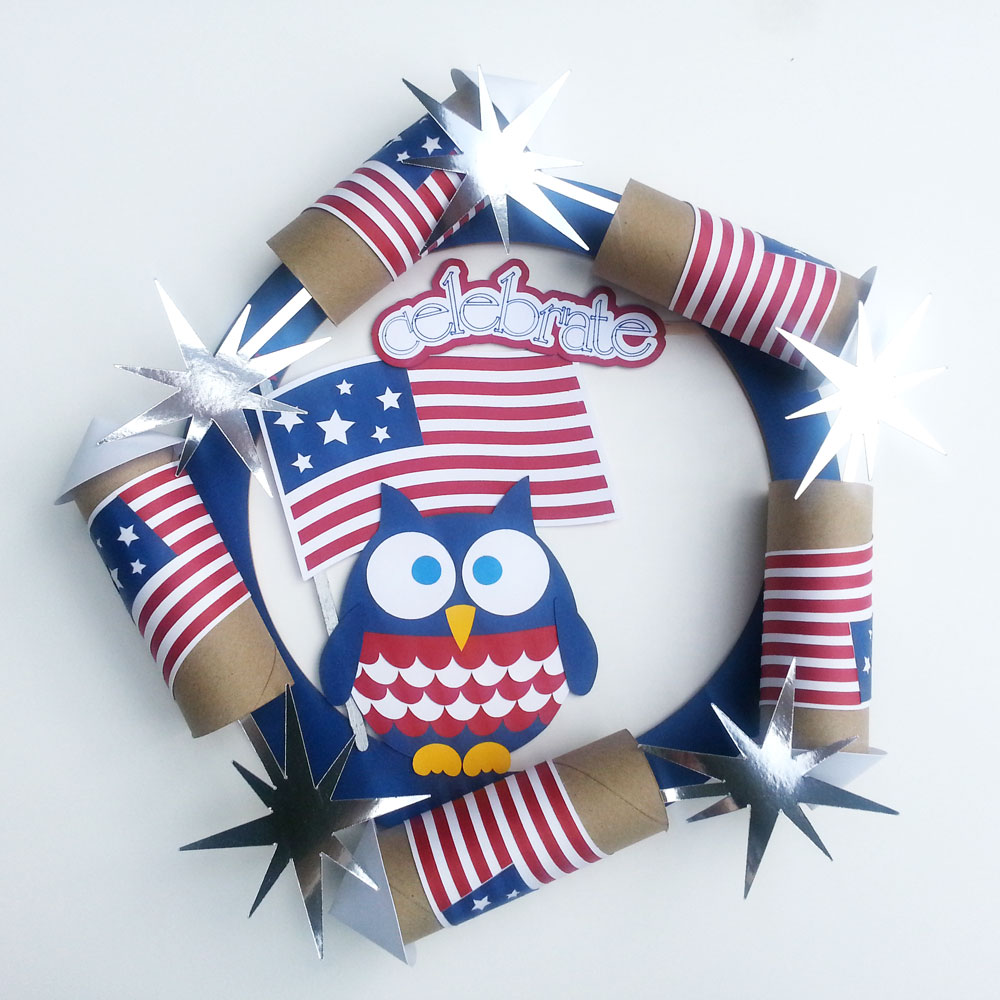
I went a little whimsical and chose to use the Owl Miss You Shaped Card file and the MK July 4th Set file. In keeping with my passion for repurposing, I made the wreath form in three sections from a cereal box and made paper tubes into firecrackers using elements from the MK July 4th Set as the main elements of the wreath. I added a patriotic owl using the Owl Miss You Shaped Card and added a sentiment (“celebrate”) drawn with the Pazzles Pen Tool in the Pazzles font Unicity Roman Medium, with two layers of outline around it. I created the firecracker tops by using the circle tool in the Inspiration Pro 2014 software. The firecracker sparkles came from the star bursts from the MK July 4th Set.
For the wreath form I created a circle, outlined it and cut it into three overlapping pieces with rounded ends and cut the pieces from a cereal box, gluing them together at their ends. I cut the same three pieces from blue cardstock to cover the front side of the wreath form because it isn’t fully covered by the embellishments.
For the firecracker flags I used the three flag layers from the MK July 4th Set but not the layer with the pole attached. I grouped them and increased the size to 12.042 wide by 3.301 high using the Condense feature to make them cover more of the tube. Keeping one set of flag layers at this size, I duplicated and increased the duplicated layers to 125% by using the Condense by percent feature and then also duplicated just the enlarged striped portion for use in the creation of the curvy, three-layer sentiment as follows. This left me with a set of small layers and a set of large layers, plus one large white layer only. Using the small flag layers set I cut the blue stars flag piece from blue cardstock, the red middle flag layer from Bazill Basics Peppermint cardstock and the white flag layer from white cardstock and assembled them with Scotch Permanent Glue Stick. It’s best to adhere each flag to the tubes as you go (I glued the white layer to the red, then glued the assembled piece straight onto the tube, then added the blue star piece) because if the assembled flags dry flat they won’t go around the curve of the tube nicely and you’ll end up with creases and lumps.
I selected the single enlarged white layer of the flag, and erased the stripes. I selected it along with the sentiment “celebrate” (created as above and colored blue) and used the center text function, then (with them still selected together) used the Fit Text to Path feature from the Text menu in the Inspiration Studio software. Once in the Fit Text to Path window, I selected Bottom, and in the vertical spacing I used the down arrow twice to get to -0.50, then clicked the Break Text/Path. Break Text/Path is an AWESOME feature which allows the text to be SHAPED to the path of the object but NOT JOINED to the object. (I LOVE THIS!) I then selected just the text and used the Visual Text Spacing feature of the Text menu to adjust my letters individually so that they all nearly touched each other. Then I used the Outline feature to add a white 0.10 outline around the blue text. I then selected the outlined text and from the Text Menu and selected Break Text: Outline so that I would have a solid outline piece on which to pen the text. I removed any extraneous interior lines created by this action so that I had only the original text and the one-piece outline. Then I selected only the outline and used the Outline feature to create a 0.14 outline in red. When I went to create and assemble I used a blue Paper Mate Flair Felt Tip Marker Pen (medium point) and the Pazzles Pen Tool to draw “celebrate” on white cardstock, then (without removing the mat) cut out the smaller/ white outline with my blade, then I cut out the larger/ red outline on Bazzill Basics Peppermint cardstock.
To create Patriot Owl using the Owl Miss You Shaped Card file I removed the sentiments and the liner piece altogether. I used the Cut Straight Line feature to separate the lower front of the card from the back so that I would end up with only the owl. I changed him to blue and the space in the middle to solid white and used the subtract weld feature to define his ears. It left a couple of funny pieces on the ears which I just removed by dragging the point down and erasing the excess. I recolored the yellow front feathers to red and the pink front feathers to white to remind me of the paper colors I will be cutting those shapes out of. I grouped the owl pieces together and resized him to about 4.5 inches tall. I assembled the owl as the front of the Owl Miss You Shaped Card directed. Behind his wing I added a skinny wooden stir stick coated with Sharpie silver oil based paint marker so he can wave the enlarged flag (directions above) . I attached him with a second wooden stir stick which I attached behind the wreath form at the ends and I topped off the pole with a red star (the largest from the blue field of the flag) cut from the Bazill Basics Peppermint cardstock.
From the MK July 4th Set I also used one of the star bursts which I separated from the bunch using the Cut Straight Line feature. I enlarged the burst so that it’s largest points (those that are almost inline with the “tail”) are about 4.023 in length. I cut out five from some silver toy packaging paper one of my daughters gleaned for me (but you could use Recollections silver foil paper or something similar) to be the sparkly end of the firecrackers, attaching them to the front inside of the tube with Glue Dots.
For the cone of the firecrackers, I created a blue perfect circle 3.09 width/heighth using the Circle feature and the Condense feature to choose the height and width of 3.09 inches. To help me line up with the center of the circle, I created a very small circle using the Circle feature and holding the shift key as I dragged to create the circle. I selected both circles and used the Horizontal and Vertical Justification feature to align them. I created a perfect square in white of approximately the same size, holding the shift key to keep it square. Using the smaller center circle as my guide, I moved the white square to cover one quarter of the circle, removed the smaller circle, then selected the blue circle and white square and used the Subtract Weld feature to remove a quarter of the circle. I then drew a small rectangle in blue at one edge of the missing circle piece and used the Weld feature to weld it back onto the circle as a tab to connect the cone edges properly.
I attached the firecrackers with Glue Dots (making sure the cones were overlapping the outer edge a bit so the firecrackers would lay flat on the wreath form. I created a picture hanger piece cut from the cereal box and attached it to the back of the wreath form with Glue Dots, gluing only along the bottom portion so that the top is flexible to go around the nail or pin on your wall or door – you could also hang the wreath from a ribbon run through this hanger (I think I’ll have to find one!). I used another wooden stir stick to mount the sentiment and attached the right side of the stick to the back of the wreath form. All done! This project could also be done with the InVue Print and Cut capabilities which would save time on the Patriot Owl, sentiment and firecracker flags over doing piecework as I did here. I hope you enjoy it!
~Renee

Supplies:
Bazill Basics Peppermint cardstock
Pazzles Pen Tool
Blue and White cardstock
Glue Dots
Paper Tubes
Silver Paper
Sharpie Silver Oil Based Paint Marker
Paper Mate Flair Felt Tip Marker Pen (medium point)
Scotch Permanent Glue Stick
Cute idea! I did have trouble finding the font. Is it one that’s purchased?
How cute! I hope I have time to make one! I just threw away a tone of toilet paper rolls! urg!
This is so cute!
Thanks for the compliment, lauribuck. I’m sorry for the trouble finding the font. I used the Inspiration Pro 2014 software (with updates) and my Inspiration to cut this project. In the Text window there are 3 buttons: TrueType, Pazzles and Import. I chose the font from the Pazzles button.
Thanks for the compliments all! I did find that the glue dots on the tubes didn’t hold up in the high heat of my glass entryway so if you are planning to hang it where it’s really warm I’d opt for a stronger adhesive, maybe hot glue.
This is such a cool project Renee.