 We are all guilty of taking our cutting blade for granted, especially if we have been using our Inspiration or other Creative Cutter for very long. After all it is just a little tiny piece of metal that barely sticks out of the blade holder. We are more likely to focus on our cutting mat and ignore the blade. In fact, we often blame the mat or cutter for problems when we should be paying more attention to the blade. Give the blade a little TLC and it will be the Super Hero of your projects. Today, I want to draw your attention to some lesser know facts about that unsung hero- your cutting blade.
 Fact #1: Be good to your blade and it will be good to you.
Start by conditioning your blade with Cutter Glide when you first remove it from the package. Cutter Glide can be purchased in the Pazzles store. Use the cleaner to clean the blade, let dry and then brush on the protective coating. It will make your blade cut cleaner and last longer.
Use the correct pressure. This is a learning process and you get better as you practice. Take the time to watch the videos and read the blogs on the cutting blade. You can find them by typing BLADE in the search window. Remember: it is better to cut twice at a lower pressure than to ruin your paper and blade by cutting at a pressure that is too high. The pressure suggestions in the software are only suggestions, pressure will vary according to climate and paper content. You must know your own environment to get the pressure correct.
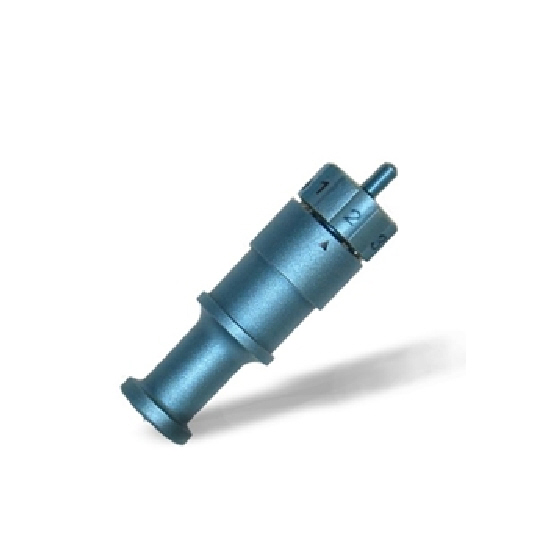
Use the correct blade length. It is a common mistake in the beginning to extend the blade too far out. It serves no purpose to have the blade out further than necessary. It can damage your blade AND your mat. On the other hand, if your blade was not out far enough, it is a simple matter of extending the blade by one click on the holder and cutting again. No damage done to the blade, the paper or your mat.
Fact #2: Put your blade out to pasture not in the trash.
Your blade will eventually become too dull to cut paper and cardstock but it still can serve you a while longer. Save it in a “Used” blade container. If you are cutting chipboard or plastic, try one of your used blades. Very often they will still cut those dense materials, thereby saving your sharper blades for the thinner papers. You can also use dull blades for scoring fold lines.
Fact #3: Educate yourself!
I said this in Fact #1, but it bears repeating: Watch the videos and read the blogs about the blades. Especially if you are a beginner, but we old-timers could benefit with brushing up on our facts once in a while. Take time to educate yourself about the paper you are cutting, in particular any new papers that you have purchased. Do a test cut first to find out what pressure and blade length are needed and WRITE IT DOWN. Keep a pressure and blade length swatch book by your workspace.
Fact #4: Don’t ignore the packaging.
Seriously, don’t ignore the blade packaging. In this era of Reduce, Reuse, Recycle, the blade holder packaging is a mini-wonder. Here are some of the ways I have found to re-use and re-cycle my blade packaging:
 #1 The little blue blade cap can be used to hold the tweezer tips together AND it is a whole lot easier to find than the clear plastic tubing that they come with.

#2 We have broken scissors at the office and I have them at home, so I am sure some of you have encountered this problem as well. The lock mechanism on the Fiskars micro tip scissors will break and you can no longer close the scissores. Slip a blade cap on the end and they will stay closed, plus they won’t poke you when you are looking for them in your drawer. This works great for embroidery scissors too.


#3 Cut the blade cap a little shorter and it becomes a replacement cap for a gel pen. I use this all the time when I am using the Pen Tool over and over again in a project but need to remove it from the blade carriage. I just slip the blade cap over the end to keep it from drying out.
![]()

#4 Use the blade case to hold used blades or rhinestones. Write on the case with a permanent marker. I will tape or glue one end of the case so that the cap won’t accidentally come off.

#5 Use the blade case as a replacement cap to the Pick tool or Craft Knife.
Here are a few links to a blog and 2 videos about the cutting blade. This is by no means a complete list so be sure to type Blades in the search window of the Craft Room to find more. Educate yourself and you will never regret it. 🙂
Videos:
Determining Blade Length and Pressure
Changing The Blade
Blog:
Feeling a Little Pressure?

What a great article…I love the recycling ideas. I need to start implementing some of them. Great ideas!
An informative article. I had always recycled the blade covers and the tubes that hold the blades even back when I owned the CE. But I did learn something new in this article, to recycle the old blades to cut heavier materials such as chipboards.
Thanks!!
Being new, I only have one tube, so I put my 1st used blade in the tube with the new one, without the blue cap, so I know which one is the old blade. Thank you for the tips, and saving my ‘old’ blade for other projects that I can hardly wait to get to! 🙂
Very good article, made me think about the blades I dispose of.
Thanks Maggie