
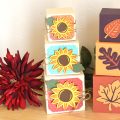
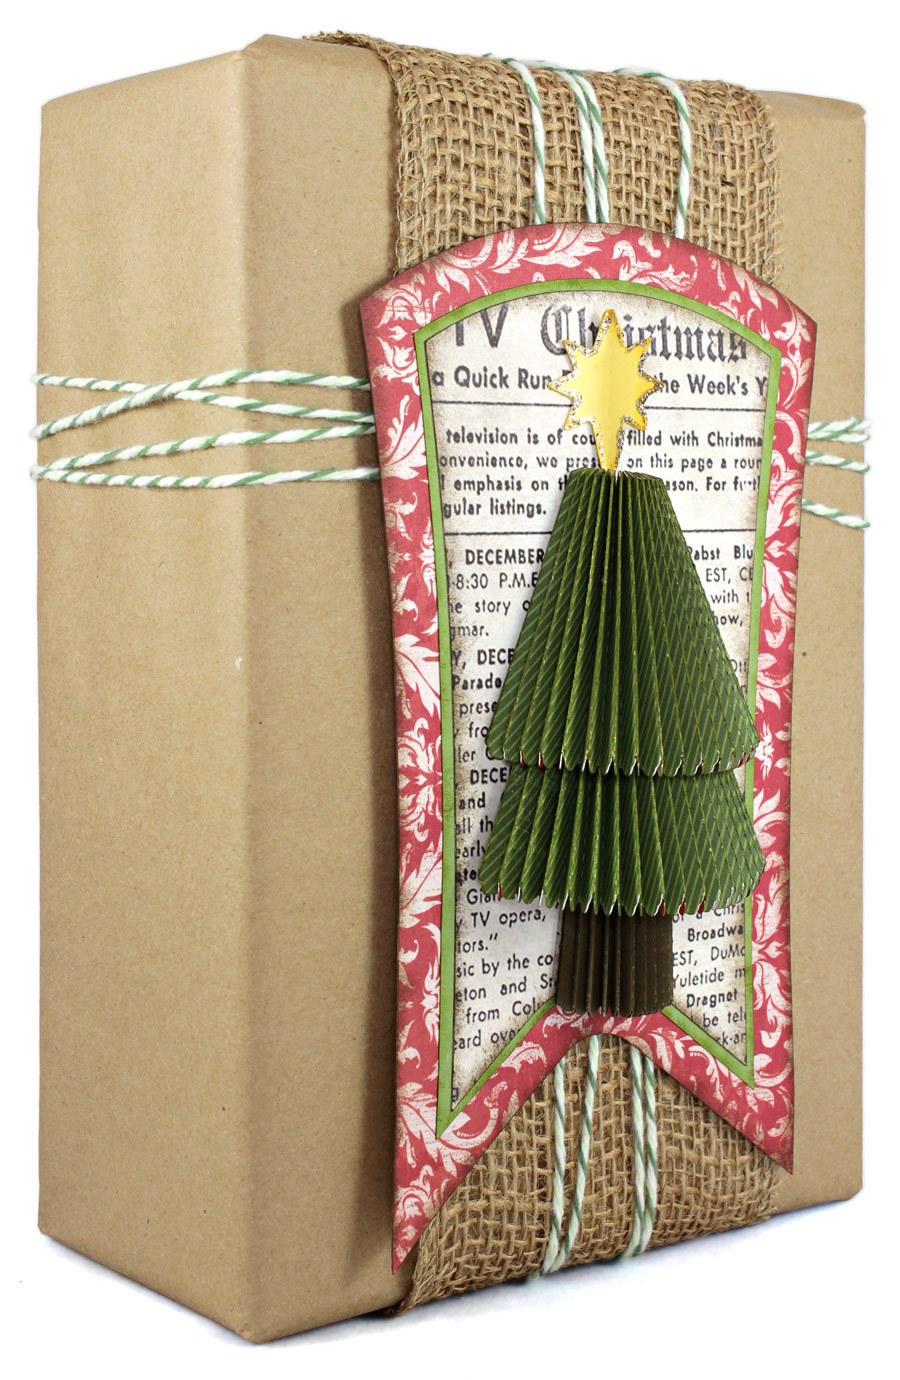
This Christmas Tree Box is double the fun because it not only holds a special gift or treat but is an adorable decoration too! Imagine several of these trees in varying sizes tucked in among the greenery. The stacked layers form a sturdy box that can hold a gift or candy treat. You can make it sugary sweet like I did, by using embossed pastel papers and rhinestone accents. It would look country rustic by using barn reds and forest greens with brown distressing accents. You could do one in gold and silver for a chic decor item or make it classic Christmas by using traditional green and red. No matter how you do it, it will be a hit with your family.

Here are is the recipe and cutting file for this project but you can only get it if you are a Craft Room member!! If you aren’t a Craft Room member now is a great time to join so you can get all 12 boxes and participate in our challenge to win great prizes!
Click Here to Download the Recipe for this Stacked Christmas Tree Box
Click Here to Download the Cutting File for this Stacked Christmas Tree Box
OR
Click Here to Download the SVG and AI Files for this Stacked Christmas Tree Box


This is really cute…but I was wondering…what paper line are you using. I love the look.
The paper is by Best Creations.
I am confused – The instructions and the pictures don’t seem to match. My two single rings are the same size when cut from two different colors, so I have 4 of the same size for 2 trees. I have 5 cone shaped tops for the 2 trees and 1 open bottom of the tree (not the base. So the question is: Are there 3 rings and 3 cones per tree or are there 2 rings and 4 cones per tree? Either way I need one more piece of one or the other – right – to make two trees. As well as a second open bottom of the tree.
I have been working on this all weekend trying to figure it out – can you help me? or am I just plain nuts??? Thanks ever so much for the wonderful boxes – I have made (or at least attempted) all but the two latest boxes and I will complete them today. LOVE THEM! Love this one too, just a bit more challenging.
The cutting file is designed for a 3 color tree.
If you use 3 colors of paper, you will have a trunk, a ring and a cone that is the same paper and size on both trees.
It might help if you copied the green pieces, moved them to the right of the page and changed the color to pink. Hint: if your kiss cut lines turn to solid lines just hit the un-do button once and the kiss cut lines will reappear.
These are the pieces you should have:
Tree base (trunk) plus a top and bottom piece
Tree Bottom: Largest piece (plus its bottom) and 2 rings.
Tree Top: 4 cones
Your trunk would be the same color of paper on both trees.
The 1st tree would alternate blue trunk, green, pink, blue, green, pink, blue, green.
The 2nd tree would alternate blue trunk, pink, green, blue, pink, green, blue, pink.
Hope this helps! 🙂
So pretty! Going to hold my breath and try. Question. I am using DCWV and it looks like you used some paper like that…it looks like your paper has glitter in it. If so, what blade depth do you use, and what pressure and speed? I love the pretty paper….but my pazzles has personnel issues with glitter in paper…I think they have a hate/love relationship….I just want to spank them both.
I used Best Creations paper but I have used DCVW paper in the past. I always cut the glitter papers in 2 passes. First start with a lighter pressure and a 2 blade. Then I will extend the blade to 2 1/2 and cut again. (possible increasing the pressure)
If needed you can use your pick tool to finish any areas that did not cut completely through.
Be sure to test cut!