I’ve been pinching my pennies lately as I’ve just bought my first home. Ouch! My wallet still hurts. As I’ve discovered, homes come with their own set of issues, one of mine being decorating. My new home is quite a bit bigger than my old apartment and I’ve got bare walls and empty shelves. It’s lacking that homey feel.
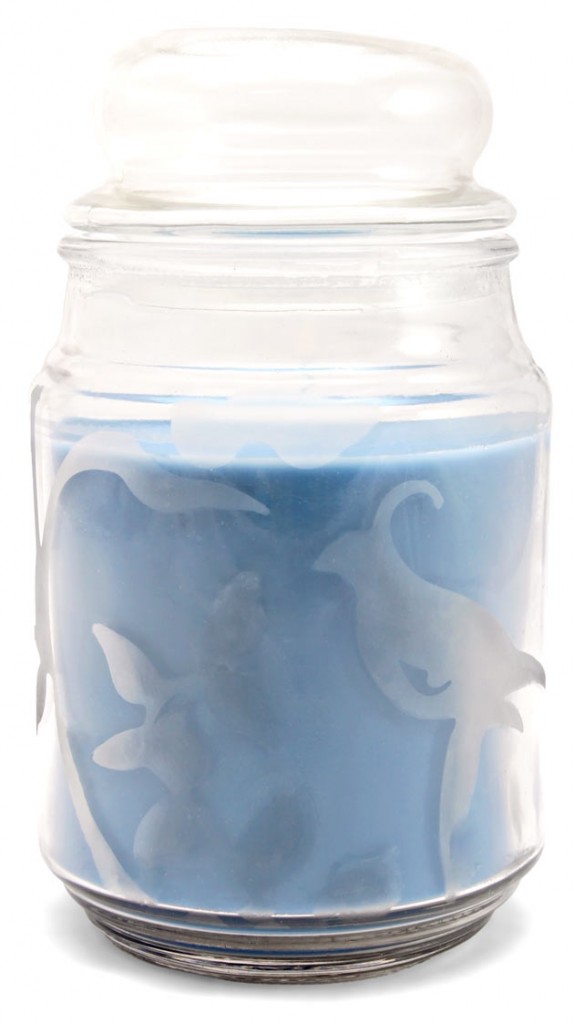
I decided affordable and easy way to add some cozy to my new crib would be with candles. I hopped down to the local dollar store and grabbed a few candles, one of which was in a big glass jar. Rather than be stuck with the not-so-pretty picture on the label, I decided I needed something more suited to my decorating style. Glass etching to the rescue!
First, I peeled the label off the jar—lucky me it came off easily, and I didn’t have to bust out the solvent. Then, I measured the circumference of my jar using a string, then cut a section of the Garden file from the Paper Lace CD out of vinyl to fit the jar. With my trusty Pick Tool and some transfer tape, I removed the reverse part of the vinyl (leaving the design itself on the backing) and applied it to the jar. With the vinyl on, I smeared glass etching cream over the exposed areas of the design.
The result is this beautiful candle. Imagine it lit, and burned down with the candlelight flickering through the design. So pretty, and a nice smell to boot.
Before you rush off to make your own custom candles (or mirrors, or picture frames, or wine glasses…) here are a few tips you might want to consider:
- • Try using permanent vinyl instead of wall vinyl. It seals better to the jar so the etched edges are sharper. If you pull it off as soon as you’re done, it won’t ‘cure’ and become permanent.
- • Follow the directions on your etching cream very closely. It is a potent chemical and should be treated carefully, much like you would handle paint thinner or bleach.
- • Given that, the directions said to leave the etching cream on for 15 minutes. It took about an hour to etch this jar enough to be seen. You might need to experiment!
- • Etching cream might seem a little pricey, but consider that you can get many applications from one jar. And compared to what you might pay a professional engraver or sandblaster, etching cream is very affordable!
I can think of so many projects I want to do in my new house with glass etching. I’m thinking about a mirror for the entryway that says ‘Welcome’. Any ideas? Leave me a note in the comments. Thanks!
Happy Crafting!
~Amanda


Very nice Amanda! The mirror project sounds great. I’d done one with a seaside scene since I live at the beach. Unfortunately it got broken in a move and so I’ll have to do it over again. I also made my husband his own collection of beer mugs with his own personal monogram on them for his mancave bar. Lovin’ this etching stuff!
Oh and question for you….what do you mean by permanent vinyl? Does Pazzles sell that too?
Permanent vinyl is what’s in our 12×12 size vinyl packs. It’s stickier than wall vinyl. The wall vinyl does work for this, but I think the permanent works better.
Glass etching is one project I haven’t tried yet. I am going to jump in and try it. If it works out another wonderful idea for gifts. Thanks!
I do tons of etching projects
here is one I did for my hubbies guys at work a few years back, I also did them for all the men in my family that say so and so’s beer or for my young son it says Root-Beer, but these have my hubbies companys logo on them.
http://auntiemargsblog.blogspot.com/2011/10/etched-beer-mugs.html
WHICH LETTERS DO YOU STENCIL BRIDGE .
WHAT ARE GOOD FONTS TO USE FOR GLASS ETCHING
Very thin or fine fonts may not show up well when etched. Try using thicker fonts with solid fills to start off with.