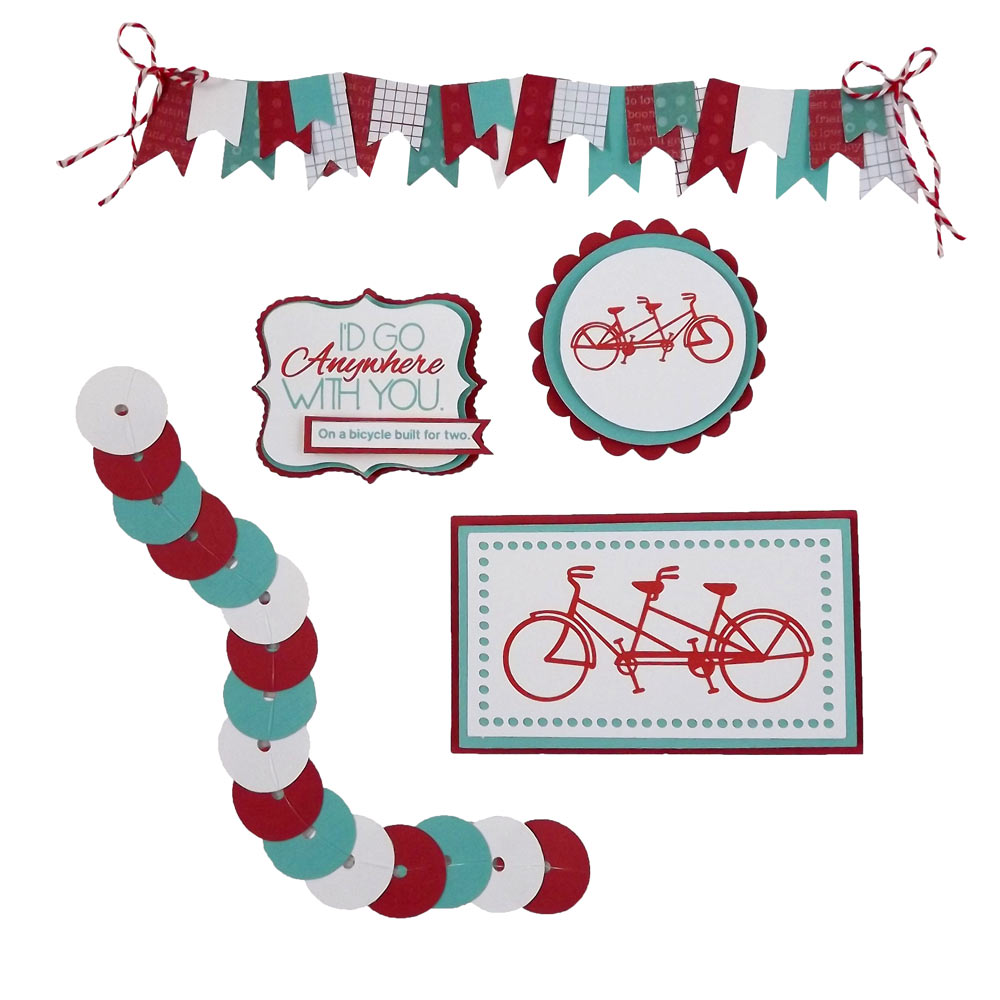
I love to bike ride. It’s so nice to breathe the fresh air. It makes me feel so carefree… until I have to pedal up a steep hill! I have always loved the novelty of tandem bikes and wished I had one…so someone else could pedal! I made five different embellishments to help me savor the feeling I get when I ride my bike! I hope they will inspire you and help you get your scrapbooking page or card put together in a snap.
Though I chose a bike theme, these embellishments can be turned into any theme you can imagine. Instead of using the quote, “I would go anywhere with you. On a bicycle built for two”. You could say “If friends were flowers, I would pick you”. Then change the pictures of the bicycles to pictures of flowers. All the embellishments using images or quotes were cut out using the print and cut technique.
I made a fun banner using the Banner Designs file. I altered the banner sizes and glued them together using a layering technique.
The round scalloped embellishment is simply a picture printed on a circle, then layered using Pop-Dots onto another larger circle, then finally onto a scalloped circle from the Large Circle Scallops file. I like the Pop-Dot effect as it gives the embellishment some dimension.
The larger rectangle embellishment is made by drawing a rectangle around your image, selecting the rhinestone tool, choosing your rhinestone size (I used 10ss) and selecting apply. This will surround your image with circles. Then draw a second rectangle about 1/8 of an inch larger than the rhinestone pattern. You should have an image surrounded by circles, enclosed by another rectangle. I glued that to a larger rectangle using glue. Then, using Pop-Dots I adhered it to the bottom rectangle.
I used the Scalloped Shape file and the Banner Designs file to make the journaling block. Just simply follow the directions for the round scalloped embellishment above. I also used Pop-Dots to adhere the banner part of the journaling embellishment, giving it even further emphasis.
The last embellishment for your scrapbooking page or card is a homemade sequin strand. You can make them as large or as small you’d like. You can also use different shapes too! Once you string them, they are very flexible and can be bent into any design you would like. You can take your string of sequins and shape them into a circle or a square for a frame. You can leave them in a straight line or make a wavy pattern. They can be used the same way you would use a traditional string of sequins, but the paper ones stay put once you shape them. I used fishing line to string mine, so I didn’t have to worry about finding matching thread. Just about any thread or string will work. They look neat strung with a contrasting colored thread too!
Sequin Instructions: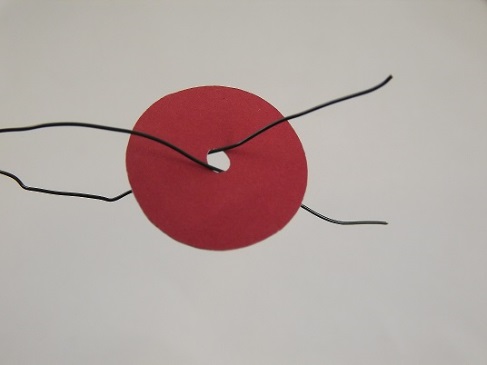
Cut two pieces of string a little longer than the length you would like your sequin chain. Tie them together at one end. This will leave you with one end tied and the other end with two open strands. Take one of the strands over the top of your first sequin and thread it through the center hole. This strand will always be used to thread over the top of remaining sequins. Then take the other strand and thread it through the bottom of the sequin. This stand will always be used to thread through the bottom. (I used wire in the example) I used a sharpie and colored the tip of the strand that I was using to thread over the top of the sequins so I wouldn’t get them confused. So, one strand over the top the other through the bottom. Keep this pattern going until you get to your last sequin. I tighten each sequin over the previous one before threading the next one. Once you are done and you are happy with your strand just tie the remaining string tight against the last sequin.
A Craft Room Membership is required to access additional content. Please Join Now or Login!~Heidi

Supplies:
DCWV (The Everyday Essentials Stack)
American Crafts Bakers Twine (Red)
4lb. fishing line – South Bend

Back in the day they were called “Card Candy’…great idea!
Fun and Fabulous!!
LETS RIDE HEIDIE….I LOVE IT
Very cool embellishments Heidi! Love the sequins and the way you used the rhinestone tool to create your border. Clever girl!
Heidi, this is a fabulous LO set. I really like the theme and colors.
I like how you made (and explained) the frames around the bike. I do not do rhinestones, but I have to try to remember the technique for decorating.