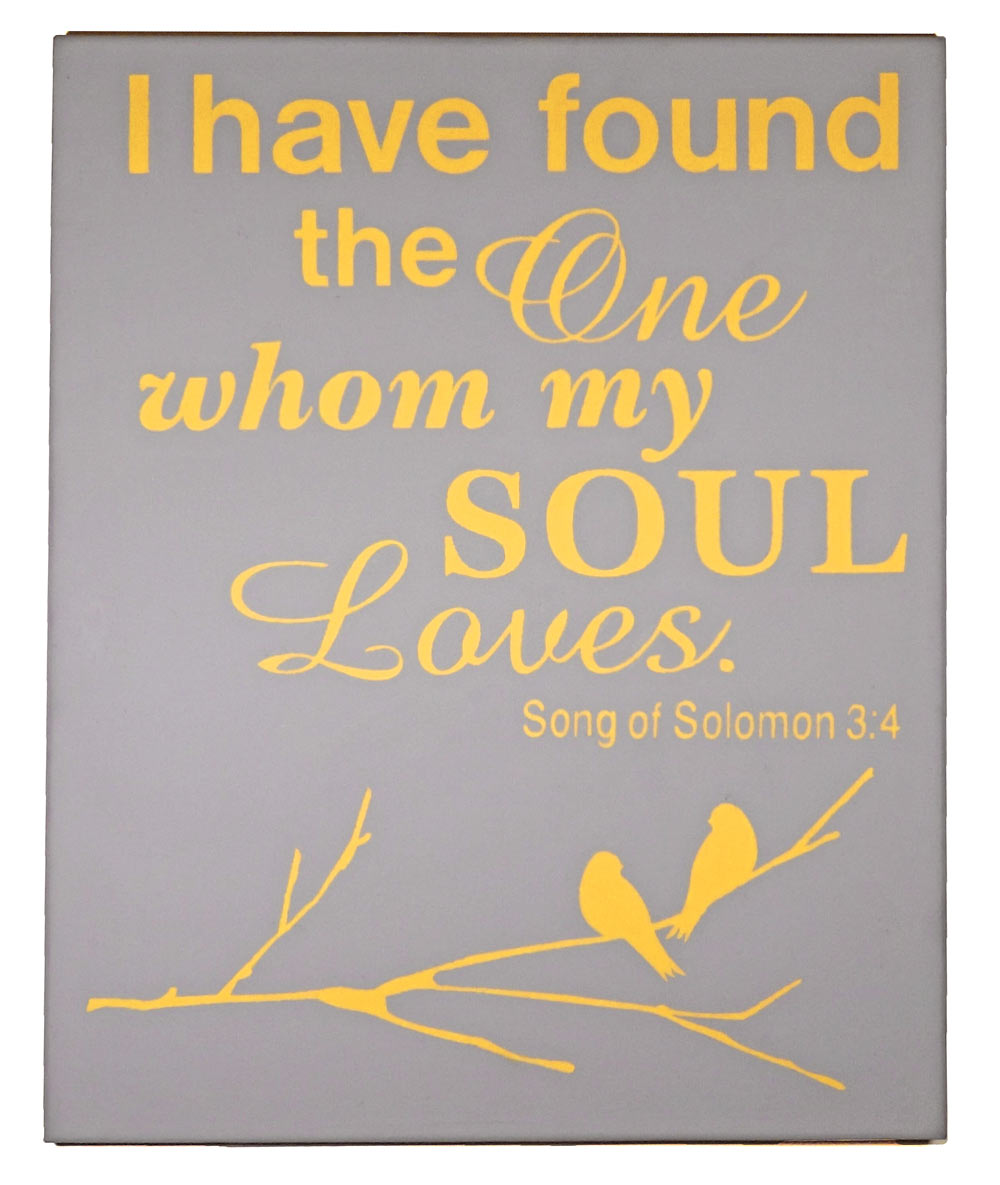
I could hardly wait to do this painting! We just redesigned our master bedroom and went with a totally different color scheme than we had before, so our previous wall hangings had to go. What is an owner of a Pazzles Creative Cutter to do? Well make your own of course! I have seen this type of art work on line and knew it was what I had envisioned for my bedroom. It was a pretty simple process and the possibilities are endless.
I measured my surface (In my case a 20″ x 16″ canvas). Then I opened my Pazzles software and changed my page setting to 20″ x 16″ so I would know that my design would fit nicely on my canvas. I used the Bird On A Branch file. I altered it by copying the bird, mirroring it and adding it back to the branch next to the original bird. I then welded it all together so it would cut out all in one piece. I made my own word art using true type fonts. Make sure any cursive fonts are welded before cutting. Obviously our Pazzles will not cut a 20″ x 16″ design, so I had to break up the design and adhere to the canvas in parts. I was able to keep all the words together, but the branch did not fit in the same cutting area so I cut it separate from the word part of the design and lined it up manually on my canvas. It wasn’t hard to do, just an additional step. This will not be an issue if your surface is smaller than 12 x 24. I chose two paint colors that matched my color scheme, then painted the canvas in one of the colors using a small paint roller. I tried it with a foam brush and got not so great results. The roller worked great and gave me an even coat of paint. While it was drying, I cut my design out using Pazzles REMOVABLE wall vinyl. I transferred my design to the canvas using Wall Vinyl Transfer Tape. If you are working with a canvas, like I did, you will need to put something in the opening on the back of the canvas so you can press your letters/design down firmly. I measured the opening and cut and stacked three piece of foam board and it worked perfectly! If you don’t have foam board you can use a book or something and press your design down in sections. Be sure to press the edges of your design down very well. Canvas does not have a smooth surface and paint can seep under the vinyl if it is not pressed down well. (Honestly, I think the process would be even faster if I choose a smooth sturdy surface, such as wood, but this is going over my bed and I wanted something lighter.) Then take your contrasting paint, and using the roller, paint over the entire surface of the canvas, right over your vinyl. Do not use a ton of paint for this part. Just enough to cover the color underneath. I also painted the sides of my canvas to give it a finished look. I let it sit a bit before pulling off the vinyl. Do not let the paint dry completely as it will adhere the vinyl to the canvas and might peel the top coat of paint off when you remove it. I used my Pazzles Tweezers to pull my vinyl off and they worked perfectly! If any of your paint seeps under the vinyl, just touch it up with a small brush.
I have a feeling a lot of these canvases are going to show up on my walls! I really liked how easy the process was, and the end results are fabulous! I am thinking a certain niece who is getting married in October might just find one of these on her gift table.
Heidi has included her cutting file free for everyone so you can make your own.
Click here for the Vinyl Resist Canvas cutting files in WPC
Click here for the Vinyl Resist Canvas cutting files in AI and SVG
~Heidi

Supplies:
Canvas
Plaid Apple Barrel Acrylic Paint (2 Bottles)
Small Paint Roller and Rolling Pan
Pazzles Wall Vinyl
Pazzles Wall Vinyl Transfer Tape
Small Paint Brush For Touch Ups

Wonderful project Heidi, so personal and cheaper than buying from the shops. You have inspired me to have a go!
Thanks for sharing this great idea! Definitely a great shower gift.
Gorgeous, love it. thank you for sharing
Heidi, what font is the cursive???
Shari, it is AmazoneBT.
What a beautiful project Ms. Heidi! I love that whole passage. It was our passage and reading at our wedding. Beautiful work!
Lovely project Heidi !
Gorgeous! I love grey and yellow together.