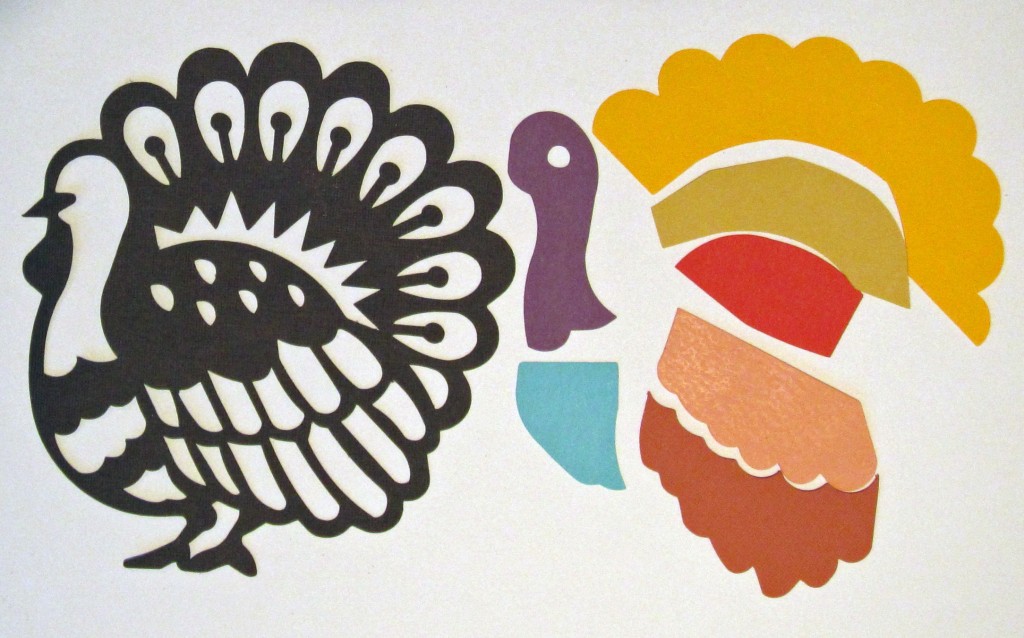
If you’re new to Pazzles or a seasoned pro, you know that getting clean cuts with your Pazzles Inspiration is important and generally fairly easy to achieve. If you happen to run into issues, there are several tips that beginners and experienced cutters alike can use to ensure clean cuts. Nothing is more frustrating than destroying an entire piece of paper trying to get a perfect cut. Here are few things to try so you can get your cuts perfect every time.
Check Pressure and Blade Length
First some definitions:
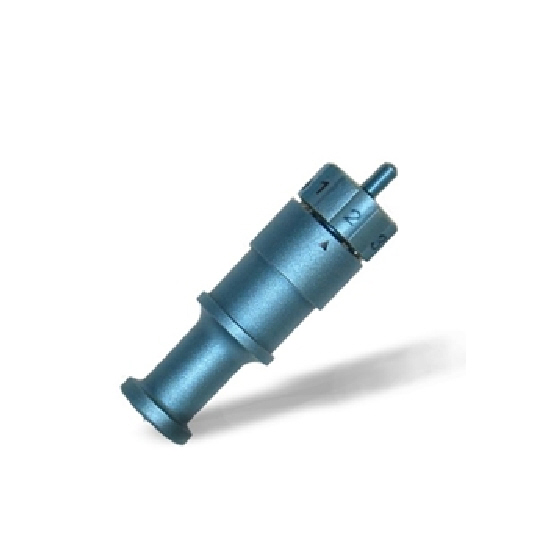
Blade length: This is the amount of blade sticking out from the bottom of the blade holder. It makes no sense to have more blade than you need. It will gouge the mat and impede the cutting process.
Pressure: This is the force that pushes the blade down to meet the paper. Too little and the blade will not engage the paper. Too much and it will push corners and rip paper.
Paper Thickness: Some manufacturers will give a paper weight, but this is rare. When it comes to determining paper thickness it is all relative. Most smooth cardstocks fall into the medium weight category. Textured cardstocks are usually (but not always) heavier. Other cardstocks such as pearls, glitters and some stamping company cardstocks are thicker yet.
Finding the correct settings to cut paper is really a four step process:
1. Find out the recommended settings for your paper. You can get a general idea by looking at the default settings for your material in the InVue or Inspiration Studio Software.
2. Know your climate. The environment you are in can make paper softer. Humidity softens paper making it easier to tear. If you live in a humid area, you can automatically assume that you will use a lower pressure and possibly shorten your blade length.
3. Test to determine the correct blade length. This is critical to a good cut. Fold a scrap of paper in half. Remove the blade holder from the Inspiration and try to cut through the top layer of the paper by dragging across it using a medium pressure. Use the recommended blade length as a starting point but test a few other blade lengths as well. You want to find a blade length that will cut the through the top layer but not the bottom one.
4. Once you know the correct blade length you can fine tune cutting by adjusting the pressure. For medium weight cardstock start at pressure 15 and work your way up changing the pressure by increments of 1 or 2 points at a time. Too much pressure can look like too little pressure. If your project is cutting through in some places and not in others and the corners are snagging, your pressure is too high.

Choose the Right Paper
There are just some brands of cardstock and patterned paper that do not cut well. Papers that are too thin, or created by layering thin pieces together generally do not do well. As you try cutting different papers you will start to come across ones that are consistently bad, and you can avoid purchasing them. If you are running into problems and you know your pressure and blade length are correct, try cutting the same design on a different brand of paper that is similar in weight. That will generally tell you if your paper is the problem.
Check your Blade and Mat
Often uneven cutting can be a result of an old mat or blade. It’s a good idea to keep an extra Inspiration Blade on hand so you can try that out if all other solutions have not worked. If it turns out you did need a new blade, remember to save those old blades that aren’t cutting through cardstock cleanly and use them for chipboard or acrylic.
Another issue is small bits of paper stuck in your blade holder. Remove the blade holder from the machine and push down on the top plunger to remove the blade. Look inside and even blow inside to make sure there are not small bits of paper stuck inside. Usually just removing the blade will cause them to fall out.
Your mat will start to cause problems when it is heavily scored or has lots of small bits of paper stuck to it. You can use a Mat Scraper to clean off the paper bits, but once the mat is heavily scored, it’s time to get a new one. A new mat can sometimes make all the difference and pulling out a new mat is honestly one of my favorite simple pleasures.
Double Cut
This is one of my secret weapons. I like to double cut everything. You can set your machine to do 2 passes in the cut control panel in both the Inspiration Studio and InVue software. If you let the machine run, it doesn’t generally take much longer to do two passes than one and it makes the cut super clean. You can set your pressure a bit lower so you don’t get torn corners and the second pass will catch anything that might have been missed on the first pass.
This post got long, but hopefully it is a good resource for making your cuts cleaner. Feel free to share your favorite cutting tips in the comments below.

What a fabulous tutorial! Great advice!
Great post Michelle. I double cut everything too – just to make sure. I’m so glad you posted this, it’s made me realise I may have had my pressure too high when I was cutting lettering a while back and everything else I cut was perfect.
Thank you for a very good explanation!
Great piece!
Agreed with you, after trying all the blade, the pressure, the weight, etc. the safest way to get a clean cut is trying 2 or even 3 passes, learned that is better to spend extra seconds on the passes than struggling with the whole cut. Thank you for your advice!.