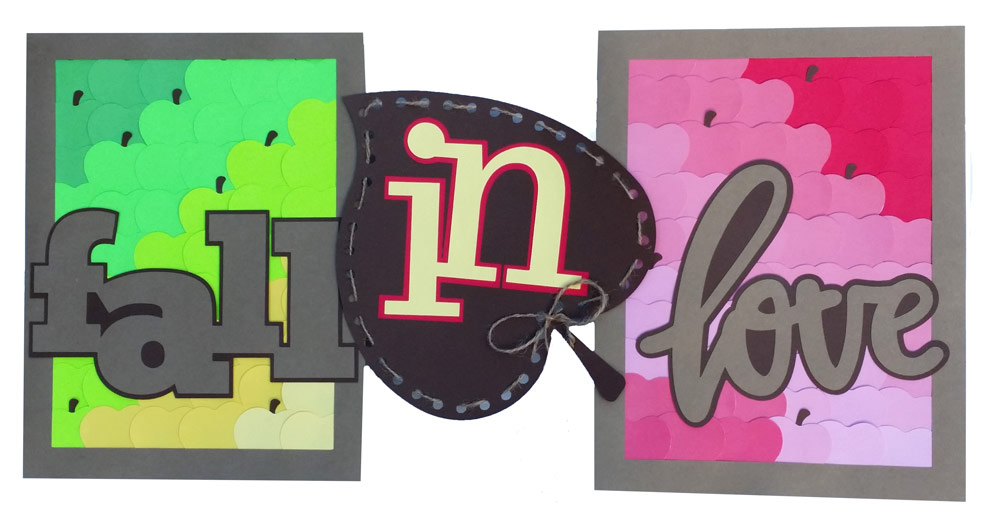
This project was created from the Early Fall Harvest themed files from the Pazzles Craft Room. I have noticed that ombre is very in and thought it would be fun to make a sign celebrating all the wonderful apple varieties we are blessed with, especially here in the Evergreen State. I had an ombre acid-free cardstock paper pad titled “Paint Chip” from Craft Smith with some of the colors already coordinated for me. I added the rest of the colors from card stock in my stash.
Components:
Backing – two 10 by 7.5 pieces of cardboard (like from a small shipping or moving box, or a cereal box will do)
~Apples from the Pazzles Craft Room
-Apple file resized via the corner handle to approximately 1.769 by 1.956 inches
-Apples cut from shades of green, yellow and red/pink cardstock. Approximate quantities: dark green 6, medium green 15, light green 18, yellow 12, light yellow 3,
red 6, dark pink 15, medium pink 18, light pink 12, light red 3
-Stems cut from brown cardstock
~“in” from Fall Is In The Air Title resized via the corner handle to approximately 4.965 by 4.747, then outlined with 0.12
-“in” cut from yellow cardstock, outline cut from red cardstock
~“Fall” from Fall Title Set resized via the corner handle to approximately 7.96 by 4.52 inches, then outlined with 0.12
-“Fall” cut from kraft cardstock, outline cut from brown cardstock
~“love” from Love Word Set resized via the corner handle to approximately 6.634 by 5.614, then outlined with 0.12
-“love” cut from kraft cardstock, outline cut from brown cardstock
~Leaf from Dotted Autumn Leaves
-rotated and resized via the corner handle to approximately 8.394 by 7.801, then outlined with 0.12
-extra dot added by duplicating another and moving it into place near the base of the stem
-hemp twine added, “sewn” through the dots and tied in a bow
~Frames made from a rectangle measuring 7 by 9.5 with an inline of 0.75 cut from kraft cardstock
I cut my cardboard with an X-Acto knife then laid out the apple shapes in rows of 6 apples each, letting them overlap the preceding apple and all the edges of the cardboard slightly, forming a diagonal ombre effect. Once I had them basically where I wanted them I went back and glued the bottom half of them down with my Scotch Permanent Glue Stick. I then placed my frames over the apples, covering the edges of the cardboard and overhanging apples, glueing it in place with the glue stick. I added the layered “fall” and “love” titles over the apples and frame and glued them in place. I think they also might look cute with 3D dots behind them. I glued the base of the stem in place on a few random apples.
For the center word I laced the dots with hemp twine and glued the layered “in” in place. The ensemble can be displayed on your wall with a little LocTite Fun-Tak Mounting Tabs (removable gum that holds up to 1 pound for posters, etc.); they are so quick and easy to use! When you hang them you can overlap the “fall” and “love” frame edges with the “in” leaf if you like, or in a cascade from left to right. Happy Harvest everyone!
~Renee

Supplies:
X-Acto knife
Two 10″ by 7.5″ pieces of cardboard
Cardstock in shades of green, yellow, red and pink
Cardstock in kraft and brown
Scotch Permanent Glue Stick
Hemp twine

Pretty cool Renee. 🙂
This is cool–but my, lots of work layering all those apples! Amazing Renee!
THANKS all! The apples actually go pretty quickly because it’s just a few swipes of the glue stick to hold down the bottoms. Planning the arrangement takes a little longer, but they could also be done randomly (mixed greens on one, mixed reds on the other, for example) and still look fun!