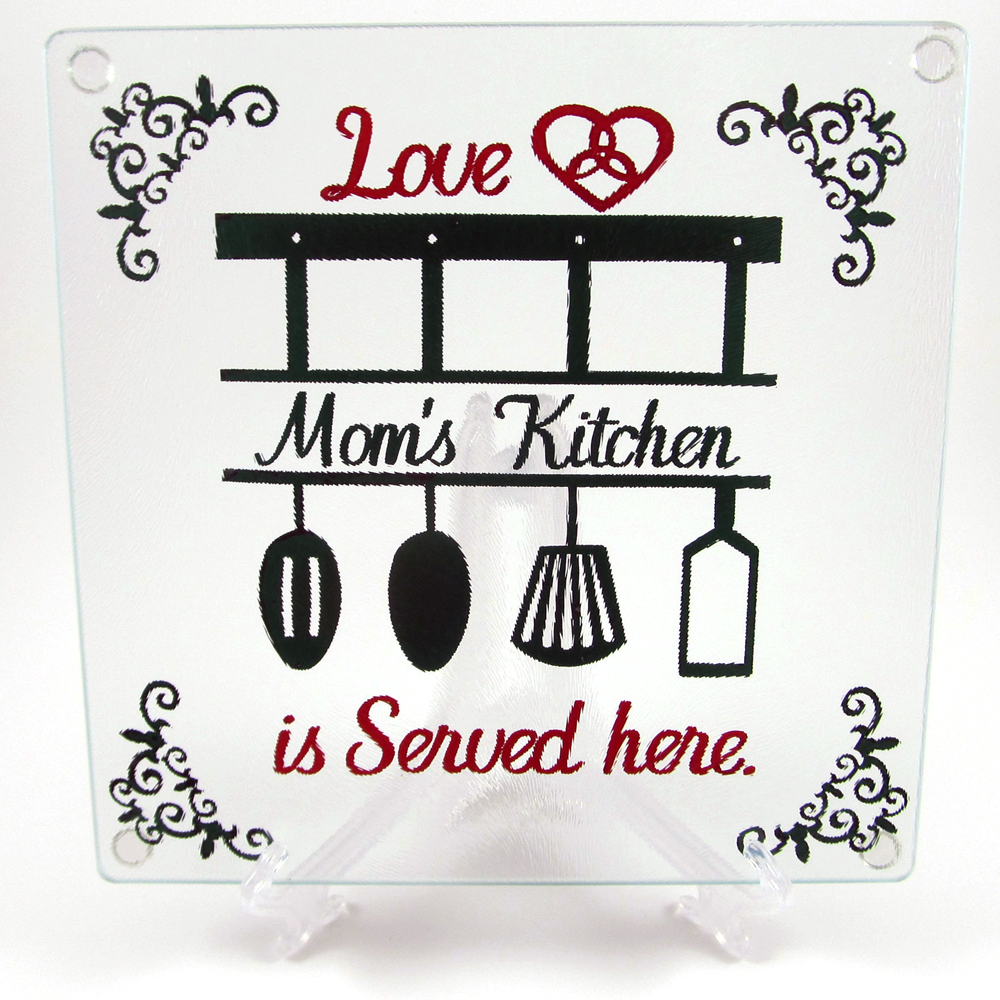
When I need a quick, inexpensive gift for a shower, wedding, birthday, or other occasion such as Valentine’s day, making a custom cutting board is a quick solution. Here is an example of one I made recently. I like to personalize the board with the recipient’s name, and I can even change out the sentiment according to the occasion. These glass cutting boards work great as a cutting surface, and when not in use, they serve as a nice decoration for the kitchen or dining room.
I found the design elements for this project in the Pazzles Craft Room Image Library, the Trinity Knot Heart, the lovely Corner Flourish, and Kitchen Border, and used a font named PN FeatheredgeBold. I was amazed at how nicely all of these pieces cut using only a single pass on the Pazzles Inspiration Vue Cutter from the InVue software. Some fonts are very difficult to weed, but this one cut and weeded beautifully. I used the technique demonstrated in this video to split the Kitchen Border design. I have included the cutting file for this project here.
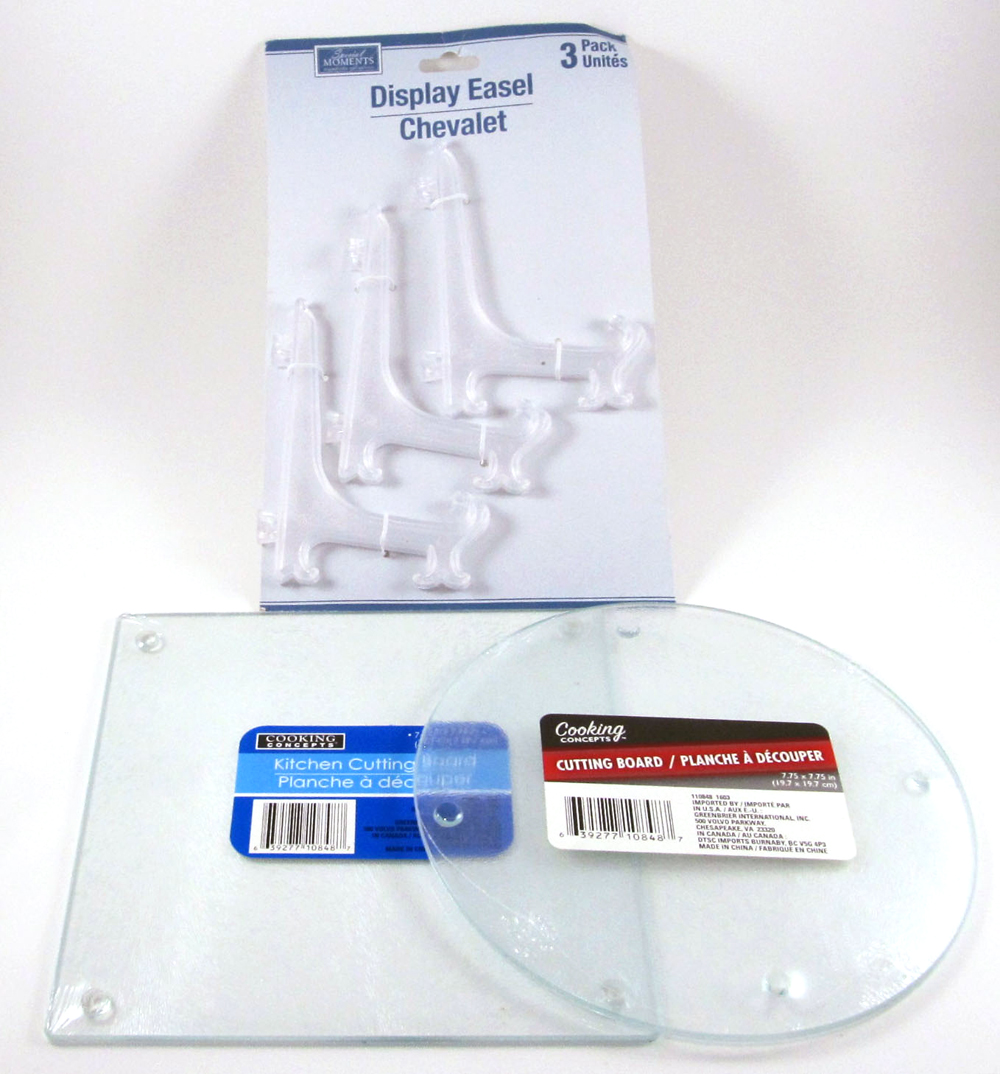
I always check Dollar Tree for these cutting boards and the easels used to display them when I go there. I find them on the back wall near the kitchen utensils from time to time. When I find them, I grab them all. Sometimes they are square like this one, and sometimes they have round ones. There are tiny clear feet on the back that can be removed for placement of the vinyl, then replaced again. The back side is smooth, while the front side is textured. I use a mirror image of the text so that I can place the vinyl on the smooth back side of the glass plates. This way they can be used for cutting without harming the vinyl design.
I generally select colors according to the needs of the recipient. My kitchen is green with red accents, so this design will be a very nice addition to my kitchen décor. I used dark green and a cranberry red Oracal 631 vinyl for this project. I have learned that the quality of the vinyl makes a huge difference in the ease of use. If I use inexpensive vinyl from the big box stores, I find the vinyl so much more difficult to manage with its wrinkling, tearing, and placement issues. Pazzles Wall Vinyl is an excellent quality vinyl, and Oracal 631 is excellent as well. This project took me only 30 minutes to create once I decided on the sentiment and colors. The vinyl cut cleanly, weeded nicely, and placement on the cutting board went very smoothly. That is not always the case with inexpensive vinyl.
To make this project, measure your cutting board and determine the size you want to use. For the round ones, I place a 7.75” circle in my software, and make sure that my design elements fit nicely within that area with space to spare. The square one is 7.75”. I resize my design to 7” square so that it will fit nicely. Make any desired changes to the design, and Adjust the design to fit the size of your cutting board. Be sure to use the Mirror function in your software to reverse the text if applying to the back side of a project.
Remove the plastic wrap, remove the feet, and clean the back surface with alcohol. I trimmed my vinyl to 8” square and placed on my Pazzles cutting mat. I use a brayer over the vinyl to make sure it is sticking well to the mat. The default settings for cutting vinyl worked for me. However, you should always do a tiny test cut to make sure that your settings will give you a very clean cut that is easy to lift off of the backing, without cutting through the backing. Different types of vinyl require different settings.
Remove the cut piece from the mat. I use the Pazzles Pick Tool to remove all of the pieces of vinyl that will not be a part of the project. This process is called “weeding.” The pick tool helps me to get all the tiny bits out of the centers of the letters. As I weed a section, I use my scissors to cut away larger pieces that might get in the way. Once weeding is done, I place the vinyl transfer tape over the design, and I rub my Pazzles Chizzle Tool firmly over the top of the transfer tape, flip the piece over, and rub the tool firmly over the back side of the backing to help release the cut pieces easily. I use the Pazzles Pick Tool again as I lift the transfer tape to make sure that the cut design is adhering well to it. Once the design is lifted from the backing by the transfer tape, I carefully place the design in the center of the back side of the cutting mat. Larger designs can be tricky to apply, but the size of the designs for the cutting boards are easy to manage. I use the Pazzles Chizzle Tool again at this point to firmly smooth the vinyl and press it to its destination. As I peel back on the transfer tape, I again use my Pazzles Pick Tool to help stray pieces stay down on the glass as the transfer tape is lifted. I check the application to make sure all pieces are secure, applied without wrinkles or bubbles. I can put the feet back on simply by pressing each one into a corner, and my project is ready to display!
Julie
Files Used:
Trinity Knot Heart
Corner Flourish
Kitchen Border
Font used:
PN FeatheredgeBold
Supplies:
Pazzles Wall Vinyl in colors of your choice
Pazzles Pick Tool
Pazzles Chizzle Tool
Cutting Board
Easel
Become a Member!
By becoming a subscriber to Pazzles Craft Room you will have access to this project as well as hundreds of other projects, thousands of cutting files, and so much more!Get Pazzles Craft Room!
Join Now for only $19.95!


Good job Julie!