 Your color palette can be an amazing tool to help create your projects. When I was creating my Christmas Nativity I used the Kiss Cut feature to add more texture to my paper. It was a great way to have the chalk I used with the paper really pop, and stand out by sinking into the perforated lines on the paper. To use the Kiss Cut feature to its fullest potential and really maximize the use of your color pallet, I thought I would introduce some of the features you see there. The dropper, or The Color from Screen icon allows you to simply click on a color from a photograph, clip art, or even a line of paper products from the internet. This is a great way to customize your images so that you can see what the final project looks like once its cut out and put together. The color fill under the letter B allows you to use the brush feature, or fill in the image. By simply clicking on the x below allows you to remove the color fill from the image once it’s selected from your screen. The same thing applies to the letter P. This allows you to change the color of your pen line only. Remember, left clicking allows you to completely fill the image in and right clicking allows you to just change the pen line color. An important thing to note here is that the software doesn’t recognize the color of the fill. It only recognizes the line color of the image you’re creating.
The Pen style that you can see underneath of all the color squares there in your color pallet gives you the option of the Kiss Cut feature. Once you have the element in your design selected, click on the dotted line (perforated line). This will change a solid line to a Kiss Cut. It’s important to note that if you don’t click away from the image, by deselecting your design you will continue to make every line in your image a Kiss Cut. To get the line back to a solid line, click on the solid line under Pen style. This may seem like a beginner step to some, but you would be surprised how even some of our oldest Creative Cutter users are just beginning to use this feature for the first time. This function can be used for so much more than just creating simply perforated fold lines for cards. Since we are creating images from a one dimension piece of paper, it’s sometimes hard to incorporate extra details. With the Kiss Cut feature you can create the illusion of ruffles in shirts, button holes, stitch marks and details in faces and animal images too.
If you don’t know where to look, locating an icon can leave you scratching your head! I hope this better clarifies the Kiss Cut, what it can do for your project, and where to locate it in your Inspiration Studio software.
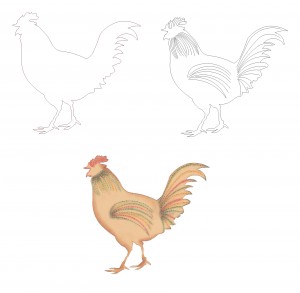
I thought it would be best to illustrate how the Kiss Cut features looks on paper. I started out with just a simple chicken image from the Image Gallery. Then, you can see where I’ve added the extra lines that I changed to be Kiss Cut lines. Finally, you can see my completed Rowdy Rooster chalked, and ready to put on my final card or layout.


I will have to work on this one…
can’t wait to get time to try this – maybe once the grandchildren go home – i need a holiday to get over the holiday.
will have to try it out