 I love making images that have a lot of layers. I’m huge on silhouettes and the look that those images give my projects, but dimension is fun too. I’m big into chalking all those pieces so that when I finally put my project together, everything really pops. In fact, a lot of the images in our Image Library have multiple layers. As you can see Mindy has a great question for cutting paper piecing images.
When I cut my project how do I select just one color to be cut at a time?
Mindy B. Desmoines, IA
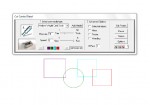
This is a great question, and one that is asked often. When you open the cutting control panel there are square color boxes at the bottom of the window. These represent your cutting lines that are in the image. I recommend clicking on each one to better illustrate what each color represents in the image. This is especially helpful if your image has a lot of cutting lines in multiple colors to help you better determine what papers you might want to use for that project. If you only want to cut one specific line in the project, select that color by clicking on the color square. Once there’s a black checkmark over that color that means that it will only cut that specific color in the project. There is also a button called “All Colors” next to the boxes. Clicking on the “All Colors” button will allow you to cut all the cutting lines that are in your entire project. It’s important to note here that when you do have all the colors selected sometimes these lines can intersect one another. Make sure that your images don’t overlap one another so that it doesn’t ruin your complete project.

