
Nana’s Garden
I love seeing things grow: tulips, grass, roses or a field of wheat. The miracle of growth amazes me in a fresh way every year. Right now is harvest time here in Idaho. The wheat harvest is almost done and soon it will be time for the mint and corn crops to be harvested. I love living in farm country, it makes me appreciate God’s blessings over and over again.
I think the most beautiful growth of all is that of my grandchildren. Their enthusiasm for life, their innocence and joy are truly beautiful to behold. They are the most precious things in my garden of life. Naturally, I wanted to express that sweetness and miracle in my scrapbooking.

A couple of months ago I taught you about paper rosettes. At the time I had played a bit with making Rosette Flowers as well but felt that they deserved a lesson all on their own. When I needed to make a project for Grandparents Day for Scrapbooking.com magazine, I decided to make flower rosettes. What I didn’t count on is how addicting they are! I just couldn’t stop trying one more style of flower. I have no idea what I am going to do with all of the test flowers I made, but I am sure my grandkids will be more than willing to help me use them. 🙂

I never like to waste time reinventing something that has already been done, so I started with the basic rosette cutting file. I cut the original file down so that I only had 12 fold sections. Then by using the Replace with a Segment tool, the Move Point tool and the Cut Straight Line tool, I was able to create new petal designs. I multiplied the new design to make more segments and joined it all together. Following this method I was able to alter the original design into several different styles of flowers.
Watch my tutorial to see how it’s done. I have also discovered a way to make folding cardstock into even the smaller flowers easier. You will want to see how it is done. I hope you have fun growing flowers in your own garden!
Chris
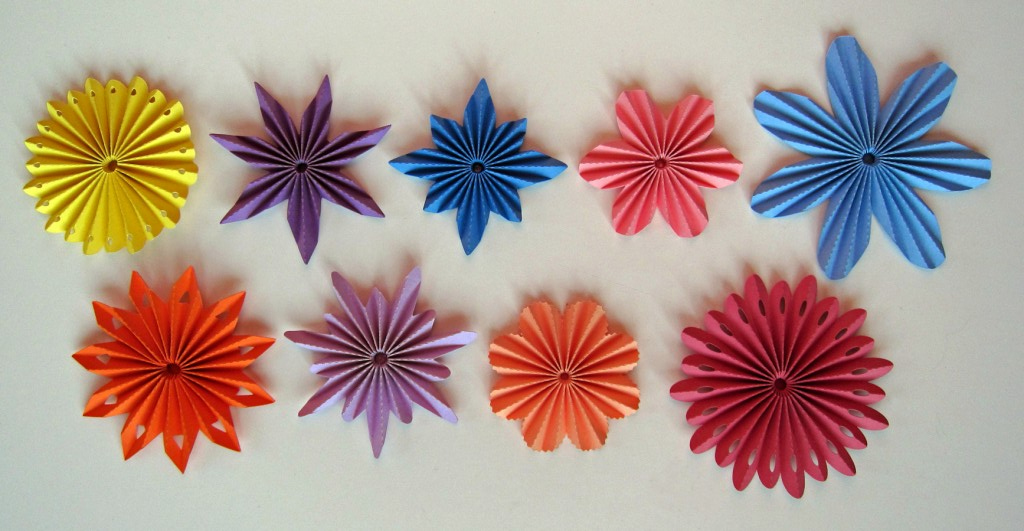
I couldn’t resist giving you the nine rosettes that I created in the process of making the tutorial. The rosettes are all on one file but I also included a photo of all nine rosettes so you can see what they look like. The rosettes shown were made with one folded strip. You can get a different look for each by cutting 2 strips and joining them together. Enjoy!


I love these. I will be going to a Crop for the Cause and wanted to contribute something towards the sponsor’s grab bags and thought…these are perfect! But,I am now thinking of making a cupcake garden with these sticking out. I can put them back to back. I had done something similar a few years ago…but not as pretty as these. They will then be able to take the flowers off of their stems and use them on their pages afterwards. Your timing is always right on the mark! BTW…looks like we have the same table!
The same table? Why am I not surprised? 🙂 I am happy that you are going to use this design for a worthy cause!
Pingback: Pazzles Craft Room » Blog Archive » Nine Rosettes
In white paper or on vellum, with more cutouts these would make beautifully different snowflakes
Chris, Your tutorials are beyond enjoyable. You ARE an instructor and certainly have a natural ability to Teach. You have a very fine and clear voice. The fine points are not skipped over and you don’t assume your viewer knows it all. Any person who wants to do an instructional tutorial should be required to watch you first. Keep the Tutorials Coming !!! Thanks, Lillian