
Are you like me? Do you hate to throw away even the smallest piece of paper? I just can’t bear to toss those nice strips of paper left over from projects. They are too small to cut anything out of but still…they might be useful! Of course, I can use them as borders and under edges of frames but I seem to manage to accumulate more than I can use. In today’s Tricky Tuesday I am going to show you how a quilt project inspired me to find a way to use those strips of paper.
 Our grandmothers never threw a scrap of fabric away, they carefully collected them. When they had enough, they made crazy quilts and strip quilts to use those precious bits of prints and solids. As I was looking through my scraps, I realized that I am drawn to certain colors and that my scraps reflected that. They reminded me of the colorful quilts my grandma made. I didn’t really want to try to piece a bunch of odd shaped bits of paper into a crazy pattern, but strips? That I could do!
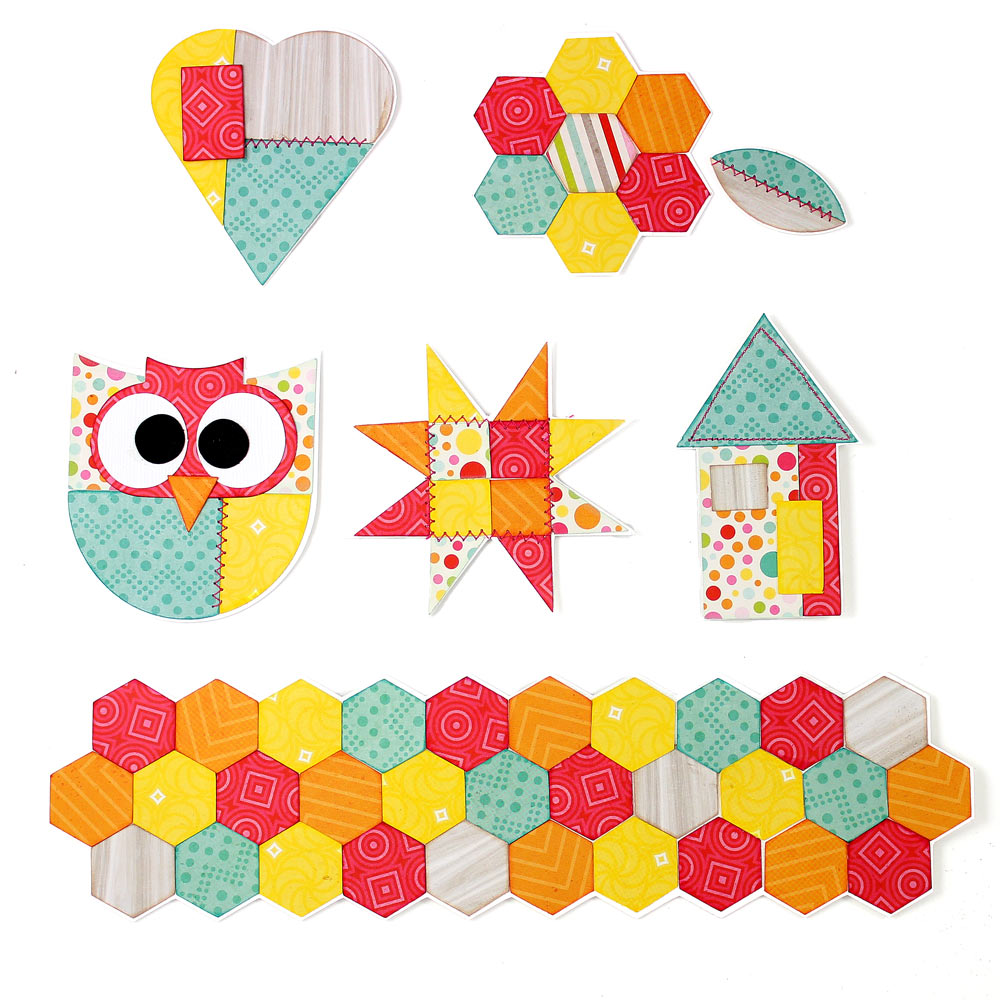
I glued the strips to a base piece of white card stock. I used 8.5″ x 11″ cardstock because not all of my strips were long enough to cover a 12″ x 12″ paper. I mixed paper and cardstock, patterns and solids, textured and smooth papers. After making my quilted paper, I placed the  paper face down on the mat to avoid catching the edges of the strips. I advise that you cut large and blocky pieces for your designs to take full advantage of the striped design.
I was really happy with the results of my project. Just think, I can even use those strips that you trim off of the bottom of cardstock that has the color name and bar code. I am feeling pretty thrifty right now! Be sure to read below to see step by step how I did it. Then go see what papers you can create with your scraps.
Happy Quilting!
A Craft Room Membership is required to access additional content. Please Join Now or
Login!

Christine,
This had been my New Year’s resolution last year…using up all of those bitty pieces of paper. I had been doing this by hand. I would cut my shape on the cutter, run it through my xyron…and then lay the strips on the cut shape. This is so much easier. Thanks for the great tip!
Great Idea!!
Vicki- How often don’t we come up with the same idea unbeknownst to the other person! I think we would be awesome if we ever were in the same room. 🙂
Yet another GREAT Idea!!!!
LOL….yeah….I know…it is kind of eerie, isn’t it?
Another thing that I have done with these strips…while we are on the topic is to take a piece of card stock and run it through the xyron. I then add the strips to the card stock like you did in the tutorial. But, I then take another piece of card stock and cut a shape out of it and make sure that it is centered like a stencil. I place this over the other “striped” paper and make it a quick topper for cards. So, if you have these striped papers on hand…you can use either method for cards or layouts. They even look nice on the sides of boxes.
Maybe if we all use each others ideas, we might put a dent in our scrap paper stash. LOL
Here’s another idea~ I weave my paper strips and glue the weaved piece to backing paper. Then I use it as a background, mat or cut out large shapes to decorate page layouts and cards.
When you lay your paper upside down, do you have to set your pazzel to “mirror” so the letters come out right? Or do you just “go for it?”
OH, never mind! I wrote my comment after just reading the overview and not the step by step instructions where you cover the reverse. I’m new to pazzel, so I assume that is the “mirror” setting. I’m so smart already on this Pazzel stuff (after two projects I scare myself sometimes…LOL!!!)
Eugenia, you are absolutely correct. While on your workspace, press the M key on your keyboard and you will bring up a window that will let you mirror individual items on your page.