Are your cutting files neat and tidy? Do you have them arranged so that they are right at your fingertips? I love the concept of being organized but rarely do I actually accomplish it. I may start well but actually getting it done is not so easy. I have a new computer and I’m determined to do a better job of organizing my Craft Room Image Library files this time around. To make sure I do it right, I decided to make a video tutorial as well. That, hopefully, will make me stick with it!
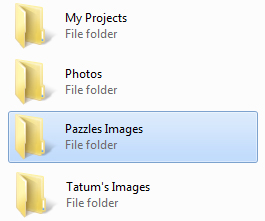
The Craft Room Image Library itself is the best example of how to arrange those wonderful cutting files. Everything is organized into categories and sub-categories already. All I need to do is replicate that on my computer. If I have the right folders to put the cutting files into, I will be more likely to make sure I save them to the right place.
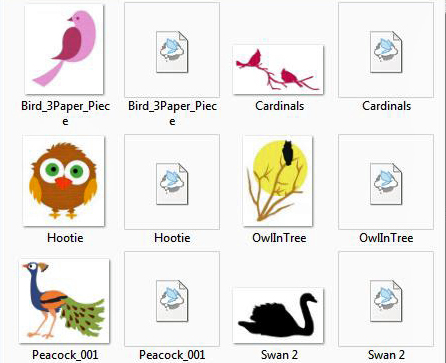
I like to save my cutting files to my computer instead of the Inspiration Studio Image Gallery because I teach and travel a lot. At times I am not on the same computer. If the files are in a folder on my computer I can easily use a flash drive to transfer them back and forth. Keeping the cutting files organized has become essential for me. I also want to make sure that I know what the cutting file looks like. The easiest way to do that is to save a copy of the file picture when I am saving the cutting file. If I put both of them in the same folder, they will end up side by side and I can easily find what file I am looking for.
Watch my video to see how it’s done. Then take some time to set up your own Image Library on your computer. It has really streamlined my search process when I need a cutting file. Since I just published the fact that I am resolved to be better organized, I better stick to it! I just know at least one of you is going to check up on me once in a while. 🙂


If I have not been saving a picture of the file over the years (yes, hundreds), what is the easiest way to save a picture of it now?
Paula, I too have that problem. Unfortunately, there is no “snap-your-fingers-and-its-done” answer. I am opening the cutting file, then I thicken the lines if I don’t have any color in them. Next I select the image. I then choose Export under the File menu and save the image as a JPEG. Make sure you name the image identical to the cutting file and in the same folder.
I wouldn’t tackle this job all at once, rather choose to do a dozen or so at a time. 🙂
I have been trying to watch the video on how to corral your images and adding the picture but have been unsuccessful. Any ideas from anyone? Thank you.
Nina F.
Chris, THIS was the best tip ever that I came home with from the Idaho retreat. 🙂 (actually, there were so so many great tips but for today this is my fav ;). I began my picture saving that same night in my room. Klo reminded us that we can login, go to the Library and click on “View Downloaded Documents”. I started there because these were definitely cutting files I had; and as I downloaded new files I took the picture along with it. Yes, it was a long haul but of my near 3000 files I am 80% picture perfect 🙂
I love you Pazzles!!
THANK YOU. This is the best method I have come across for having a visual representation of the cutting file. I really got fed up trying to add them to the blue book and converting them to a JPG by opening up each file seemed too daunting a task. This method is so quick, once you have saved one image into a folder it’s only 3 clicks of the mouse to save further images and they don’t take up a lot of space because they are thumnails – it makes me wonder why I didn’t think of it myself. The Craft Room subscription is well worth the money!
Paula, if you have saved files from the Craft Room, you can use Susan’s method if you prefer. We now have a link in the Library that says View Downloaded Items where you can see thumbnails of the files you have downloaded from the Craft Room. Since I have my pictures stored in random places and have other files as well, it is easier for me to create the JPG myself.
Nina, make sure you update your Apple Quicktime software.This is especially important if you are using Firefox. Dave, our tech support guy, tells me that in some cases it is better to delete the Quicktime and reinstall it.
If you still have problems, please call tech support and talk to Dave. He has been able to get everyone with problems up and running. 🙂
Susan, thanks for the tip! 🙂 We love you too! 😉
Chris
I love this tip! Like Susan, I’ve been doing this since the Idaho Rereat. One suggestion that would be helpful to me (& maybe others): Every Friday when the new images are loaded into the “New” folder, would you indicate which folder they’re going to be saved to? I’m trying to keep all the images in the same folder as the Craft Room. Thanks!!!
Thanks Ladies! I’m well on my way to saving pictures of previously downloaded files. I’ll do a category at a time to lessen the amount of time I’m at the computer. This is so awesome for this organizational fiend! P.S. I’ll probably use my files more now that I can see them first!
I still can’t get the video to play… on computer or phone??? I’ll keep trying…
As for storing the images from the library I have always copied it just like the library on this site…in the blue book and on my computer… I’ll have to try saving them with the picture on my computer that would help out a lot…great tip thanks…
Ta Da!!
I am happy to announce that there is now a section in the forum that tells you where the New Images will be located when they are moved.
(Little curtsy and big smile!)
~Chris
Chris, that quick response is exactly why I love Pazzles! You always listen to your customers!! SUPER customer service!
I really want to see this!
first I got just the sound, so I downloaded new quicktime, Now I have just a blank black screen.
Help!