
No one wants to admit it, but I’m sure we all have drawers that look like the one on the left. This is my Tsukineko Dew Drops drawer. I bravely brought this ugly mess from home to the office—not to show off my love of tiny ink pads (good for distressing!), but to show you how to save money with your Inspiration electronic die cutter by making your own custom drawer dividers out of chipboard.
These drawer organizers are great for sorting lots of objects of the same size, but since you control the measurements, you can make each column fit objects of different widths. They are so simple to put together because they are just notched chipboard strips—no glue involved! I love it because I can cut the dividers small enough to make the ink pads stand on end without falling over every time I take out the drawer! It’s a really handy system, once you get the trick. And the trick is math.
Yes, sadly, there is math involved, but we’re going to make it easy by using calculators, computers, scratch paper, and rulers to help us do the work.
 First, you should take accurate measurements of the objects you want to store. You’ll need to know the depth, width, and height. For my Dew Drops, They are 2 inches high, about 1.25 inches wide, and about .875 inches deep when standing upright. To make sure that the dividers don’t fit the ink pads too snugly, we want to round up the width and depth to the next 1/8th inch measurement. I rounded up to 1.375 inches wide and 1 inch deep.
Second, take the measurements of the inside of the drawer. My drawer is about 9 inches wide by 11.75 inches long. To make sure I’m not fitting the drawer too tightly, I’m going to round down the width and length to 8.75 inches and 11.5 inches.
Here’s where it starts to get tricky. We need to grid out how many ink pads will hold; how many columns across and how many rows down. To figure out the number of columns, divide the width of the drawer by the width of the ink pads. For my example, it’s 8.75 inches divided by 1.375 inches = 6.36 pads. That means my drawer will hold six columns of ink pads across, and .36 of another ink pad… which I can’t do. Since it’s not a round number, it means I will have extra space on the sides. How much extra space? That’s easy. The width of the 6 ink pads is 1.375 inches times 6 = 8.25 inches. My drawer is 8.75 inches wide, so I will have .5 inch extra space. I want to have a little extra space on each side of my dividers, so I’ll cut that in half, down to .25.
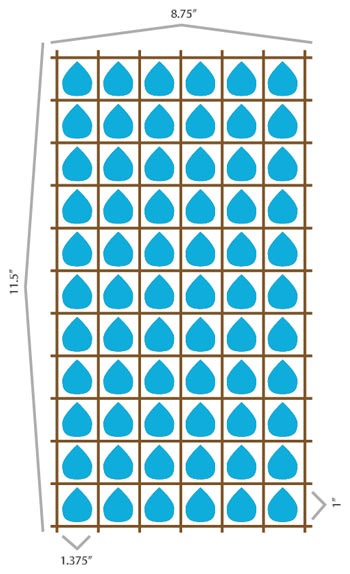
Repeat the same steps for the rows/depth of the drawer. For my example, the drawer will hold 11 ink pads in one column, as 11.5 inches of drawer length divided by 1 inch of ink pad depth gets me 11 pads in a column. Conveniently, there is another .5 inch of remaining space, or .25 inch remaining at the top and bottom.
It’s very helpful to draw it out on a piece of paper, with all the math and the measurements. For my drawing, I made blue tear shapes to represent the ink pads: six wide, 11 deep. Then I drew lines around them all to show where the chipboard strips will be. On my drawing, wherever a row and column line meet, there are notches in the chipboard. You can see in my drawing that I have six columns, but need seven vertical strips of paper to make them. I have 11 rows, but need 12 strips of paper to fit them.
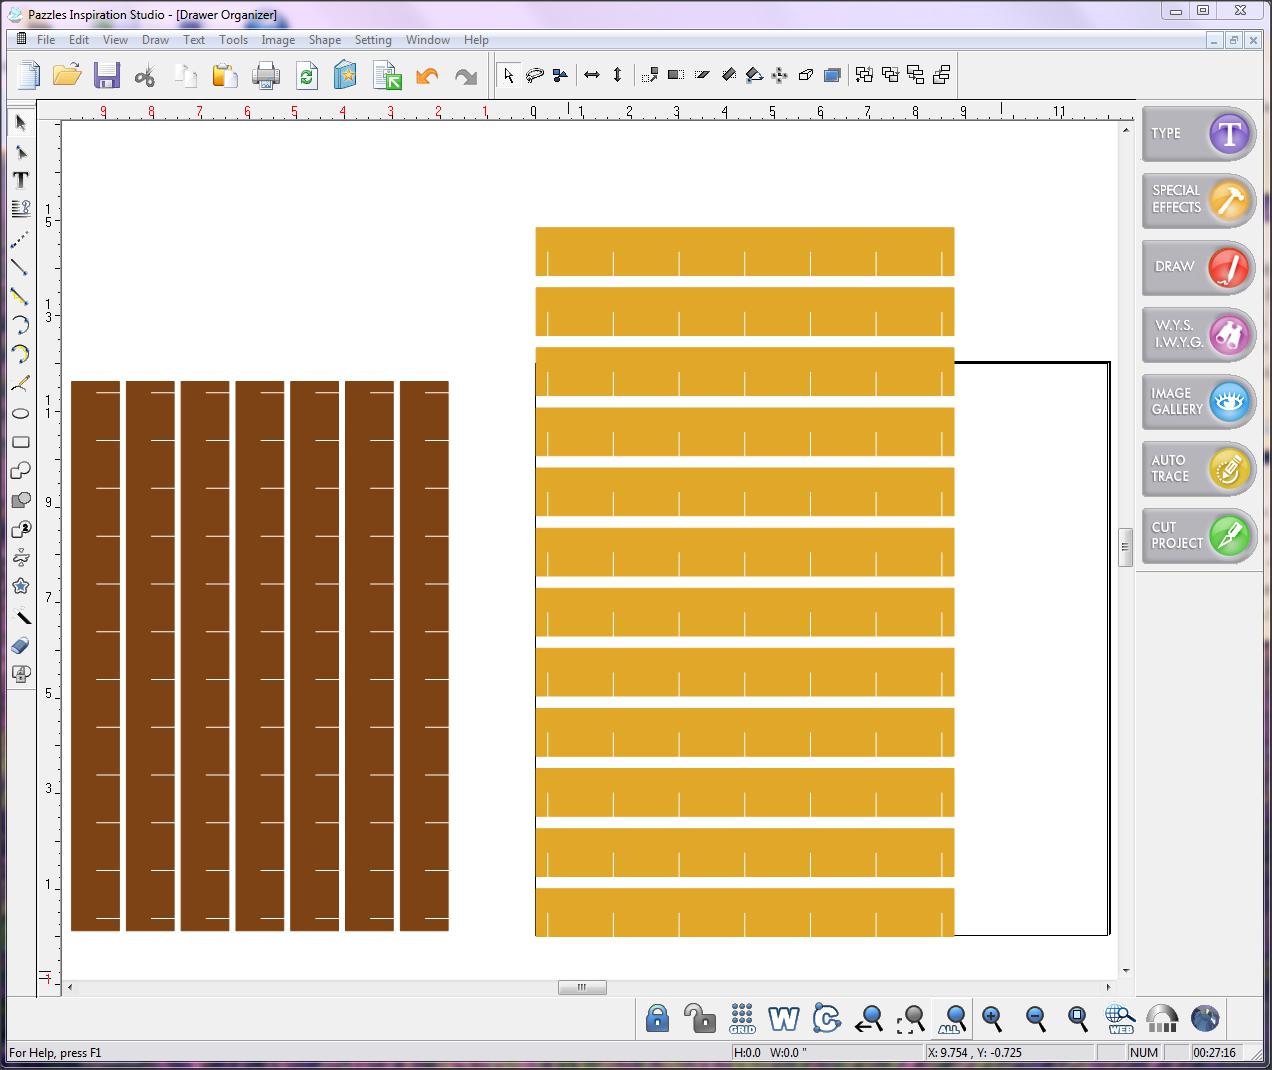
Now that we know all of our measurements and how many strips we need, it’s time to set up the cutting file in Inspiration Studio. I need to cut a lot of skinny strips of chipboard with notches in them to fit them together. How to put the notches in the right spot is pretty easy using the tools in the software.
The Dew Drops are about 2 inches tall. I don’t want the dividers to be as tall as the ink pads or I won’t be able to see the colors. I want them to be just tall enough to hold them in place, so I made all my strips an inch tall. Draw a tall skinny rectangle for the column dividers: one inch wide (as tall as the dividers should be) and 11.75 inches long (to fit the length of the drawer). Use the Transformation panel to adjust the width and height as necessary.

Finished vertical strip, with notches.
Now, we’re going to use some positioning and measuring tricks to put the notches on the strips exactly where we want them. Use the Position tool in the Transformation panel to move the lower left of rectangle into the x/y 0,0 point on your project. This means the bottom left of the rectangle is touching the bottom left of the page, and the corners are lined up exactly.
Next, draw a straight line to be a notch. Make it half the width of the strip, or in my example, .5 inches. Remember the extra space from before? This is where we use it. Take the .5 inch line/notch and use the position tools to move it to X-position .5 inches and Y-position .25 inches. This means the notch cuts halfway into the strip, starting .25 inches inside the strip… the wasted space stays on the edge.
According to my grid, I need 12 notches along each vertical strip. I have the first one, I need eleven more, and I will use the Edit > Multiply Object function to place them. I set the number of copies to 11, the vertical spacing to the depth of my ink pads, 1 inch, and select to multiply upward vertically. Pressing ‘OK’ positioned the remaining notches perfectly! Even the extra .25 waste space is there now at the other end of the strip. Group the notches with the rectangle, and you have your first vertical strip. We need six more, for seven total vertical/long strips.
 Repeat the same process for the row dividers. In my example, I need 12 rows that are 8.75 inches long, with a notch every 1.375 inch, starting .25 inches from the end for the waste space.
Now that you have all all the row and column strips, arrange them to fit your chipboard and mat, and start cutting. There are great tips for cutting chipboard in the Craft Room, so I won’t cover it here. Cutting and assembly are the easy part, compared to all the math! To assemble, just line up the notches and push the strips together. It might be a little lopsided if you used thinner chipboard (I confess, mine was!), but it will shape up when you fit it in the drawer with all the contents in it.
I have been dreaming about making this for weeks and I am so happy with the finished project! I had the one big ink pad, so I cheated (gasp!) and cut two spaces out with scissors (double gasp!!) once I knew where I wanted it to fit. (It divides the Brilliance from the VersaMagic. I’m weird, I know.) I’m so glad I was able to do this with my Inspiration, instead of leaving that mess, or paying for something more customized. Next up… my makeup drawer! It’s even worse than the inks!
Happy Crafting!
~Amanda


Very nice Amanda.
Thanks, Regina! I hope you’re able to adapt it for your own purposes.
Holy Cow Amanda!! What a great idea. Thank you, thank you, thank you! We can’t all have Klo’s new craft room but I can at least have this.
My head is spinning with the ideas. Thank you so much. I love organization, and I have a few of these drawers in my craft space.
Brilliant idea, ink pads one day, sock drawer another day!
What a concept!! Get Organized? LOL
Here’s an idea, since you have already done the “Dew Drops” how about giving us the cutting file. (I’m basically lazy)
Dana,
I’ve added the cutting file for Craft Room Members, but keep in mind it will only fit Dew Drops and only in a drawer of that size. To fit any other size drawer, you will have to modify it.
No worries on the lazy part! 😉 How long do you think that drawer looked like that!?
-Amanda
This tutorial was posted nearly two years ago but it will always be necessary. I’m in the process of converting the room that merely houses my craft stash into one that I can actually find and use my supplies. I found your tutorial just in time. Thank you!