I have a three foot stack of Thickers Alphabet stickers in my scrap room. They are a reminder of the dark days before Pazzles when I had to plan my titles around the fact that I had no E stickers left. Now I cut whatever title I want and have no limits on letters. We all know how to cut a basic title from cardstock. Layering cardstock colors and welding words can give you a different look to your title, but today I wanted to share with you a few other creative ideas for titles using your Inspiration and the new InVue Software.

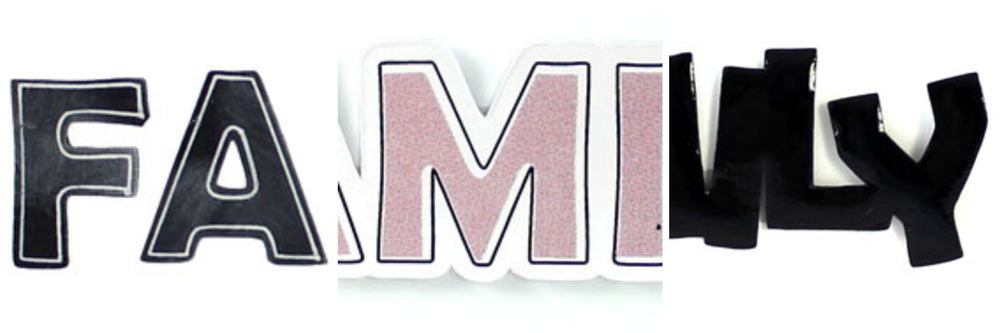
The first is a faux chalkboard look. Here’s how I created this look in InVue:
- Type your text. Change the pen line and fill to black. Make sure your text is selected.
- Select the outline/inline option from the left sidebar. You will see fill and pen line colors represented within that box. Change your pen line to gray and your fill to black by dragging those colors from the color palette on the right up into the Outline/Inline color selections.
- Select inline with a setting of .04 and click preview. Click on the green arrow just below your text to accept the changes.
- Using black cardstock and a white pen, first draw the gray inlines with a white pen, then cut the black letters out.
- To give them an extra chalk effect dip a sponge in some white ink and then lightly rub it across the cut out letters to give them chalk smudges.

The next idea uses the print and cut feature in the Invue software. Follow the same steps as above to create an inline.
- Make sure your main letters are black pen/white fill. Right click on your title and select Text Manipulation>Convert To Path.
- Select each of the inline letters and change the pen and fill line to a color of your choice. Move the inline slightly off center from the main letter with the arrow keys. In my example I started with the first letter and moved it two arrows to the left and two arrows down. I repeated the same standard for each letter.
- Once you have everything set up, select all of the text and inline together and group it by clicking the blue + sign on the mat.
- Select the outline/inline button again and this time select contour with a setting of .12. Accept the changes and you should have a welded outline. Make sure the fill for that outline is white and pen color light gray. Select that outline and then unselect the printable button on the far right in the line type window. This will make sure your outline is for cutting only and will not print.
- Complete the print and cut steps as outlined in the getting started manual.
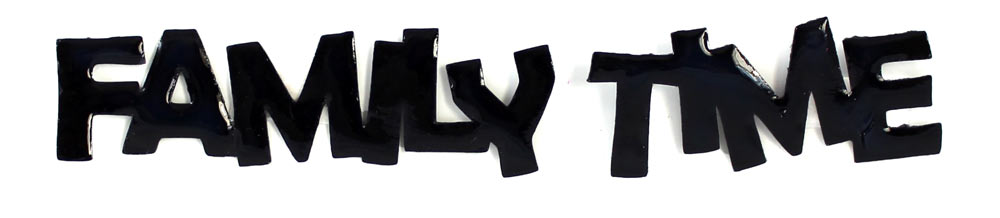
The final example has more to do with a dimensional product, than it does with a cutting technique. Coating a cut title with dimensional gloss gives it a smooth plastic feel.
- Type your text. Convert the text to path by right clicking on your title and selecting Text Manipulation>Convert To Path.
- Move your letters up and down and tip them side to side. Make sure each letter is touching both letters next to it.
- Select all of your title. Right click on the title and choose Welding>Union. This will weld your title.
- Cut out your title. Use a dimensional gloss product such as Ranger Glossy Accents or JudiKins Diamond Glaze. You could also change it up with Ranger Stickles Glitter Glue for a glitter effect. Let your title dry.
I hope this gives you some fun new ideas to try.
~Michelle
And because I know you’ll ask, the font I used for the samples is Berlin Sans FB Demi.