kristaspapercafe


Spring Hat and Cake Mini ...

I am anxious for spring. I need to see the fresh colors and blooming flowers. Maybe a beautiful 3D hat and cake will encourage an earlier arrival. This can be given for many occasions: May Day, Mother’s Day, Graduation, Birthday, Just Because. This is an idea that will take you just minutes to complete.


Instant Film Shaker Cards

Today let’s use an old idea to make something new. Instant photos have become the rage as of late. I have chosen to use an “instant film" cutting file to make greeting cards. In the Pazzles’ Craft Room Library you will find a pre-designed scrapbook title named Snapshots. I used only the “instant film” of this title for my card. I increased the picture to 3 inches wide. That is a good size to fit on a 4.5 X 6 inch card. You will see that I made a plain picture as well as some with words at the bottom. The words add a tad bit more fun. We can make it even more festive by adding confetti to the “picture.” This means that the photo portion of the “instant film” needs a “window.”


Salt and Light Framed Vinyl ...

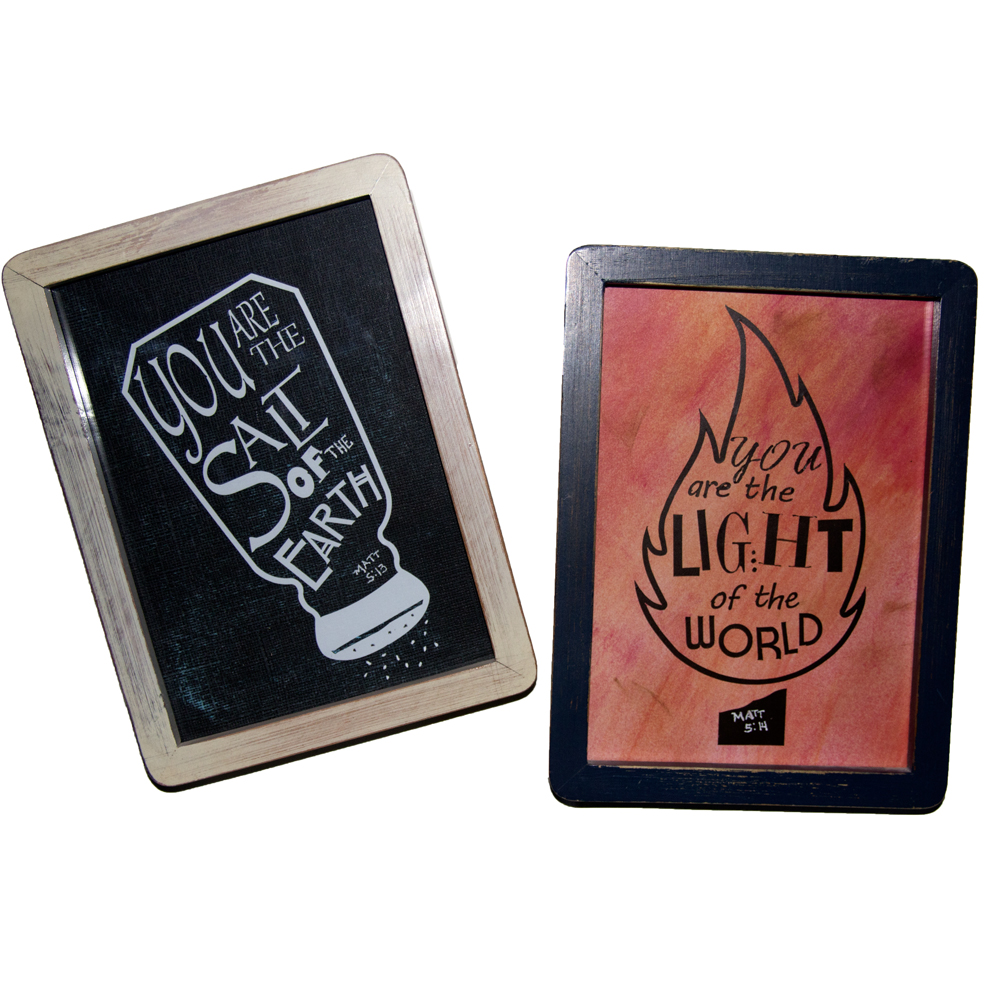
This month was a new challenge for me. I was assigned to create a project around the theme “Typography.” If you have used the fit text to path option with the Pro Software, you can see where it might be easier to manipulate the text. However, I used the newer InVue Software to create my project. As the InVue Software does not yet have the fit text to path option, I was a little lost at first. Then I realized that working with the text was easier and just as fun. By foregoing fit to text, I was able to manipulate each letter freely. I did draw the salt shaker and flame myself. However, you can find a salt shaker and flames in the Pazzles Craft Room Library. I cut the outline for the shaker and the flame, as well as the type, out of vinyl. I adhered the vinyl to cardstock. I used a white gel pen to write the scripture address, as it is so tiny. My finished, framed pictures each measure just under 6" X 8".


DIY Menu Planner Board

Organization Week: Menu Board Planner

It is a brand new year and time to get organized! Don’t huff and groan. I am going to start you off easy. I created a striking, modular Menu Board. Sit yourself down here at the hearth and I’ll teach you how to make one for your kitchen. It was wonderful to design my entire project in the Pazzles InVue Software. The software is a great tool for getting your ideas down “on paper” yet still be able to easily manipulate it and make notes. To play around with shapes, their sizes, and various fonts is a blessing for this non-artist. My metal sign measures 12 X 16 inches. In my InVue software, I created a new file measuring 12 X 24 inches. I chose and made shapes that represented the image in my head. Originally I was going to simply cut circles out of card stock for the days of the week. As my project evolved, I decided to use decorative bottle caps. Each letter representing the days of the week are cut from Pazzles Vinyl.


New Years Eve Crackers

I was not aware of “crackers” until I became an adult. They are just as fun for me as for kids! There are two cracker files in the Pazzles Craft Room that you can use for any special occasion, Cracker Box and Cracker Box 2 . Today I have dressed them up for New Years! These are very easy to assemble. I also added Print & Cut images from the Happy New Year Title as a bonus decoration.


DIY Ornaments: Santa Box

I am excited to present to you this Jolly Santa Ornament. He went together quite quickly using the Tall Pyramid Box file. I used two files from the Pazzles Craft Room Library to make the white hat trim: Large Circle Scallops and Scallop Tag. With the InVue software, I layered the oval in front of the circle. Then I used Subtract Weld for the final look (deleting any extra pieces). You can use the same scallop for the ball on the pointed top of the hat. Santa’s moustache came from the Six Moustaches file.


Thanksgiving Table Decorations

Thanksgiving Table Decorations

I am decorating my Thanksgiving table with Pazzles vinyl. This was my very first attempt to cut vinyl. I do not know what I had been afraid of. It is so easy. I started with the Give Thanks phrase from the Craft Room Library to decorate a vase for a centerpiece. I was working with small pieces, so I did not use the transfer tape. I did however, print out the image, tape it to the inside of the glass vase and use that as a guide to lay down the layers of vinyl.


Pumpkin Shadow Box

Pumpkin Shadow Box

This is a delightful, but quick creation that you can make with the assistance of your Inspiration Cutter as […]


Pen Paper Keeper

Pencil Homework Helpers

Today we are doing our homework! It is back to school time and everyone is getting prepared. I have created two quick back to school items using one file from the Pazzles Craft Room. I am using the School Pencil file to help both the teacher and student! A note "FOR" the teacher. I found an over-sized clothespin at the craft store. Mine measures just under 5 inches in length and over 1 inch in width. I used my Pazzles software to draw a rectangle representing the clothespin. Then I placed the rectangle on top of the pencil file, and re-sized the pencil to fit just around the clothespin.


Project Rewind: Paper Lanterns

Today we have a project rewind. Design Team member Krista Petersen-Hong has taken and old project and made it new again! Instead of rewinding, I want to help you un-wind! Although our world is very modern and sterile, we can still get a glimpse of nature and its simplicity. I really like how Michelle used the 3D bird cage to make these beautiful winter lanterns. I have taken the same 3D pattern and made a lantern for enjoying the summer evenings. I left the top off the original pattern (snow & holly on Michelle’s lantern) and replaced it with leaves that I found in the Inspiration Studio Library and white flowers that are made with a hand punch. I chose a rustic color for my lantern and added brown inking to give it a rusted, weathered feel.


Baby Week: Baby Shower Banner ...

I hope you are enjoying celebrating babies here at Pazzles. The cuteness is limitless! I have used the Dimensional Bow from the Craft Room to create a darling pink banner to welcome a baby girl. At first I was going to use only one layer for the bows. I was worried that the bows would come out too big, but I am glad I used other layers. So Cute! You can always change the size, but I went with the imported size. This file is so easy to use. You will want to make extra bows to spread throughout the room! In the center of the banner, I have used the Onesie file from the Craft Room to announce the baby’s sex. It is strung together with a coordinating, but bright, hemp string.


Goodbye Braces Celebration

Ha! I love this. By now you know that I like dimensional creations. I like the challenge of taking a Pazzles files and doing something out of the ordinary with them. When the Perfect Smile Card appeared in the Pazzles Craft Room Library, I could not resist it! Do you have a young (or not so young) person in your life that is finally getting their braces off? Here is a cute and easy idea to celebrate that occasion. I used that Perfect Smile to make napkins rings! I just cut a 7" by 1" strip of coordinating paper for the ring and attached the smile.


Gum Tube Sand Shovel Favor

Are you having a sizzling summer? Then it’s time to cool off at the beach. Grab your sand bucket, shovel and let’s go! Today I want to show you an idea for a party favor or gift box. I started with the Pazzles Craft Room file Sandy Bucket. There is sand, a bucket and a shovel. You will see that I altered the original pattern just a tad. I wanted a separate shovel that was more or less 3 dimensional. I enlarged that pattern so that I would have a finished creation large enough to hold a gift as well as the gum tube that I used to make the shovel. To make a sand bucket, I needed to increase the size of the Takeout Box (5-A from the software library). Because the box is so large, I had to cut it by making it two pieces. I also cut the box without its top.


Graduate Bag

June is quite busy for some of you. Are there grads and dads that you want to honor? Pazzles can help. The Craft Room makes celebrations quick. I found several great files that help me celebrate these to special occasions. First I made some simple graduation cards. I even used the Print & Cut method to make my sentiments. For the cards I used the 2014 Photo Booth Hat and the Grad Girl files Next I made a small gift bag for a boy graduating.