No Class: July 27, 2014
There is no class this weekend, this is a great opportunity for you to watch past classes or videos or just spend time creating. ~Klo
There is no class this weekend, this is a great opportunity for you to watch past classes or videos or just spend time creating. ~Klo
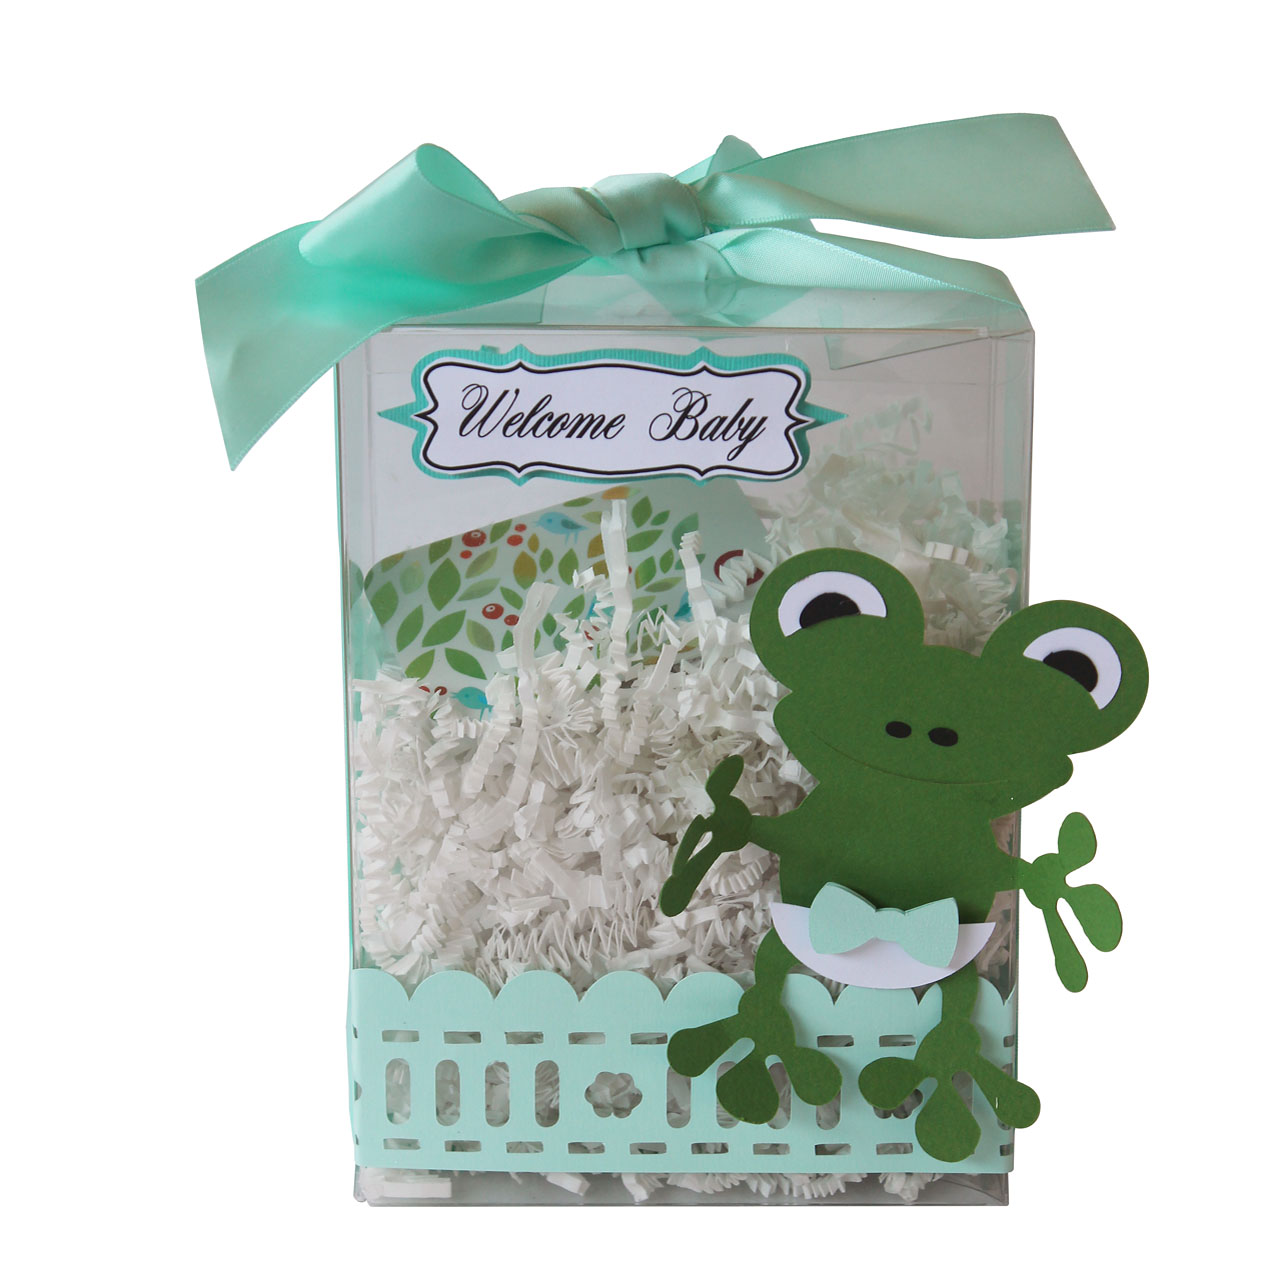
Gift cards are great for baby showers, as this allows for the mom to be to buy exactly what she needs. I thought it would be a great idea to dress up a packaging box I had saved. I used the Baby Frog, Ribbon Slot Borders and Scallop Mat files which can all be found in the Craft Room Library. Tuck cash or gift card inside this gift card box and you are ready to go.
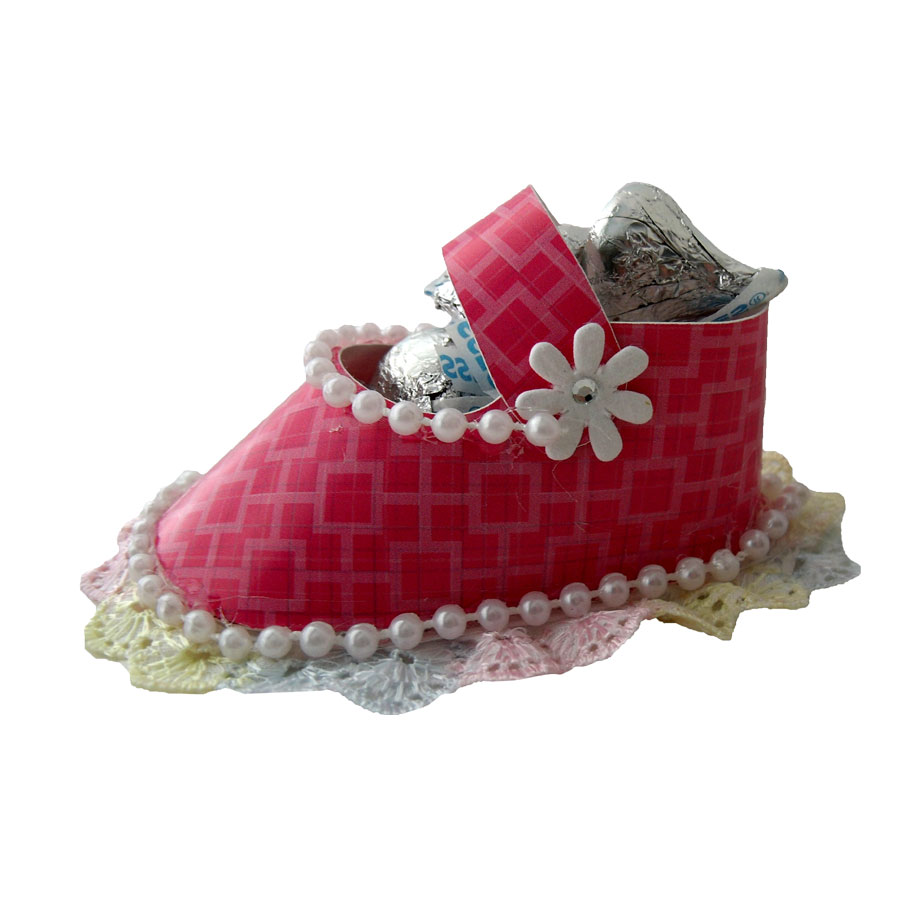
I used the cute little baby bootie file from the CD51: Party CD to create the adorable bootie favors. I used some Die Cuts With A View papers from the baby girl stack. I simply added some lace and pearls around the bottom and a pretty flower with gem for the "snap". I filled it with some candy kisses and they were ready to go! For my hot air balloon favor, I used the free Berry Basket file for the base. I hot glued two bamboo skewers and then inserted them into the balloon. The balloon is from the On the Move Hot Air Balloon file.
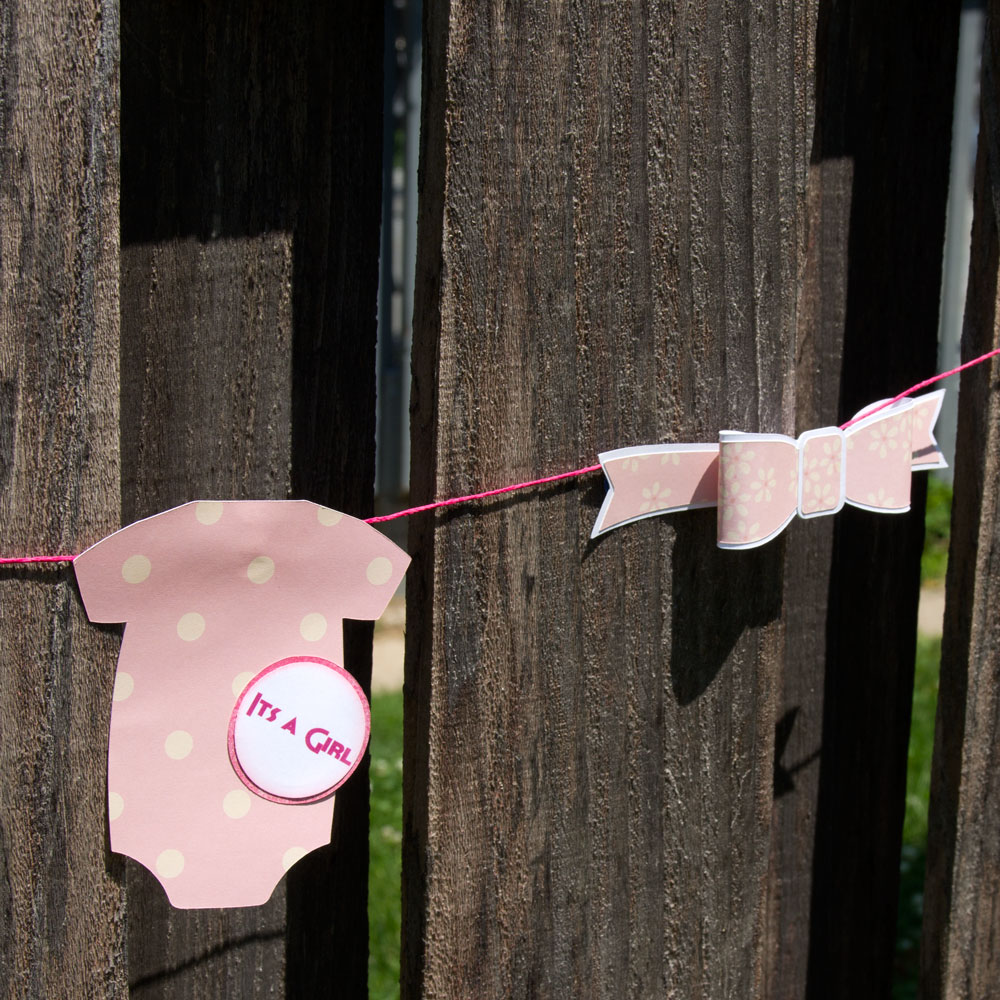
I hope you are enjoying celebrating babies here at Pazzles. The cuteness is limitless! I have used the Dimensional Bow from the Craft Room to create a darling pink banner to welcome a baby girl. At first I was going to use only one layer for the bows. I was worried that the bows would come out too big, but I am glad I used other layers. So Cute! You can always change the size, but I went with the imported size. This file is so easy to use. You will want to make extra bows to spread throughout the room! In the center of the banner, I have used the Onesie file from the Craft Room to announce the baby’s sex. It is strung together with a coordinating, but bright, hemp string.
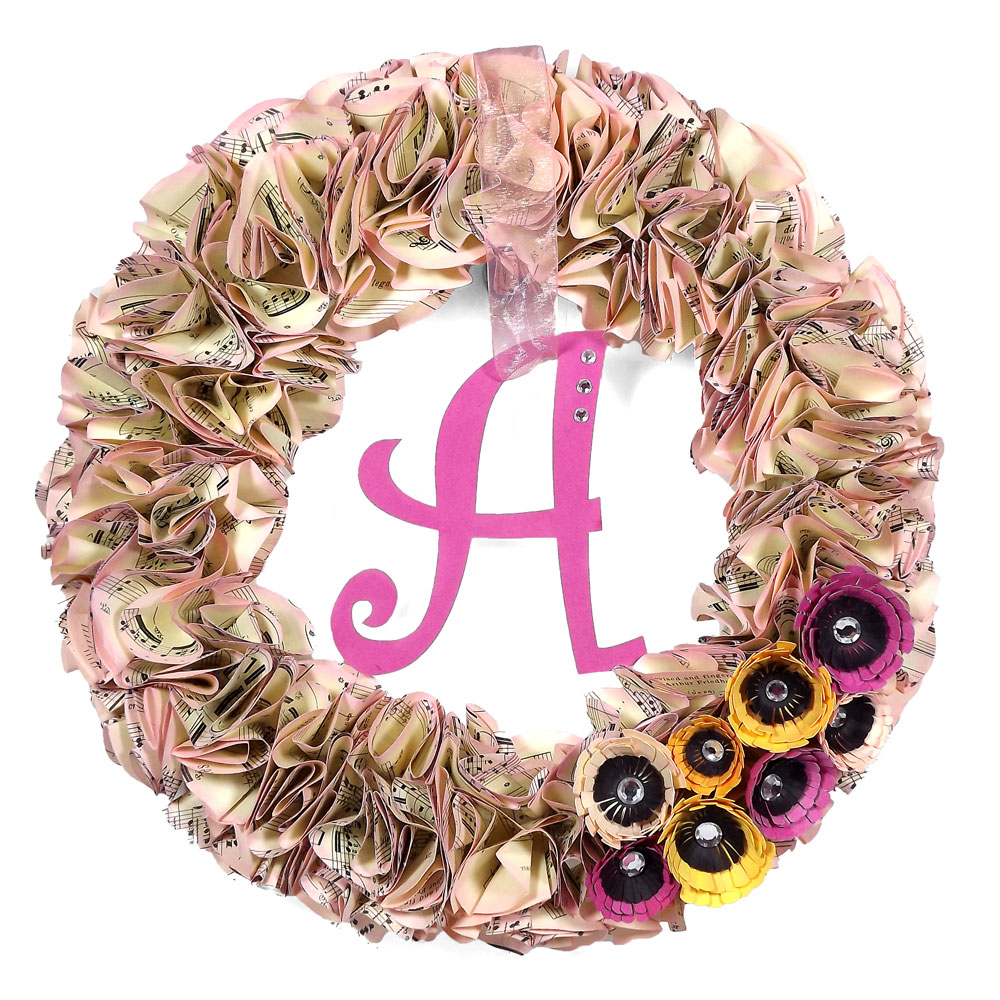
This wreath will welcome your guests as they arrive to your baby shower. It will set the tone and get your guests excited before the baby shower even starts! Once all your guests arrive you can move your wreath inside and use it for an indoor baby shower decoration too! It can easily be changed from girl to boy with just a little tweaking. Instructions: I cut about 130 3.25 inch circles. Yes, I know this sounds like a lot but it goes super-fast using your Pazzles Creative Cutter! I used a 90 year old music book for mine but you can buy a cheap book at a thrift store, use printed scrapbooking paper, print your own on your printer or just buy colored copy paper. I think it would be precious to use an old nursery rhyme book. *NOTE: The paper you use for the circles needs to be the thickness of copy paper or the pages of a book. You don’t want to use cardstock for this project. The paper needs to be flexible as you are gluing them very close together and cardstock creases easily, giving your wreath a more angular look. Instead, we are going for a softer feel since it is for a baby shower.
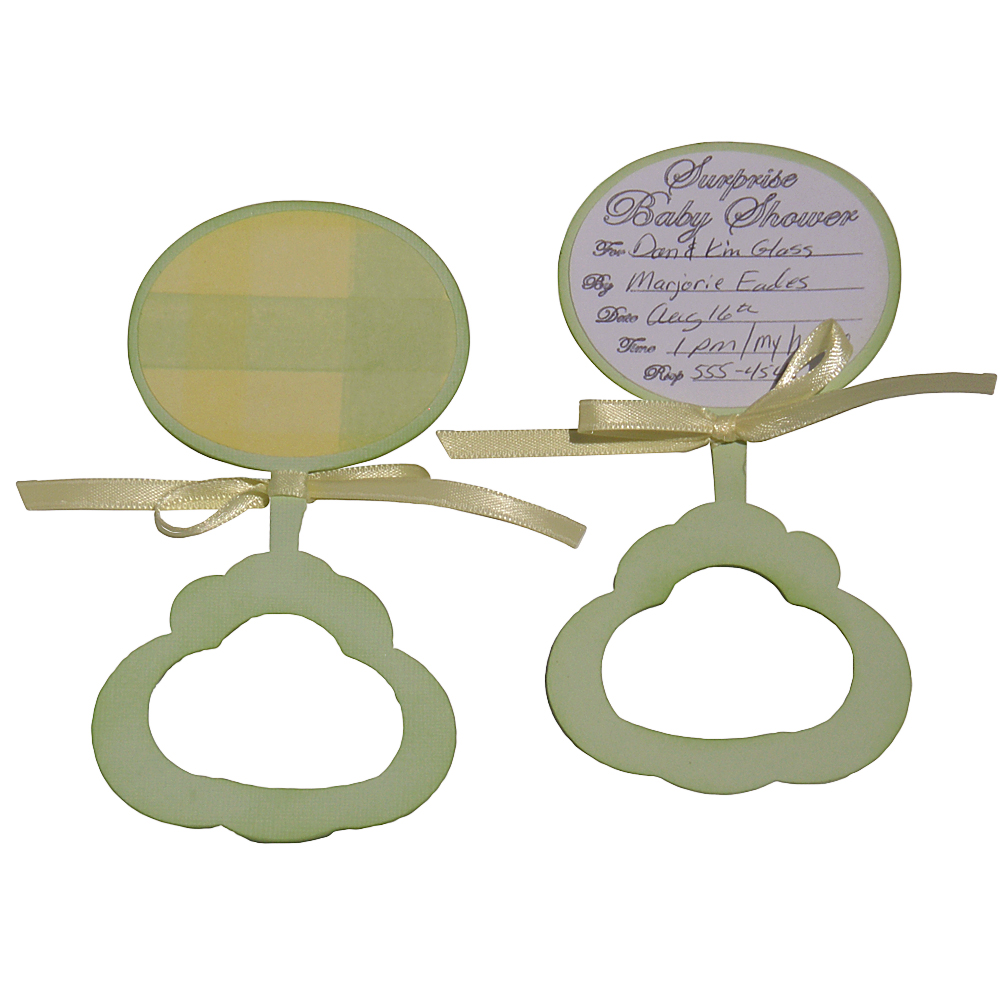
It’s Baby Week and who doesn’t love babies? So for you I have created a shower invitation using the Baby Rattle file. The first thing I did was to resize it to fit in a standard invitation envelope. I then added two circles, one for the front and one for the back. The front one was for information (i.e. who, when, rsvp) which I did with the Pazzles Pen Tool. I used Edwardian script font and then hand wrote the information, but you could do the whole thing with the Pen Tool. The back circle was for decorative paper. I added some inking and a bow and it turned out great. It's very simple and very fast. You could do a lot of these in no time at all and you can get six out of one piece of 12" x 12" cardstock. Tip: make sure you make an extra one for the mom to keep in the baby book.
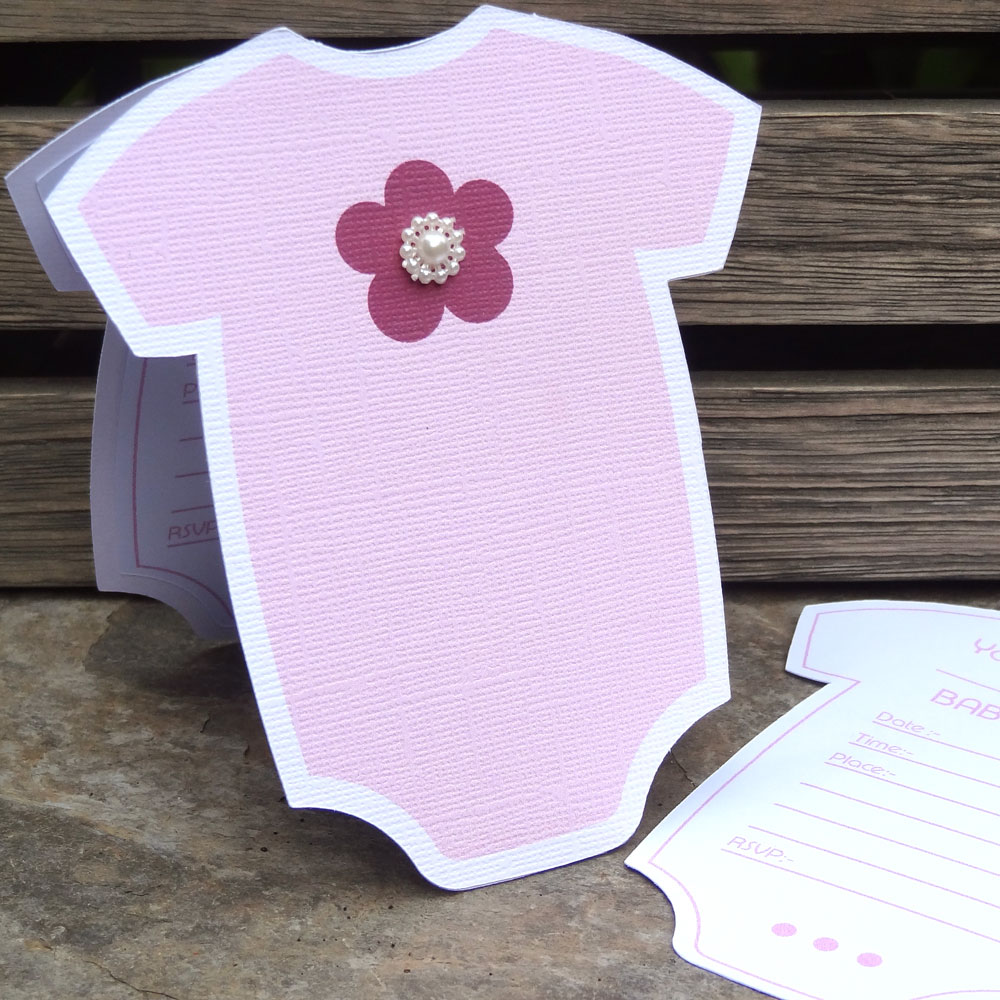
Hello fellow crafters, Joanna here today highlighting some Baby Shower printables using Print and Cut with your Pazzles. I thought I would share with you how versatile using the Print and Cut technique with your Pazzles can be to create even more creativity. You could of course paper piece some of the elements such as the onesie with your favorite papers. However, when sending out invitations in bulk it is easier and quicker to Print and Cut them. There is an excellent video tutorial How To Use Cutting Files for Print and Cut which will give you step by step instructions.
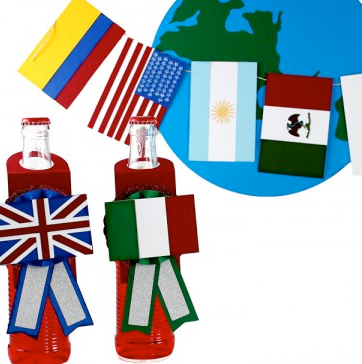
There have been several times this year that I wished I had a set of paper flags representing many countries. First there was the Olympics, then the World Cup, and now the Tour De France. In between all of these world events, I was in charge of a Cub Scout Blue & Gold Banquet with a world traveler theme. The point is, I decided it was time to have a little world celebration and make up some of these country flags. Today's project includes 18 different world flags, and a bottle hanger medallion. Customize these for whatever team you are cheering for and celebrate! In order to make these "cutting friendly" I've left off some small details on a few of the flags. Australia, USA and Brazil all have small stars on them which will need to be drawn with the Pen Tool.
There is no class this weekend, this is a great opportunity for you to watch past classes or videos or just spend time creating. ~Klo
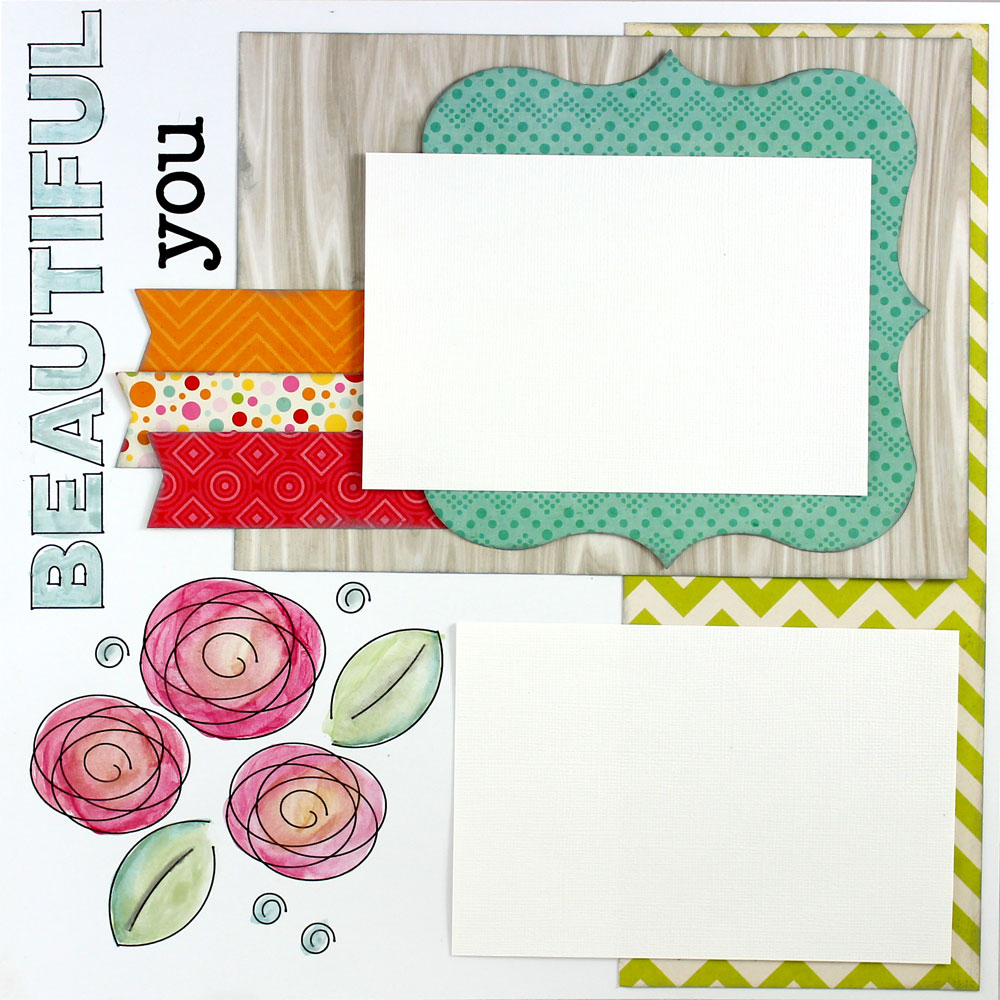
I love the watercolor trend that is showing up everywhere right now. It's fairly easy to achieve this look with the help of my Inspiration. Although I can't doodle or freehand sketch to save my life, I do have the Pazzles Pen Tool. With the Pen Tool I can cheat and have the machine make my hand drawn designs. Instead of Kindergarten art, I get a professional looking sketch, which makes it easy to add water colored elements to my projects. Let me show you the steps I took to make this page.

Hello crafty friends, Melin here and today and I am sharing a fun card. I chose the DCWV Solstice paper stack for all the patterned papers along with white, cream and green Bazzil cardstock. I started by using my software to create my card's layout. I then used my software to cut out the Ladybug Flower file, the Ribbon Slot Borders and the Square Doilie file all from the Craft Room Library. I did edit the ribbon border to remove some of the extra dash lines and then threaded some ribbon through the ribbon border.
I've mentioned before my love of paper started with office supplies and I admit I still love them. The back to school section of Target makes me giddy. Today's card was inspired by office supplies. This little file folder tab card would look even better held together with a big paperclip. Have fun with this design!
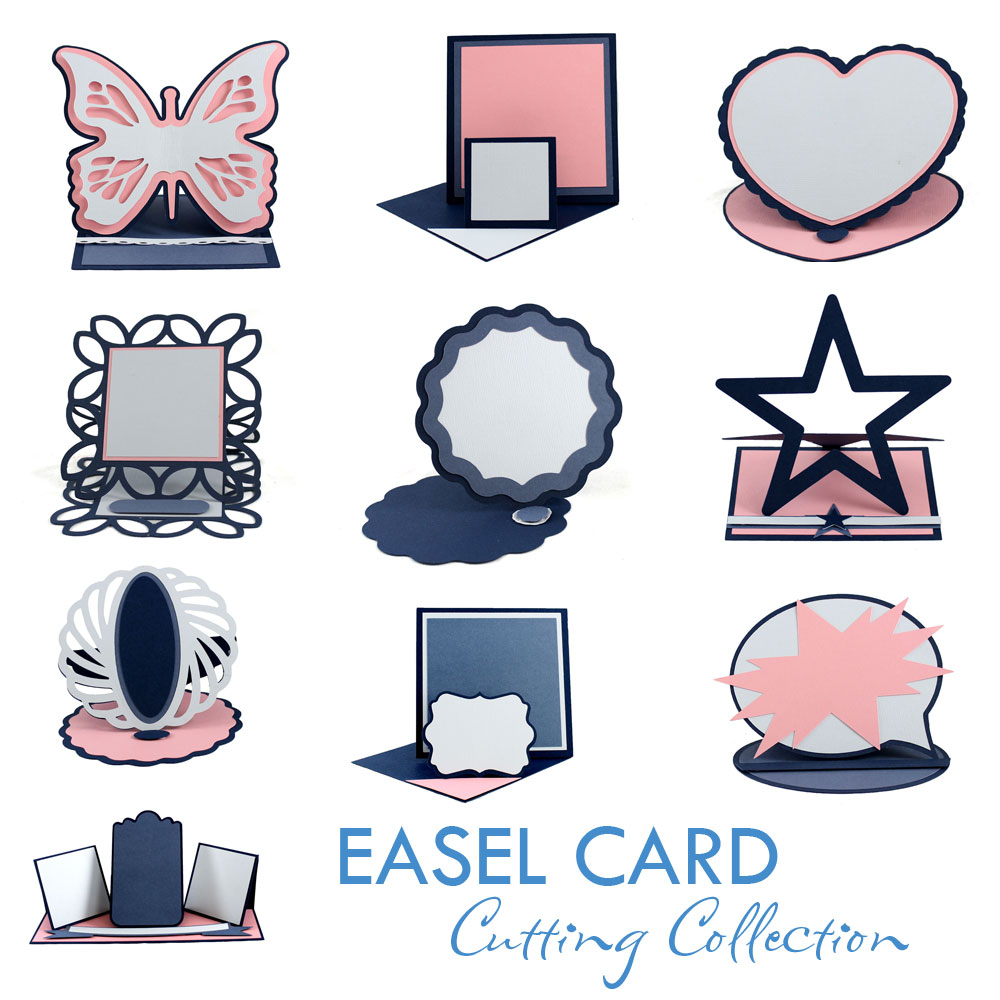
I love the look of fancy cards with unique card bases and lots of paper layers. I like to call these little mini masterpieces super cards. It's a card you make for an extra special occasion or for an extra special recipient. I love to make super cards, but I don't like to figure out the dimensions and folds of each new pattern. The first set of card bases I created, Fun Folds Cutting Collection, has been very popular as well as the rest of the card base collections. That tells me that you ladies like to make super cards too, but don't always like to measure and score. I created this newest set mostly for myself, but I'm happy to share with you as well. After some designing and measuring I've come up with the Easel Cards Cutting Collection. There are 10 different options and lots of layers to mix and match.
We haven't done a Question and Answer Class for awhile, so we will be doing that this week. If you have a specific question or having trouble figuring out a file, this is the perfect time to ask. Join us starting Sunday Morning at 5am, 1pm and 7pm (all times are USA Central, Chicago Time). If you are not sure what time that is in your location, go to the World Time Conversion site to see what time you will join us. Just go to Klo’s Classroom and click on Enter Classroom, join as a guest.
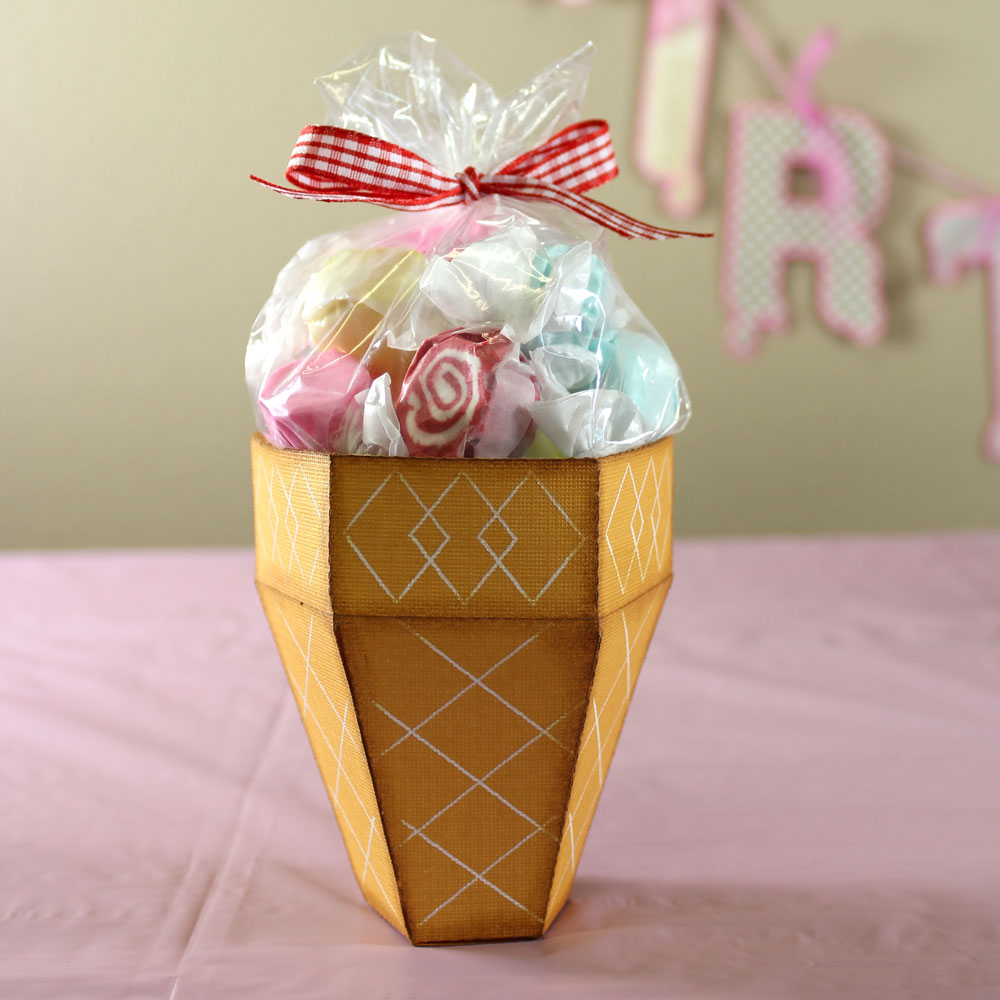
Cool ice cream cones filled with sweet surprises such as candy, gift cards, or nail polish plus a cute candle birthday banner
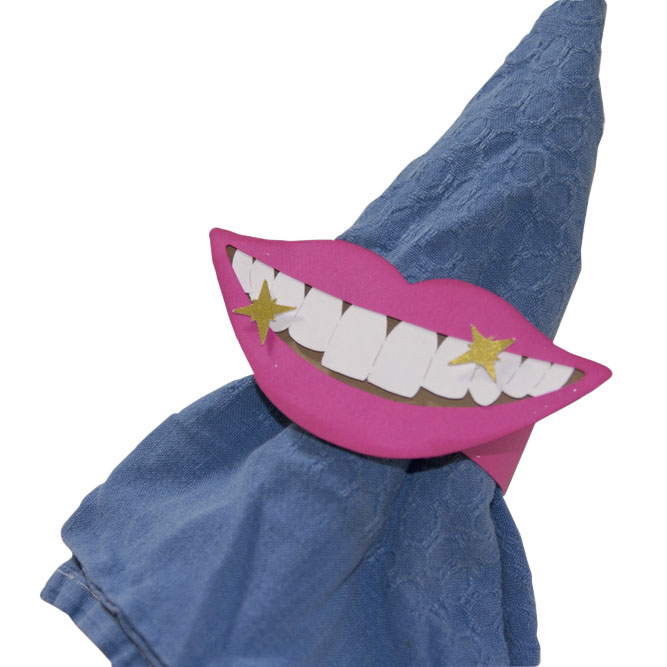
Ha! I love this. By now you know that I like dimensional creations. I like the challenge of taking a Pazzles files and doing something out of the ordinary with them. When the Perfect Smile Card appeared in the Pazzles Craft Room Library, I could not resist it! Do you have a young (or not so young) person in your life that is finally getting their braces off? Here is a cute and easy idea to celebrate that occasion. I used that Perfect Smile to make napkins rings! I just cut a 7" by 1" strip of coordinating paper for the ring and attached the smile.
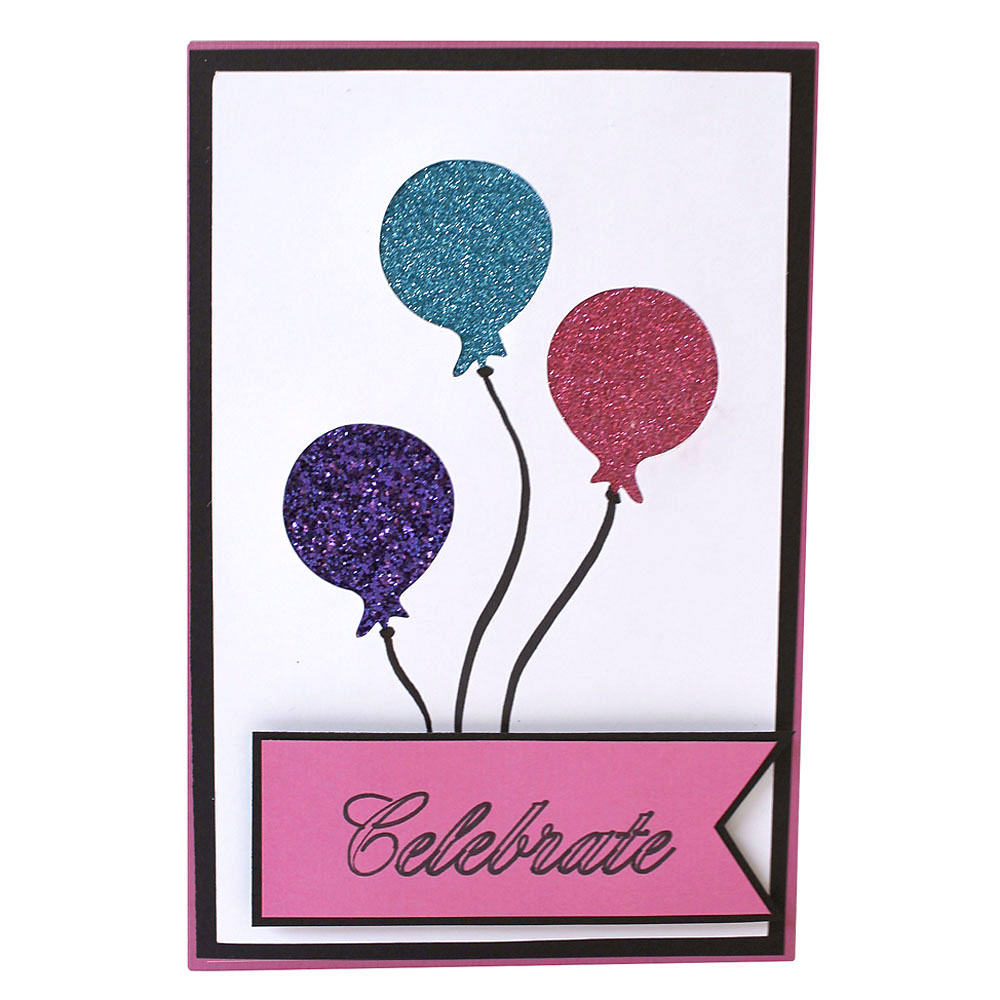
Sometimes you just need a quick and simple card. For my card I used a 9 ½" x 6 ½" base. I used the Balloons cutting file as well as the Pocket Scrapbooking Banners which can be found in the Pazzles Craft Room Library. I decided to remove the balloon cut out and add a glitter balloon cut out instead. I then went ahead and created a sentiment using the Pocket Scrapbooking Banners and my Pen Tool. I drew some balloon strings and in just minutes I had a card ready to send out.
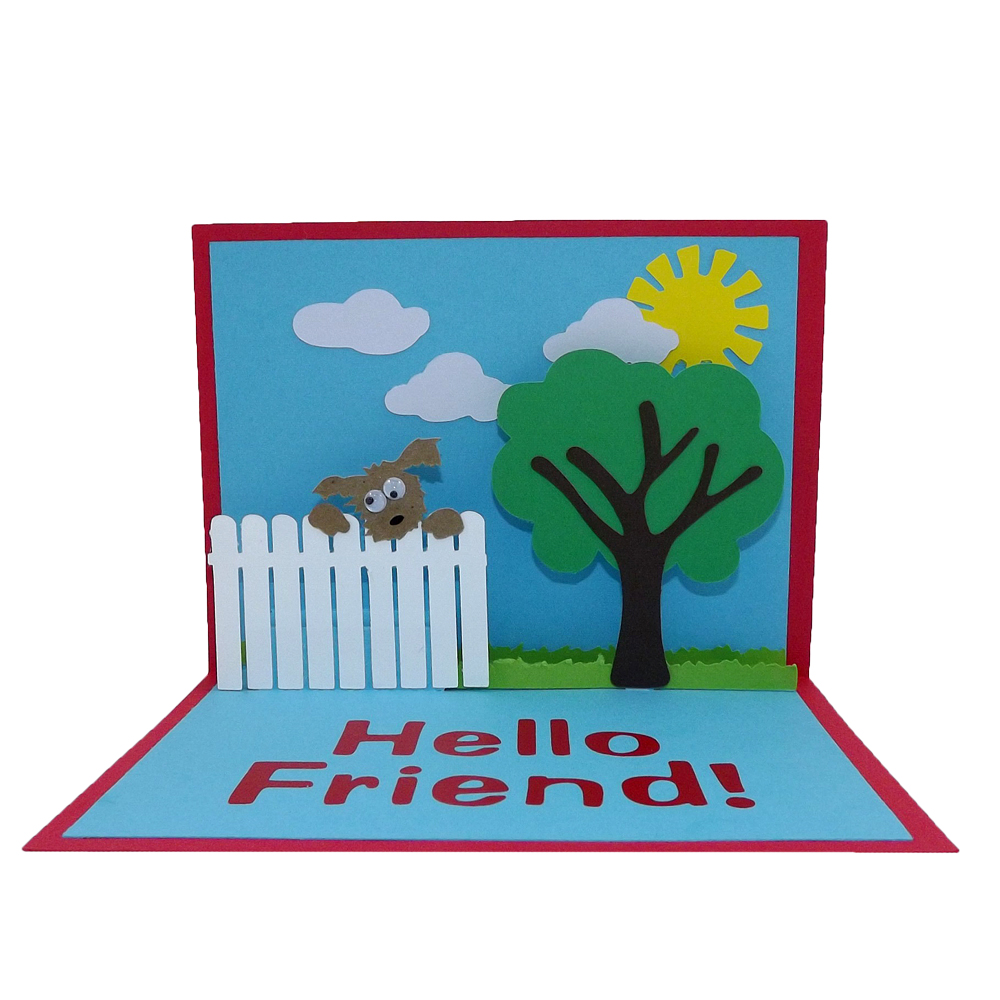
Pop up cards are so much fun! I love looking at the face of the recipient when they open the card and see it come to life! This card was made by following the Basic Pop Up Cards Video. The little dog hanging over the fence is hoping to get a pat or two, or maybe a treat!
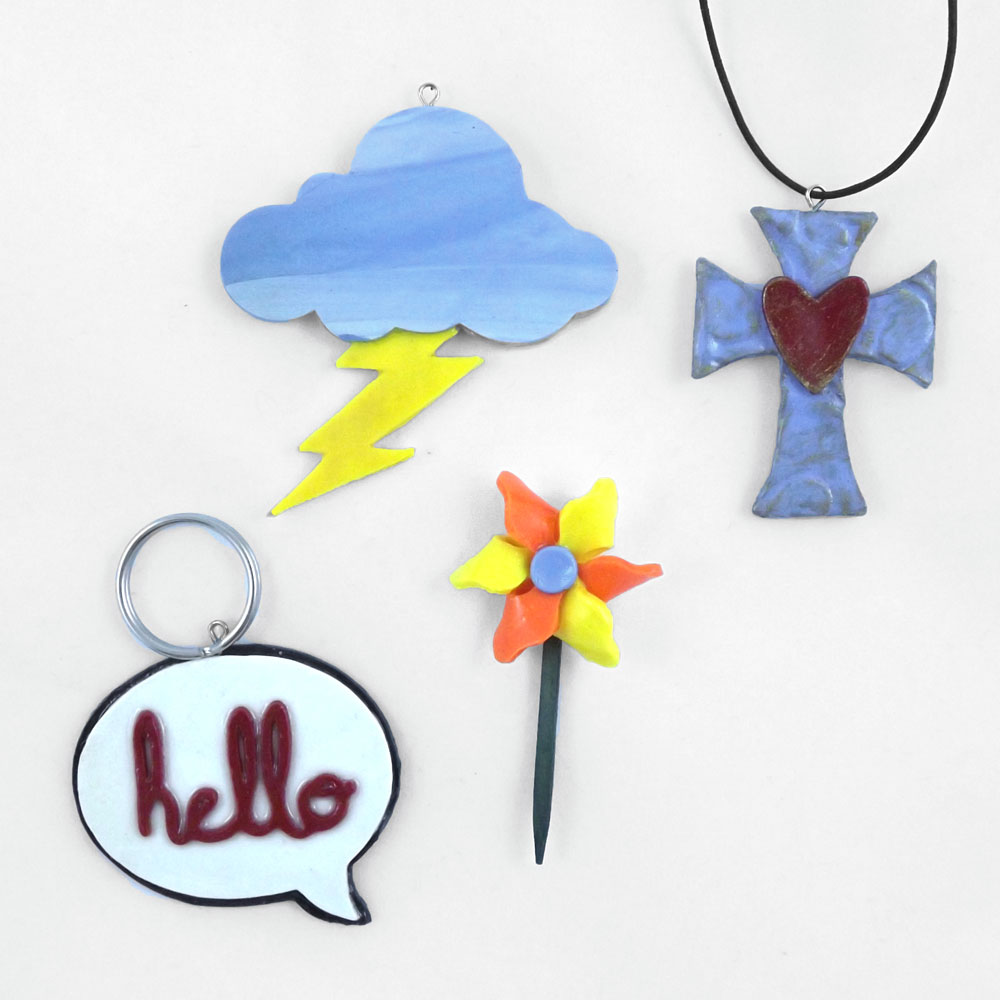
I am so excited about this project! I made these pendants using the Pastry Tool, Pastry Mat and polymer clay. Just like all other types of mediums you cut on your Creative Cutter, the possibilities are endless! It’s amazing the detailed cuts you can get using clay! To get started, watch Klo’s Polymer clay video for some fabulous instructions. It is in the January 18th – 21st Marathon classes, sessions 10 & 11. The files I used are found in the Craft Room Library and are listed at the end of the instructions. First, I rolled my clay out using a pasta machine using a thickness of 5. I placed my rolled out clay on my Pastry mat and patted it down until I was sure it was firmly stuck to the mat. Then I chose my design and cut it out. I used a pressure of 13 and a speed of 2. The blade is stationary so you do not have to adjust it. I cut two of my design out and layered them on top of each other so I would have the thickness I wanted and also to hide the jewelry pin inside.
The Pen Spacer is going to make switching pen colors on the same project so easy. Come join us for the quick and fun class. Join us starting Sunday Morning at 5am, 1pm and 7pm (all times are USA Central, Chicago Time). If you are not sure what time that is in your location, go to the World Time Conversion site to see what time you will join us. Just go to Klo’s Classroom and click on Enter Classroom, join as a guest.

A friend and I have planned a trip to celebrate her 30th birthday. We thought Hawaii would be the perfect getaway. With that in mind, I decided making paper Lei’s would be a fun way to share my “Inspiration” and travel in style. If sandy beaches aren’t in your wake this summer season, I hope you find time to make your own backyard Luau BBQ and create paper Lei’s for each of your guests. Mahalo!
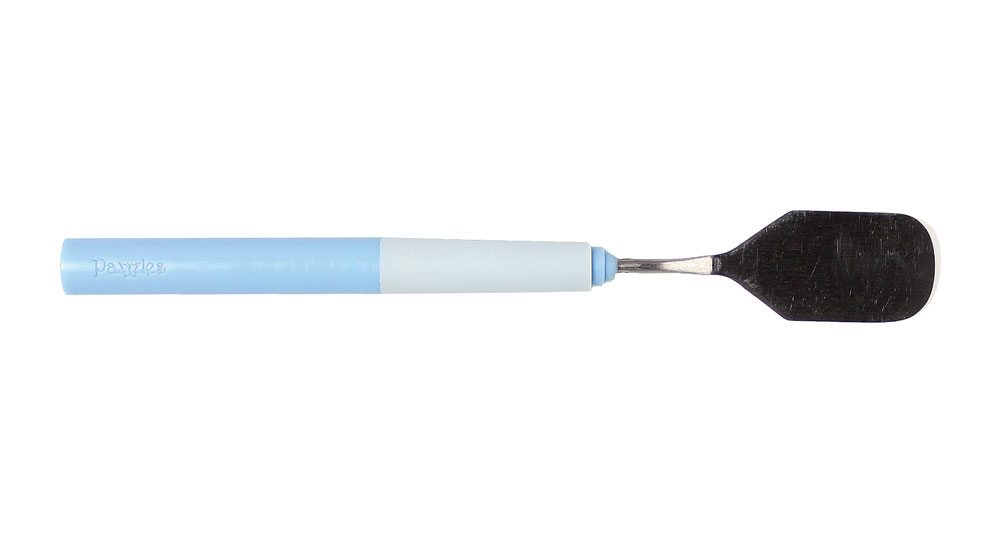
Did you notice something new in the Pazzles store? Actually it is three new somethings! We are excited to release three new products designed to make cutting and drawing with your Inspiration even easier. Sometimes it's the little things that make a big difference, and we think these are some pretty cool little things! The Pen Tool Spacer, Spatula, and Fine Point Tweezers were developed by Pazzles Designers based on requests from customers. Pazzles Spatula Tool Lifting small designs from a very sticky mat can be a bit tricky. The Pazzles Spatula Tool is designed to take your fingernails out of the equation when lifting up your cut designs. The smooth angled edge glides along your mat, lifting your projects without tearing or curling.
The July Challenge is taking a page from the whole repurpose, revitalize and restore craze going on with the DIY world. The challenge is to take an existing project from the project area and repurpose it. Whether it is just changing the theme or remaking it for another purpose, this should be a really fun challenge. After you have finished your project, go and add it to the July Challenge Folder. If you need instructions to upload your project, here are the instructions. In your description, please tell us which project you chose. Remember, all you have to do is enter to have a chance to win one of the fabulous prizes. Be sure and check out the Challenge Page to see what those prize choices are.
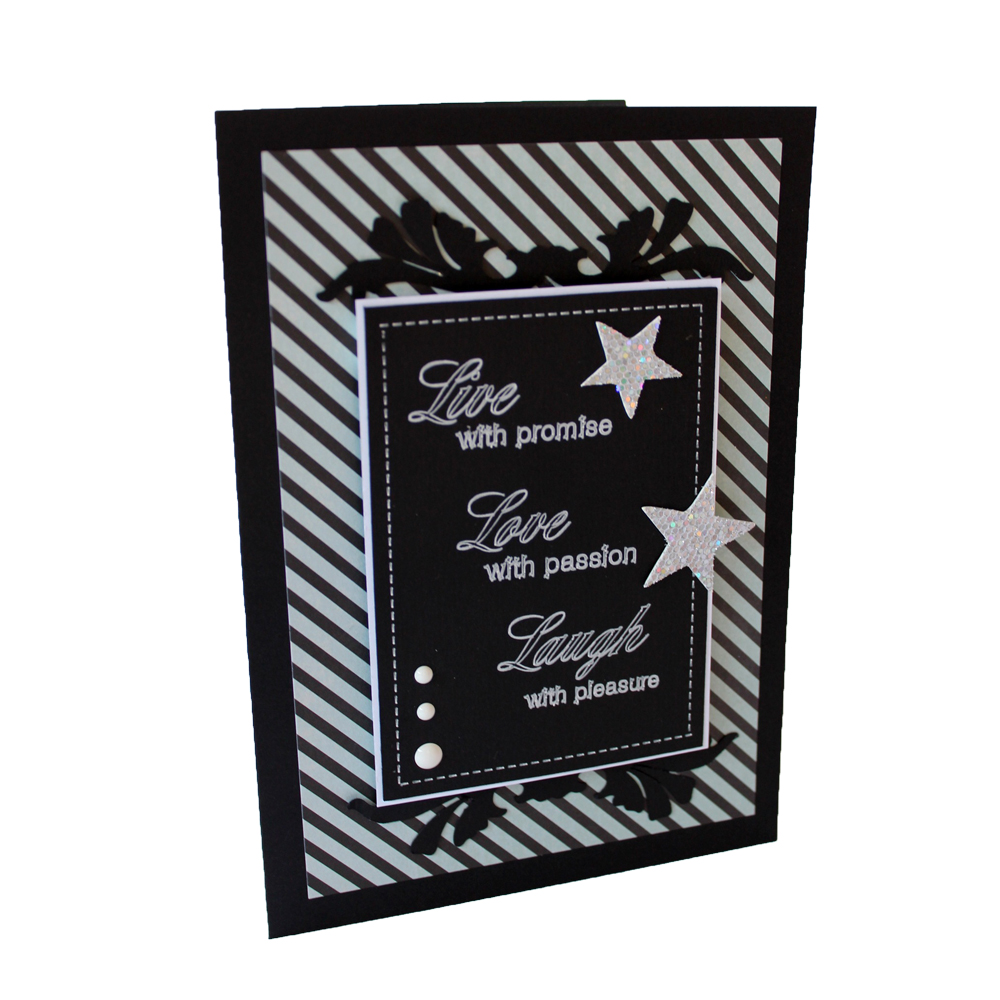
I just love the chalkboard look on cards. Inspired by a lovely saying that I found online, I created this note card using my Pen Tool. I created a perforated outline for the note card and then set my text in place. For my card base I used a 7" x 5" base. I used the draw tool to create two stars.