
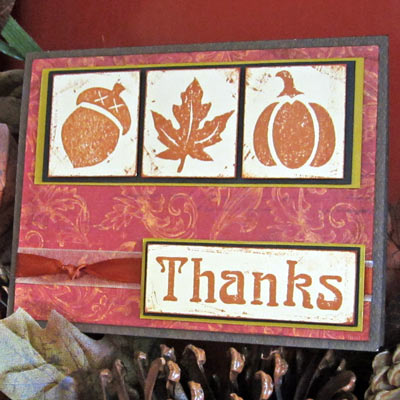
I know Halloween is just behind us and Thanksgiving is still 3 weeks away, but it is time to think of Christmas cards if you are going to make your own. Rich greens, deep reds and gold evoke Christmas elegance. This beautiful card has an abundance of all those elements.
In my “rubber stamping days”, I would have to buy a special rubber stamp to do this technique. Each time I wanted a new shape and design I had to spend more money for a new stamp. Now, with the Pazzles Inspiration you can make this beautiful medallion card for someone special in your life without purchasing a new rubber stamp.
Creating nested medallions in any shape or size is quick and easy with the tools in the Inspiration Studio Software.
1.Create any shape you desire using the draw tools or use a design from the Image Library. Use the Condense tool to make several layers of the shape. I made 12 layers for mine. Every other layer was my pen line so I assigned them a different color. (If you need to know more about the Condense tool see my earlier blog Condense or Outline– What’s the Difference?)
2. Move the rubber rollers on the Inspiration out of the way. (See video for how to safely move the rollers.)
3. Cut the shapes from cardstock in deep jewel tones. I cut 6 dark red and 6 dark green.( Leave paper in the Inspiration after cutting!
4. Draw lines with a glue pen using the Inspiration pen tool. I used a Quickie Glue Pen from Sakura. The glue will turn clear, don’t worry, this is not a problem. (See below for special offer.)
5. Sprinkle embossing powder over the glue lines and heat to melt.
6. Layer the finished medallion onto an embossed card for a classic elegance that will inspire compliments from everyone!
Have fun!
Chris
Hint: To get you started with glue pen embossing we sell the Quickie Glue Pen for a great price. Click here to check it out!!


Simply Elegant! And Yes don’t forget to move the rubber rollers. I found this out the hard way, before I knew they had a video.
Oh Yes I Love This Time Of Year. This is BEAUTIFUL. Thank you
I was always afraid to move the rollers. I had tried to cut out foam and it would get smashed by the rollers. At the time, I thought that it might void out my warranty. This is good to know now that it is coming straight from Chris.
BTW….I did this technique almost out of the box. I had a wedding album to make and it adds a beautiful touch. However, I also want to remind you that in using this technique….don’t forget to use the foils and flocking that come in sheets. You have to wait until the glue is tacky…but not dry…and then just rub on the foil or flocking….beautiful results!
And Chris, now that we can move the rollers….if we get a cap for the blade….would it now be safe (for the machine) to use the icings or polymer clay this way?
oh my!!! beautiful card & u answered a question for me 🙂 for the last 2 days, i have been looking high & low in my area for an embossing pen. no idea u could use the glue pen. thank you so much!!!
Thanks so much for this video and the cutting files too! I just need to get the pen tool!!!
This is a really beautiful card, I wish I could see the video so I would know how to move the rollers though. When I click on the video link, (including the low res one), nothing happens. It may be my internet connection.
This looks lovely and I can’t wait to try it out. Thank you.
You can try cutting fondant and polymer clay but just like with anything else you cut, if it gets up into the blade holder or in the rollers it has the potential to damage the blade holder or Inspiration. While the Inspiration can safely be used for the materials you mentioned, it also can be damaged if you’re not especially careful. The reason I say this is that, for example, a damaged blade holder or an Inspiration full of fondant will not be covered by the warranty. You will need to roll it thin enough that there is not any creeping up the blade. Also make sure that your material is not going to get into the rollers on each side. (They will be wider when you move the smaller rollers over to the side.) I suggest that you get an additional blade holder specifically for cutting these things if you want to try it.
ATTENTION!!!
If you downloaded the cutting file before 7 am Eastern time November 4, you may want to re-download it. There were a couple of layers who took a vacation. They have now returned and are in their proper place in the cutting file. LOL!! 🙂
Thanks so much for this…way cool
Beautiful! I’m very anxious to try this. I have a Sailor Rolling Ball 2 in 1 Glue Pen, do you think this will work?
Thanks
I am completely new to Pazzles, I like the design very much but am not sure how to print it out, do I just put in the card and press cut or do I have to separate the different shapes onto another document. I know this sounds strange but as I said I am a complete novice and would like some help.
@ Doris – I think the sailor pens require you to squeeze them to get the glue to come out, if so then I don’t think it will work very well as you would need to squeeze it as it is writing. Anything that doesn’t require you to squeeze it (and fits in the pen tool) should work fine though.
@ June – I think some of our beginner videos would really help you get started and will probably answer your questions for you (also feel free to ask anything in the forums!) Here is a link to the videos https://www.pazzles.net/wordpress/videos/fundamentals