
When working on virtually everything that has to do with Pazzles, our customers are the first thought in mind. We’ve tried to create a user friendly crafting community that makes expressing your creative side fun and easy. Not only is the Craft Room a great place to mingle with other crafters, watch video tutorials and download new images from the library. It’s a convenient and great way to place orders too! If you’re running low on supplies to use with your Inspiration don’t forget about our online store. It makes shopping easy, especially if you find you’re in a pinch for time.
I’ve been meaning to replace my cutting strip on my Inspiration. Where can I purchase a new one?
Lyndsey L. Tampa, FL
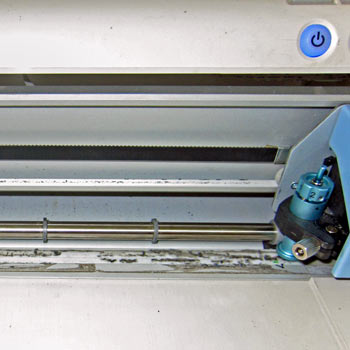
Recently we just added the Cut Strip Kit to our online store. So if you’re not able to place an order during our office hours, you can place the order through our store here in the Craft Room. You’ll find the Cut Strip Kit under Trays and Replacement Parts. Often times I’m asked the purpose of the cutting strip and what function it serves for the Inspiration. If you’re in need of replacing it, you’ll know exactly why purchasing a new cutting strip is so important.The reason that the Inspiration has a cutting strip is to ensure that the blade doesn’t come in contact with the base of the Inspiration and which can leave cuts and grooves on your machine and damage your blade as well. When dealing with different crafting adhesives, vinyl, sticky backed papers there can start to be a buildup of adhesive residue on your cutting strip. A great way to remove the buildup is wiping it off with a wet wipe. This will get a majority of the residue off, but if the tape on the top of the cutting strip is starting to curl and peal back you might want to consider a new cutting strip. If the tape that holds the cutting strip comes loose due to years of use, the cutting strip will start to lift off of the machine. As a result it can start to put some pressure on the mat as your Inspiration is cutting. The kit will include a new white cutting strip as well as the tape that goes over the top of the strip. When you get your Cut Strip Kit all you will need to do is remove the old tape and cutting strip from your machine and any residue that’s left behind. Once you’ve cleaned it and allowed time for it to dry, lay the white cutting strip down on top of the gray metal strip. When you have it positioned properly you can then place the clear protective adhesive over the top. That’s all there is to it and then you’ll be able to get back to crafting, and feel like you’re using a brand new cutter!


I replaced mine within the last few months because the tape was curling at the edges. It was really easy to replace. I was having difficulty loading my mat. The problem was fixed as soon as I replaced the cutting strip and adhesive strip.
AAAhhh! Have just recently removed torn tape and all the sticky residue. This may explain why my machine doesn’t cut quite so well on one side only.
Just add it to the “things I must buy at the retreat” list that I have growing…
The new strip and tape did not come with instructions. Since the blade mechanism covers one end of the strip, I don’t see a way to ensure that both the strip and the tape will be put down evenly at both ends. What is the trick? Does the blade holder get removed first?