melin


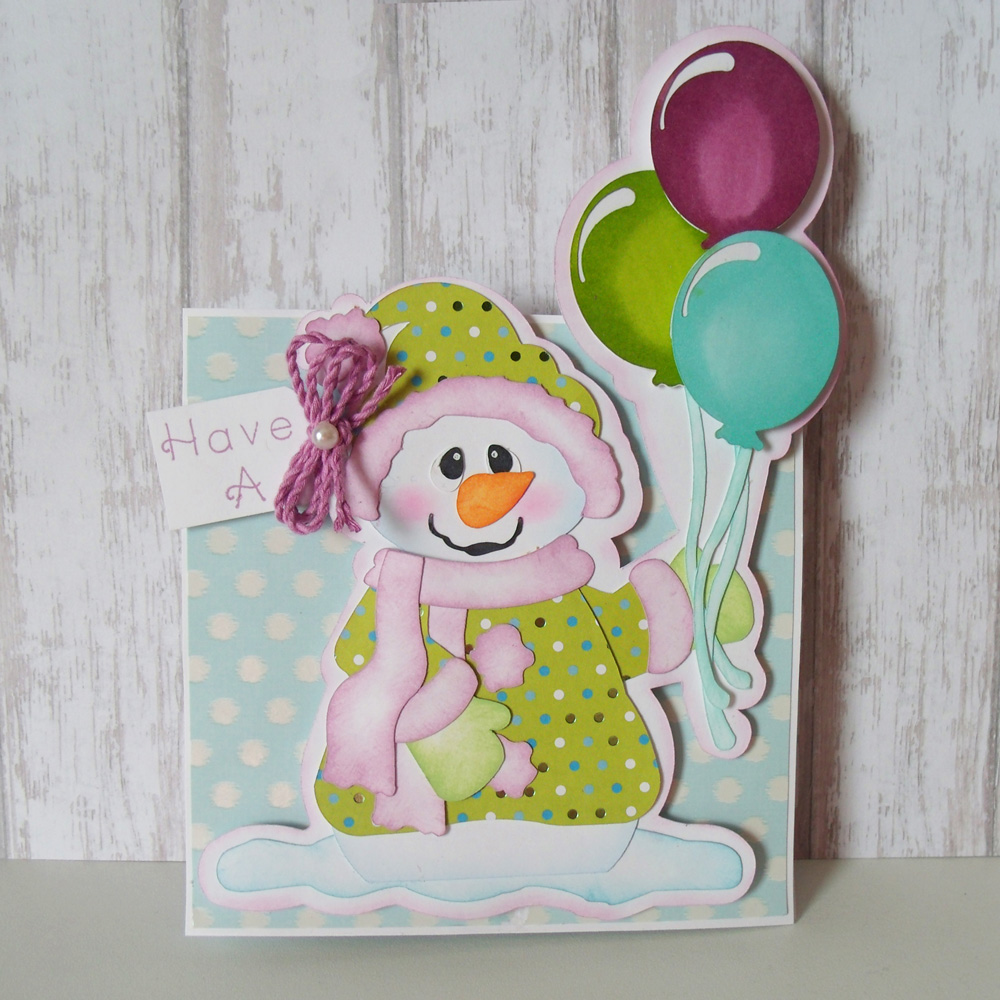
Frosty Fun Birthday Card

Hello Craft Room friends, Melinda here with you today. My task was to share something with a winter theme. So I decided to use two of the new files in the Craft Room to create this wintery fun birthday card. Often I create birthday cards that aren't necessarily specific to the season in which they happen, but this card is going to my niece who was born in the first week of January. Plus she lives in Michigan, so I thought a cute little snowman card would fit the bill.


DIY Paper Candy Box

Hello Craft Room friends, Melinda here with you today to share a super quick and easy project for you to make. If you need a quick box for some last minute gift giving, then this is perfect. I created this fun and simple box which you can find in the Craft Room. It features a flap top so you can open and close it very easily.


Baby’s First Christmas Layout

Hello crafty friends, Melinda here with you today. It is my turn to share here in the Craft Room and well, as I thought about what I wanted to make....I just couldn't let the holiday season go by without making a scrapbook layout! Yep, the whole reason I got into paper crafting, was to scrapbook. A friend asked me to make a layout for a baby book she is working on and I thought this would be the perfect layout to capture the little baby boy's first Christmas.


Go Team Swimming Layout

Hello crafty friends, Today is my turn to share with you. I decided to create this fun layout for my super swimmer niece. She is a Junior in high school and a fantastic swimmer.


Sweet Treats

Hello crafty friends, Melinda with you here today. October is here already. Whether you go trick or treating or attend fall festivals or even Trunk or Treat, there is a lot of "sweetness" involved with this month.  So I decided to create this super fun treat box-bag, that you can put some fun treats and sweets in for your favorite little or not so little person...


School Ride Layout

Hey crafty friends, Melinda here with you today. I am sharing a fun school layout I recently made. I used a few of the fun files from the craft room.  I used some fun papers from the paper studio dots and stripes paper pad. I used a couple of stamps and added a button and some twine to finish it off. It came together very easily. I used the file following files.


Scalloped Deco Edge Card

Hello crafty friends, Melinda here with you today sharing a super easy and pretty card. I created this with the craft room file, scalloped deco edge card.


Flourished Easel Card

Hello crafty friends, Melinda here with you today sharing a pretty and fun interactive easel card. I […]


Mini Album Calendar

Calendar Mini Album

Hello crafty friends, Melin here with you today to share my mini album. I was so thrilled to have a chance to create a mini album for this week's Christmas in July projects. I chose to go with a Calendar theme. This makes the perfect gift for special friends and or family. I started with the Scalloped Shaped Frame. I sized it to approximately 8.25 x 8.25. I cut the scallop in white. I cut out seven of them. I then cut the larger mat out in kraft cardstock. I cut out 14 of them and adhered them to both sides of the white scallop mats. I then chose several patterned papers from the DCWV Linen Closet. I love the beautiful soft teals, blues and greens. I created the little mini calendars and the labels for the months. I've included them below for you to download along with a notes journaling card. I printed them out and cut them with my Inspiration Vue.


Patriotic 4th of July Bear Layout

4th of July Patriotic Bear ...

Hello crafty friends, Melin back in the Craft Room with you today. I was tasked this time with creating a project with a patriotic theme, so this is what I came up with. I created this layout using a few of the fun Craft Room files. I selected the MK July 4th Title, the MK Independence Borders. I also used the Sparkler, the Independence Hat, the Panda Bear and the Panda Sitting files.


Live In The Moment Layered ...

Hello crafty friends, Melinda with you today sharing a quick and easy card you can make in no time at all! For my card I used the Fancy Floral Frame cut file I found in the Craft Room. When I saw it, I thought...what a gorgeous file. I made my card base a 5" x 6.5" size. So I sized the frame a quarter inch smaller. I wondered how it would cut and was not disappointed. It cut beautifully. I then turned to my In The Moment stamp set. I stamped the flourished frame stamp with my Versamark Ink Pad and heat embossed it with some gold embossing powder. I then used my Cashmere Ink Pad to stamp the sentiment. I cut the sentiment out and then used some foam tape under it to give it a little lift. I then added a bow and a Prima flower from my stash. The green mat and the colored mat under the frame are patterned papers from the DCWV Dear Jane Stack. The base was Colonial White Cardstock. I finished it off by putting some pearl accents around the stamping. The card doesn't have too much on it as I really wanted the frame to be the focal point of the card, as it is such a beautiful file. This card came together fast and beautifully!


Sisters Forever Layout

Design Team Favorites: Sisters Scrapbook ...

Join the Pazzles Design Team this week as we share a few of our favorite things with you. Hello crafty friends, Melinda here with you today. Our theme this week is Favorite Things. We were to use and or incorporate some of our favorite things in our projects. So here is what I came up with. My favorite thing hands down is my Pazzles Inspiration Vue. This machine literally changed my crafting. I went from hand drawing and hand cutting my paper piecings to being able to create and cut some of the most intricate designs. Aside from the machine my second favorite thing is the software. The software allows you to design your layouts before you cut a thing. I love that it works so much like many of our other programs. I can even insert the pictures I am going to use in my layout.


Floating Butterfly Rainbow Card

A pretty butterfly overlay reveals rainbow colors under each wing. Add any sentiment and a little string for a perfect any-occasion card.


Twisted Easel Card with Rolled Roses

Elegant Cards Week: Rose Cornered ...

Melin with you today, sharing my card today. I started by using the Twisted Easel Label card file. I cut the label with a kraft cardstock base. I then used printed paper from the Paper Studio paper pack. I then created the frame edges that I used and cut them in white cardstock and made them in two sizes. I used more of the patterned paper for mats. I also used some foam tape to give the mats some lift from the base. I then used some of the twirled flowers and cut them out in plain white cardstock, then inked them with my Cranberry and Ruby mini ink pads to give them some color.


12 Page Mini Album and ...

Hello crafty friends, Melin here with you today sharing this mini album box set. I started by creating the box. It's very easy to do. You can watch the Making Boxes with Lids video in the Craft Room that shows you how easy it is to do. Once I came up with my box size, I created the pages inside. I made twenty four sides, 12 pages, double sided. The box base and page base are all from kraft cardstock.


Number Overlay Brthday Card with free number overlay cutting files in WPC, SVG

Number Card Overlay

Hello crafty friends, Melinda here with you today sharing a super quick and easy birthday card. I started […]


Dream Big Embossed Vellum Card

Hello crafty friends, Melinda here with you today sharing this pretty and easy card with you today. The task was to use one of the many wonderful tools that Pazzles offers. So I decided to turn my attention to the Embossing Tool. I love that you can emboss different surfaces with your tool and machine. I decided to go with some vellum for a card. I started by using my software to layout the top of the card that would be embossed. I used the Cheery Chrysanthemum file from the Beautiful Blossoms Cutting Collection and created the vellum overlay.


Easy Layout Backgrounds with Stencils

Hello crafty friends, Melinda here with you today sharing a fun set of layouts using something we all have...FONTS. With so many free font sites and options, you can really express your creative style! Here are the layouts I created: To start with I used my Pazzles software and created the word background. I cut it out on some black cardstock. I popped all the letters out and made sure to edit letters like "a" and "o" so that they wouldn't have any pieces "falling out" of the template. I then used the template as a mask on the first layout (Circa 1975) and sponged some chocolate ink on the pink cardstock. I loved that it gave it a vintage look. I then took a flower stamp and the same chocolate ink and inked around the layout. I matted that onto a kraft cardstock base that also had a pretty piece of patterned paper. I used my sewing machine to stitch around the pink paper with some black thread. I then used a couple of files from the Craft Room to create the flourished photo corners. I cut those out of black cardstock. I added some ribbon from May Arts and a couple of chipboard embellishments I had in my stash and all done. It wasn't too hard to do, and I let the wording of the template and the photo take center stage.


DIY Home Calendar Planner

Organization Week: DIY Home Calendar

Hello crafty friends, Melin here with you today sharing my calendar. Part of being organized for me means keeping better track of time. So I decided to create this calendar that will hang on my bulletin board. I started by using a standard 12" x 12" scrapbook page size. From there I laid out my concept with my software. I love being able to lay my project out in my software before I cut anything. It helps me figure out my die cut sizes as well as what pieces I will use. Once I laid it all out, I picked my papers. I started by cutting a base of the Doilie Frame cut file from the library. I then cut the Flourish Hardware, Royal Damask, Wire Dress Form and the Doilie Frame 2 all from the Craft Room Library.


DIY Christmas Ornaments: Victorian Baubles

Hello crafty friends, Melinda here today sharing my ornament project with you. These ornaments were super easy to make and very pretty. To start with I chose the Filigree Ornament file from the Craft Room. I proceeded to cut out 8 of these ornament files in white. I then created the solid "liner" piece by ungrouping the ornaments internal structure. I cut eight of these pieces out using some pretty paper from the Paper Studio Stack. Once I had all of my pieces cut out, I folded each piece in half. I did use my score board so that I could get a really good, clean score. You need to be careful with the filigree ornament when folding as there are a lot of little open pieces. Once all my pieces were folded, I glued one liner to one of the filigree pieces.


Christmas Lamp Card Two Ways

Hello Pazzles friends, Melin here today sharing a fun way to make a fast simple card and or take it to the next level. For the main card base, I used the Side Step Fold file from the Craft Room. I cut them both in kraft cardstock. I then used my DCWV Performance stack and found some lovely cream note paper. So I cut a cream mat for the main area of the card and then cut the rest of the mats in the patterned paper. I then turned to the Craft Room Library and found the fun Christmas Lamp file. I cut them out in black cardstock. For the "fancier" version, I took it a step further and embossed it with black embossing powder. If you look at it, you can see how it makes the lamp look a little more "realistic". I then cut the flames out and inked them to give them a bit of a "glow". I then cut out the garland and cut extras to line the bottom two steps on each card.


Page 2 of 3123