Stained Glass Butterflies Collection
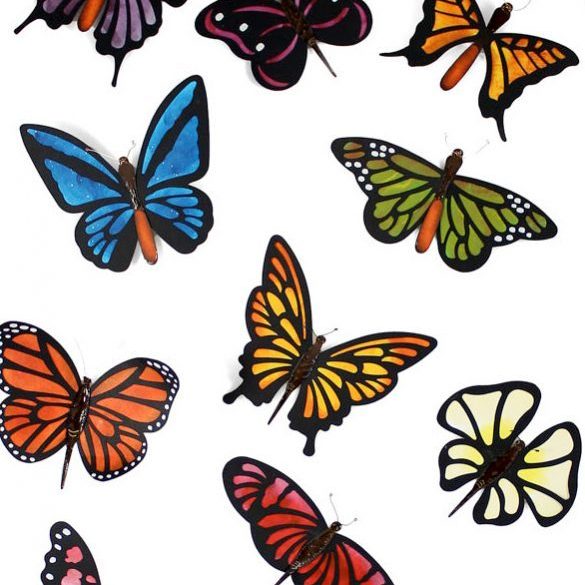
A collection of 13 beautiful paper butterflies you can use on all your projects. The best part about these gorgeous butterflies is how easy they are to make, but they look extremely detailed and intricate.
A collection of 13 beautiful paper butterflies you can use on all your projects. The best part about these gorgeous butterflies is how easy they are to make, but they look extremely detailed and intricate.
Have a Happy Easter! There is no class this weekend, this is a great opportunity for you to watch past classes or videos or just spend an evening creating. ~Klo
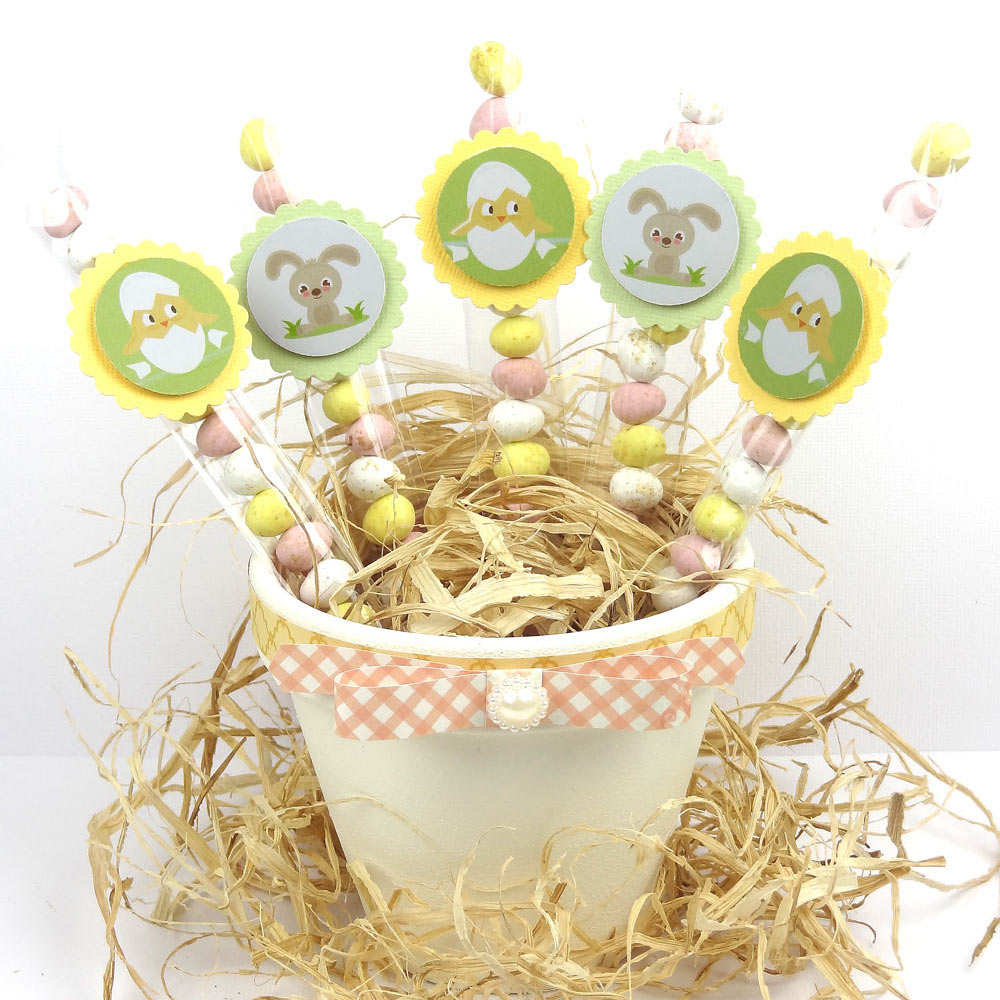
Easter toppers for treats, bags, cake and cupcakes, or just as tags! All made with files from the craft room!
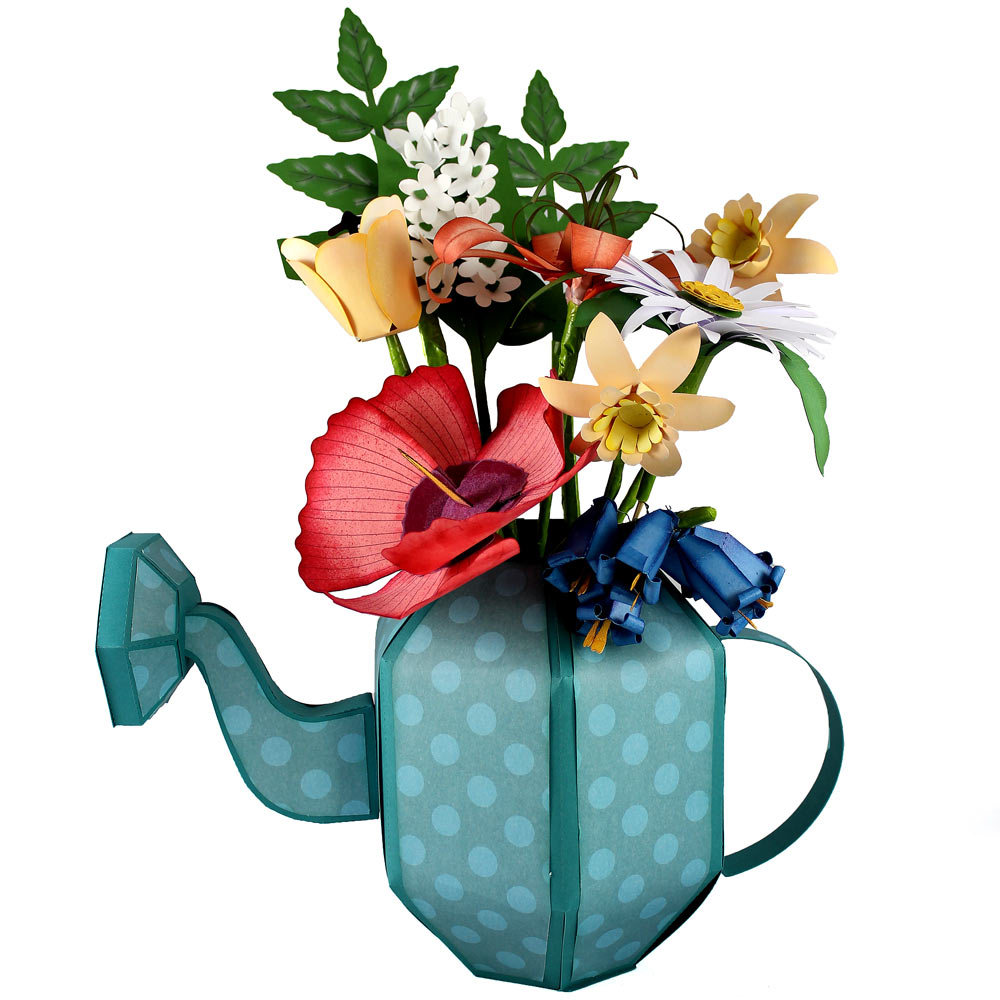
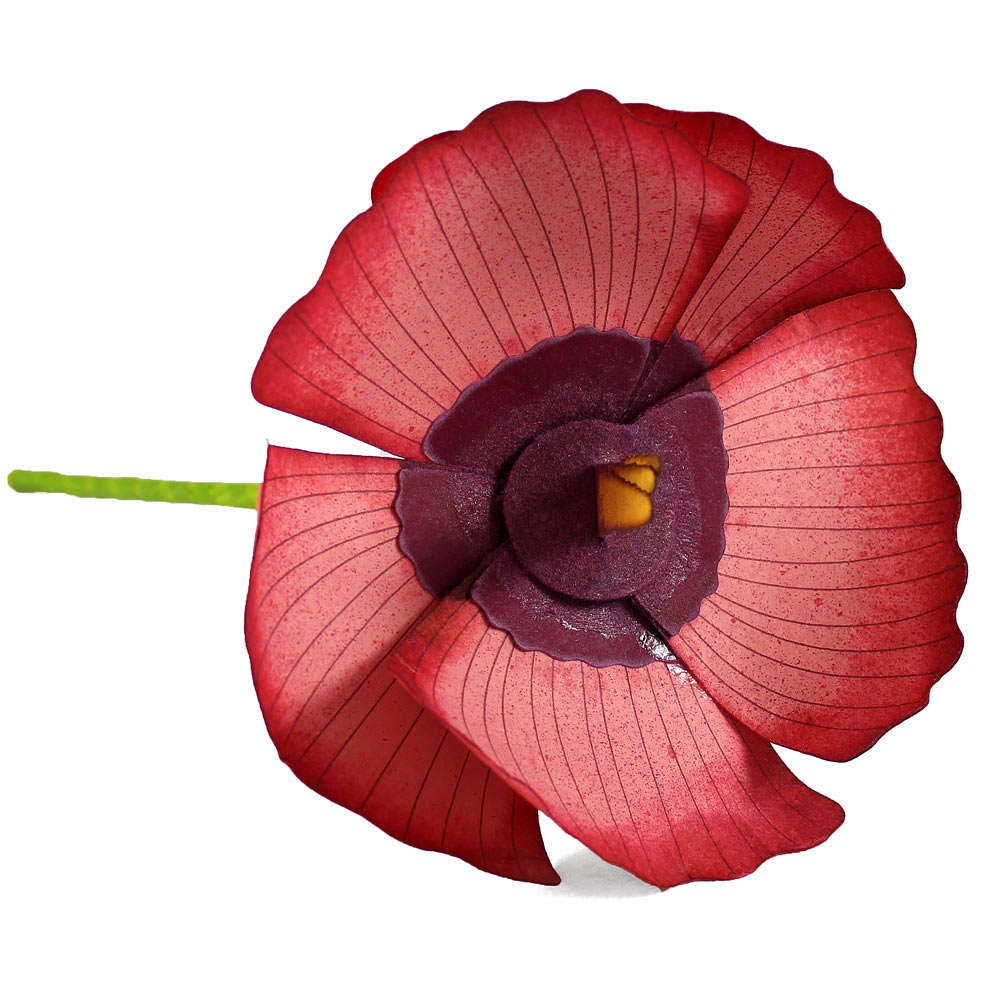
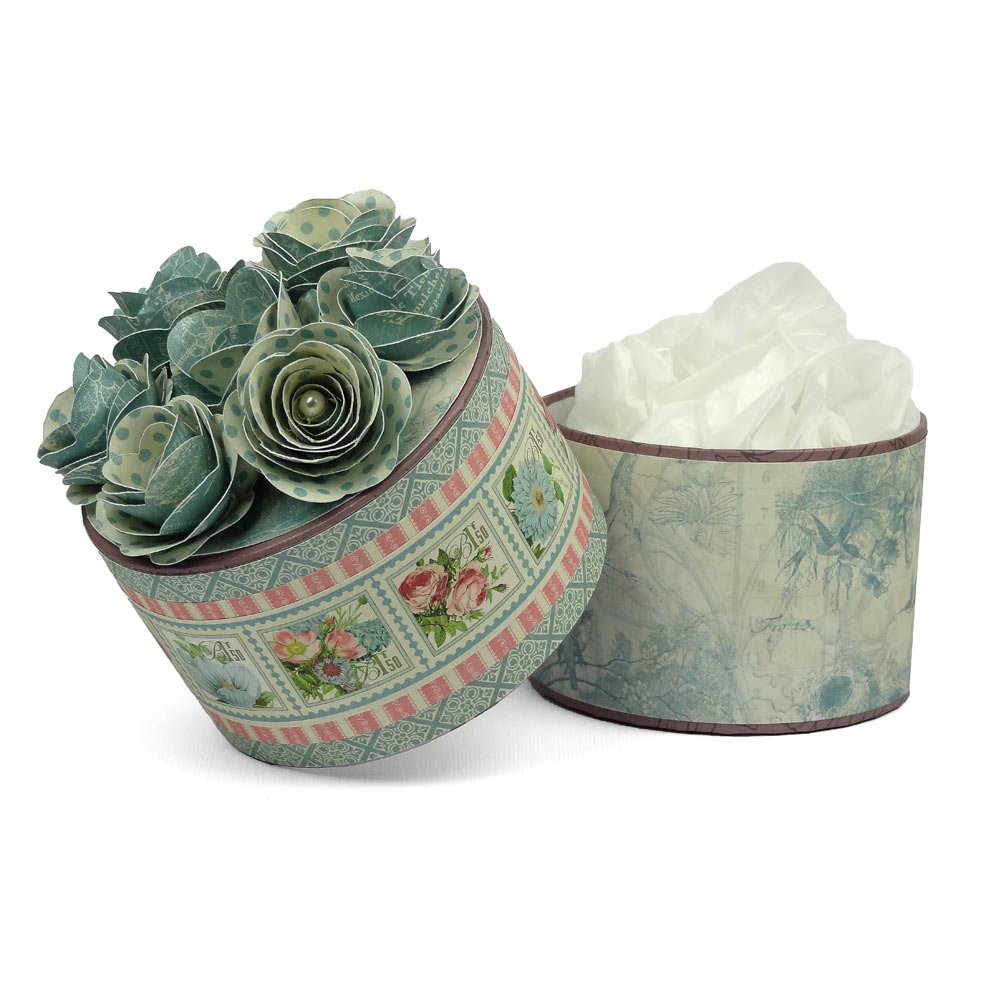
It’s Build A Bouquet week here on the blog. All this week we are sharing dimensional paper flowers. A few designs will be featured each day and by the end of the week you will have a full bouquet perfect for Mother’s Day festivities. Now that you have a "bunch" of flowers, it's time to wrap up this week and give your flowers a place to bloom and grow. This watering can vase makes just the spot and looks beautiful as a table centerpiece. Tuck your paper flowers inside for a gift, or place a jar in the middle of it and fill it with real flowers.
It’s Build A Bouquet week here on the blog. All this week we are sharing dimensional paper flowers. A few designs will be featured each day and by the end of the week you will have a full bouquet perfect for Mother’s Day festivities. Design Team member Heidi Edwards is joining me today as we build our bouquet. She created this beautiful Lily of the Valley, which is perfect for Easter too, by the way! I'm excited to create this bouquet for my mom for Mother's Day. I think sometimes as paper crafters we take for granted how cool it is to make a dimensional object out of paper. People not involved in this paper world are absolutely blown away when they see what we can make out of a flat piece of paper. Give a bouquet away to someone and let them think you are a paper magician!
It’s Build A Bouquet week here on the blog. All this week we are sharing dimensional paper flowers. A few designs will be featured each day and by the end of the week you will have a full bouquet perfect for Mother’s Day festivities. With Spring blooming, pick these two cute flowers to create next for Build A Bouquet Week.
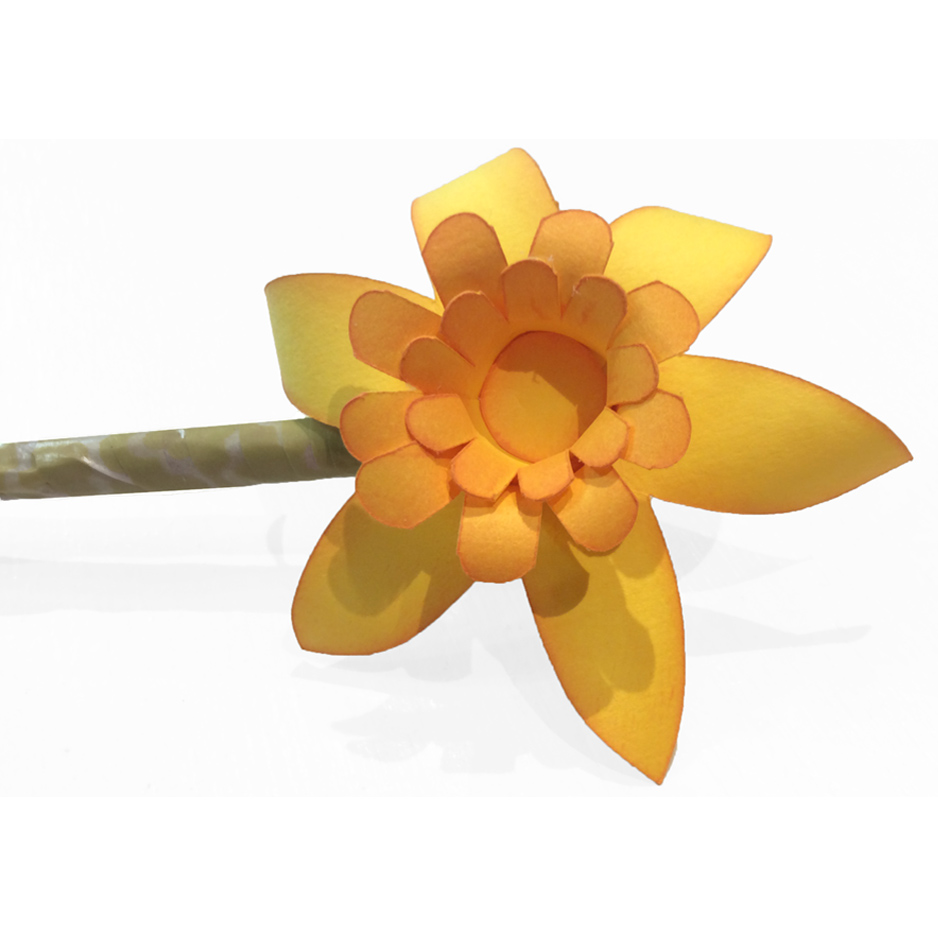
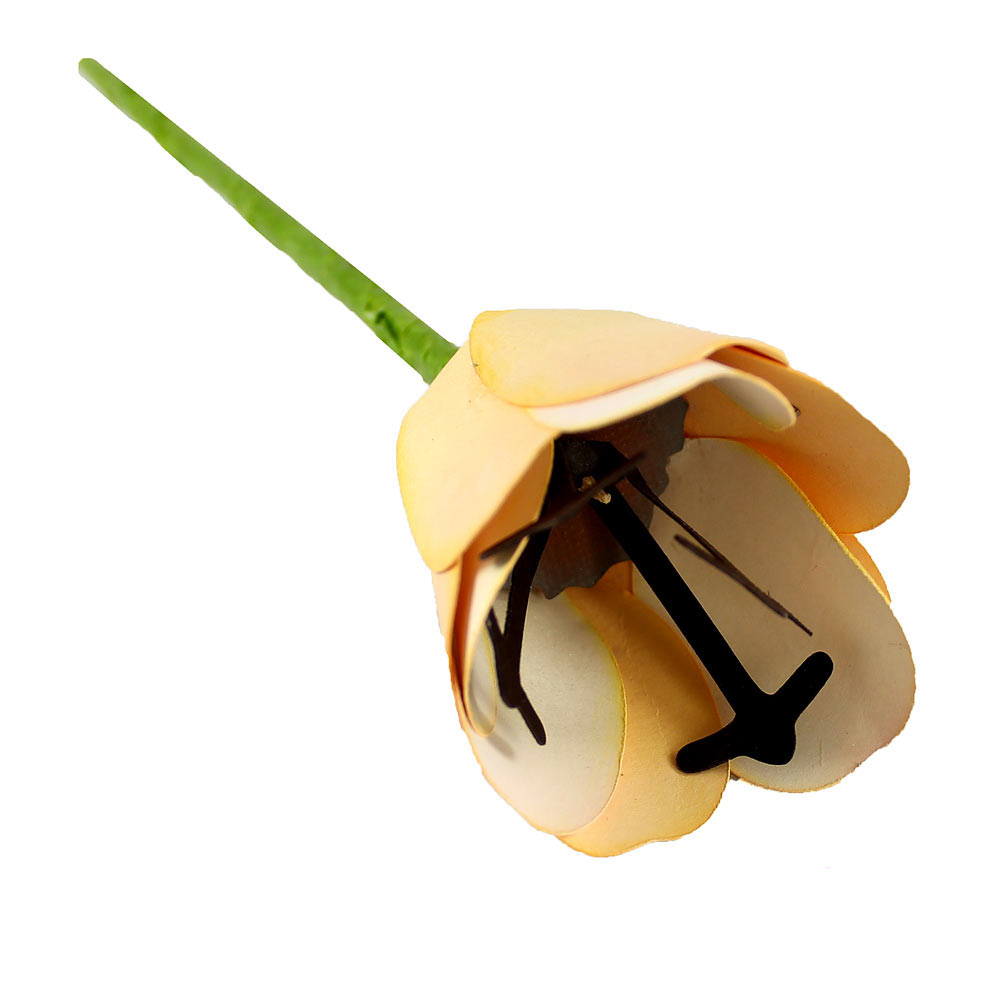
It’s Build A Bouquet week here on the blog. All this week we are sharing dimensional paper flowers. A few designs will be featured each day and by the end of the week you will have a full bouquet perfect for Mother’s Day festivities. As we continue to build our bouquet this week, we are adding a beautiful daffodil and a fern stem so we will have some beautiful greenery to add a more realistic feel to our bouquet. Daffodil
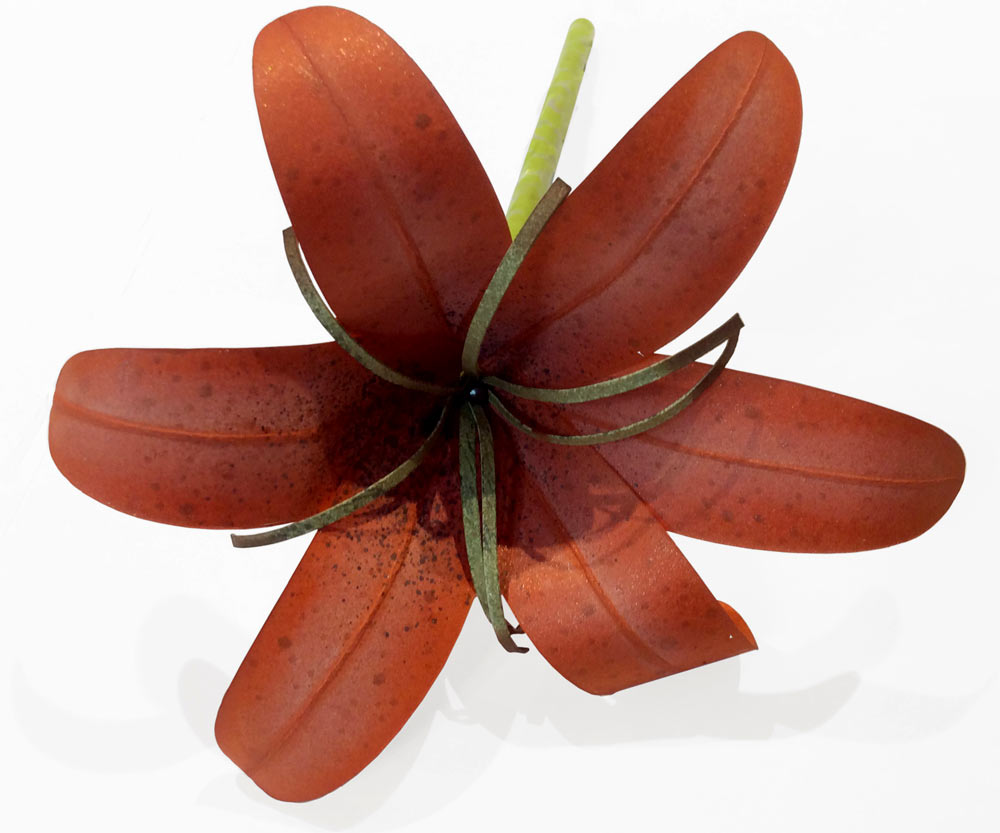
We have a fun surprise for you! It's Build A Bouquet week here on the blog. All this week we are sharing dimensional paper flowers. A few designs will be featured each day and by the end of the week you will have a full bouquet perfect for Mother's Day festivities. We've had fun coming up with these designs and hope you will love them. It's always amazing to me that a flat piece of paper can become something amazing, so let's get started. Tiger Lily
I love to use journaling fonts with my pen tool, embossing tool, engraving tool and occasionally my distressing tool. In addition to the journaling fonts that come with the Inspiration Software, I also like to use true type fonts on occasion. Some of the things I look for are the width and size of the font. Some fonts are very thin and may not cut well, but they are wonderful for use with the pen tool. One thing to keep in mind is the type of pen you use. Some pens have fatter nibs, others are thin. You will find that they will give you different looks depending on the how thin the font is. Experiment with different pen sizes if you are not sure of the look you want. I think you will be pleasantly surprised at the different looks you can get with the same font. Keep in mind that as you get larger with the font, you will have more of an open look on your font. This is why experimenting with pen nibs is helpful.
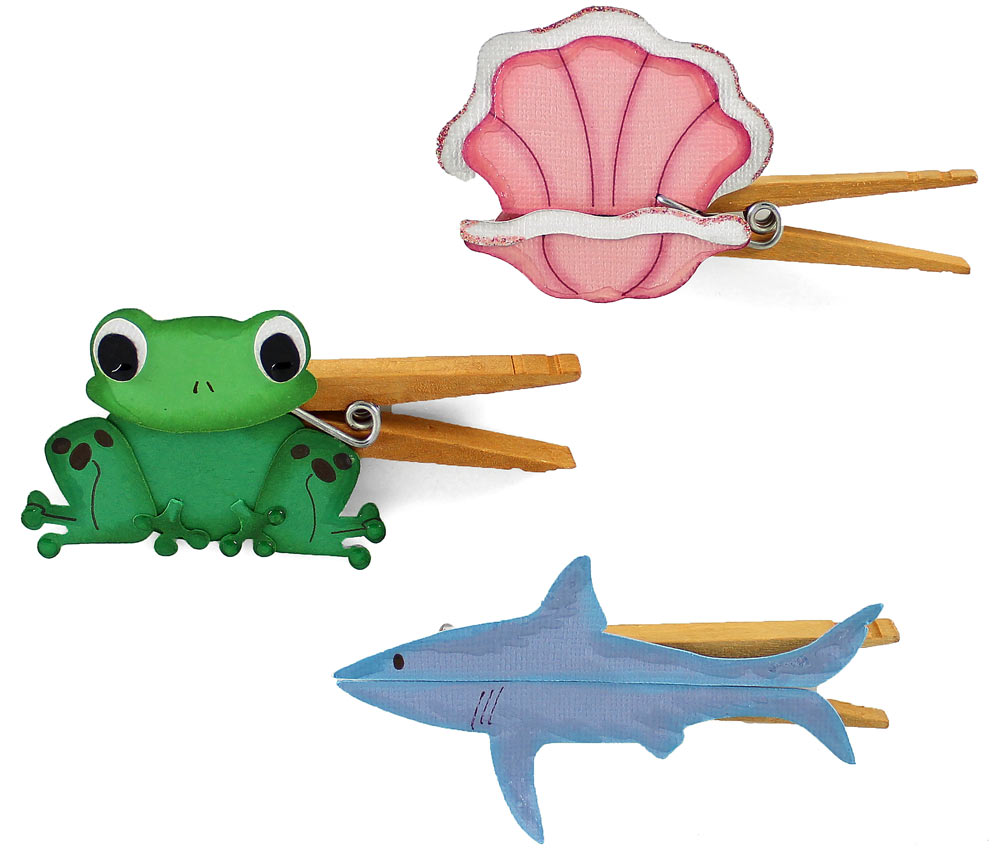
Make these little clothespin character puppets to help keep little hands busy. This is a great way to take existing cutting files in the Craft Room and turn them into puppets too!
There is no class this weekend, this is a great opportunity for you to watch past classes or videos or just spend an evening creating. ~Klo

We have received several calls regarding the Heartbleed Virus that is affecting some companies. We want to reassure our Pazzles customers that we have not been affected by the Heartbleed Virus. This virus has impacted nearly 2/3 of the internet, however our version of OpenSSL was not affected by the virus. You can find more information on this virus here.
More recently, I have found that I am looking at packaging and thinking how I can use it for my projects. At Christmas we received a lovely box of truffles and I immediately thought how I could decorate it, when all the chocolates had been eaten. I measured the dimensions of the box and laid my patterned paper onto my cutting mat. I cut the pieces for the wrap around the box, the inside and top of the lid. It was so easy using the Transformation Menu in my Pazzles software to create the exact measurements for my paper piecing. The video tutorial in the Pazzles Craft Room called How to Resize Images helps you understand the capabilities of the Transformation Menu.
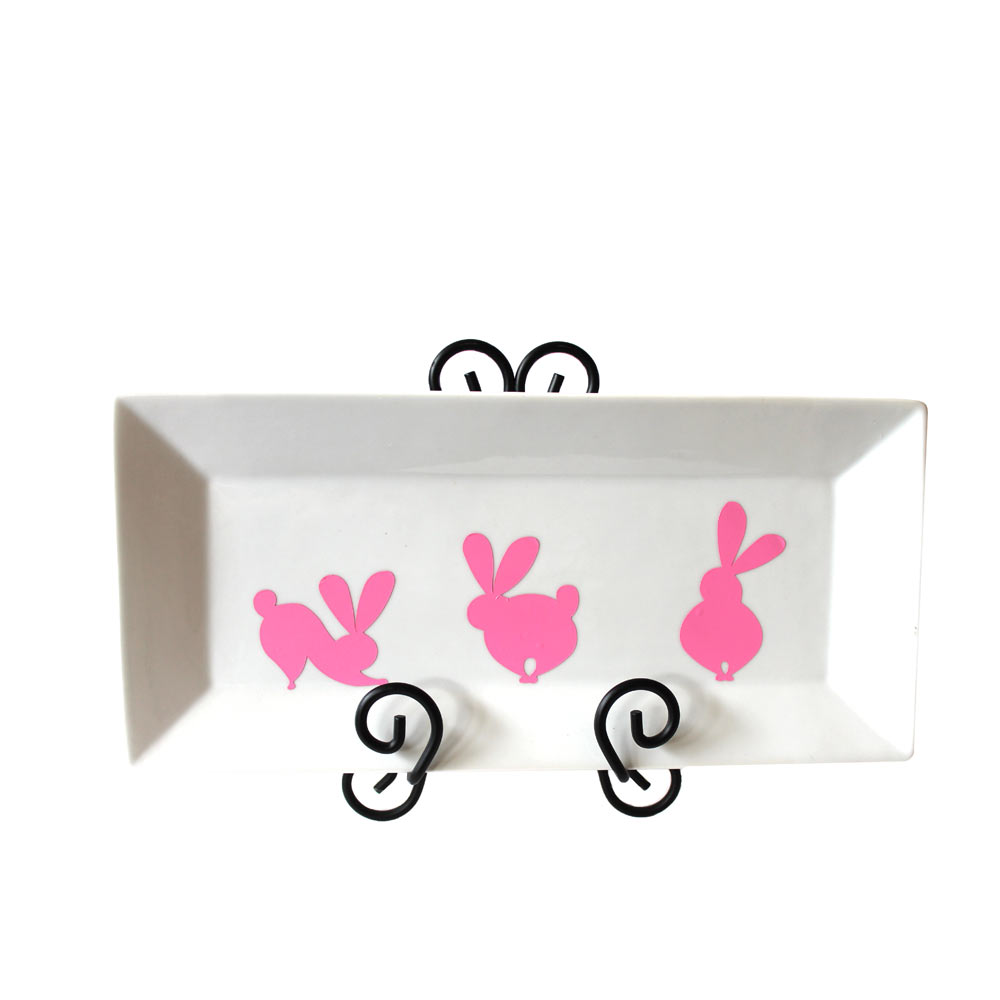
Turn a plain white tray in to an Easter serving tray with a little vinyl and these bunnies from the craft room library!
The Pazzles Design Team has been inspiring us for over a year now and it is time to say goodbye to one and welcome our newest designers. Tara Brown has wowed us with her projects again and again, but she has decided to step down from the Design Team. We will miss her elegant vintage design in the Craft Room, but be sure and stop by her blog to say hello to her now and then. Thank you Tara! Please help me welcome our newest Pazzles Design Team Members:
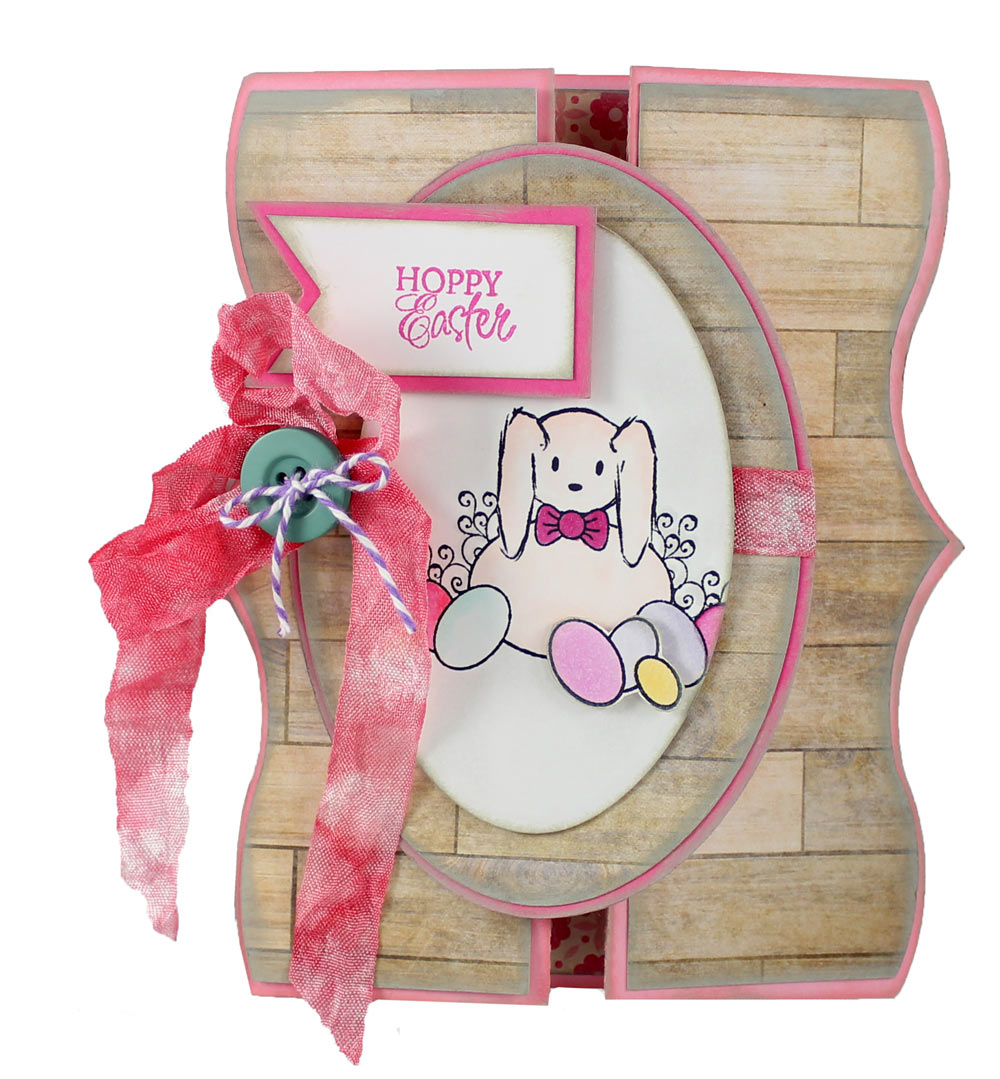
Quickly make an Easter card using the Shutter Card file from theFun Folds 2 Card Bases Cutting Collection and and some Verve stamps.
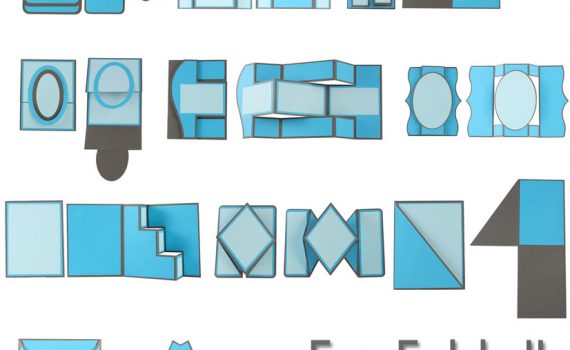
Our original Fun Folds Collection was one of our most popular collections ever. Introducing the Fun Folds 2 Cutting Collection. Ten brand new card bases ready for you to embellish and create with. Our Fun Fold card bases give you a beautiful starting point for your creations, with no measuring and scoring. I quickly made an Easter card using the Shutter Card file and some Verve stamps. You'll notice that I actually folded this card backwards to create a new look. Instead of the center panel being on the front, I folded it to the back and adhered my oval to just one side of the card. Try this with the other folds to get even more options. The Diamond Fold Card has as completely new look when folded backwards.
Thanks for joining our Spellbinders Digital Dies by Pazzles Launch Party. We hope you've been inspired and had fun! Are you ready for a giveaway now? One lucky winner is taking home this fabulous prize! Giveaway Includes: Spellbinders Grand Calibur Nested Butterflies Two Metal Die Anemone Flower Topper Metal Die Foliage Metal Die Floral Accents Digital Die Lines Flourettes Digital Die Lines Crown Circles Digital Die Lines Dahlia Digital Die Lines
As we finish up our chat in the Member Chat Area, we have our last inspiring Design Team project by Angie Contreras. Stop by the blog in 1 hour (2pm MDT) to see the Spellbinders giveaway and get your entry in. Giveaway will close Friday April 11, 2014 at midnight MDT. Angie's Blog In need of a quick card? Layer the Spellbinders Digital Die files as you'd like them to appear on the screen and select the colors for each piece. Then simply print them out as images on your home printer. Use the technique in our Print And Cut video to cut around your printed image and you have a beautiful card. Use glitter glue, rhinestones and other embellishments to dress up your card.
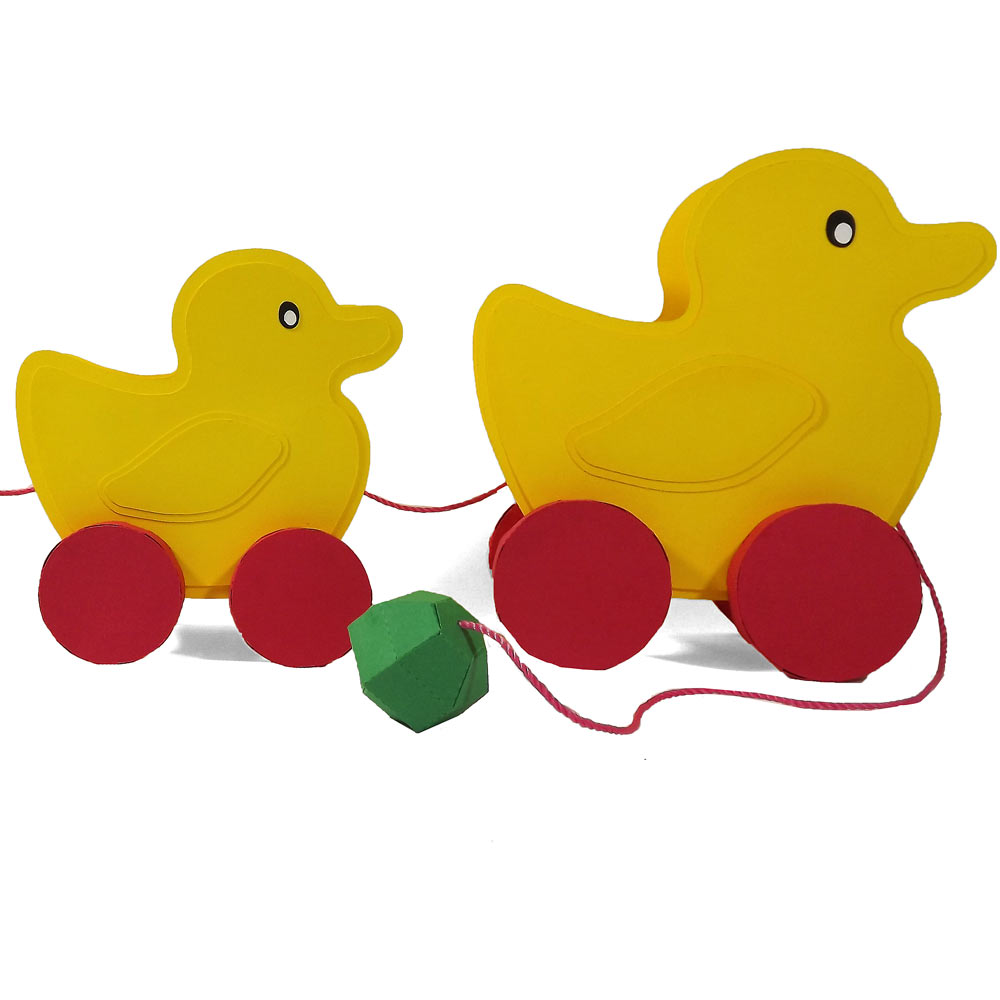
Pazzles designer Heidi Edwards makes the coolest dimensional projects and this is no exception! Heidi's Blog This sweet little duck pull toy would make the cutest baby shower decoration. Filled with treats it can serve as a functioning candy bowl as well. Heidi created this fun piece by using the technique taught in our Making Shaped Bags Video.

An elegant Easter card made by layering the individual layers of the Cross Collection from Spellbinders digital dies.
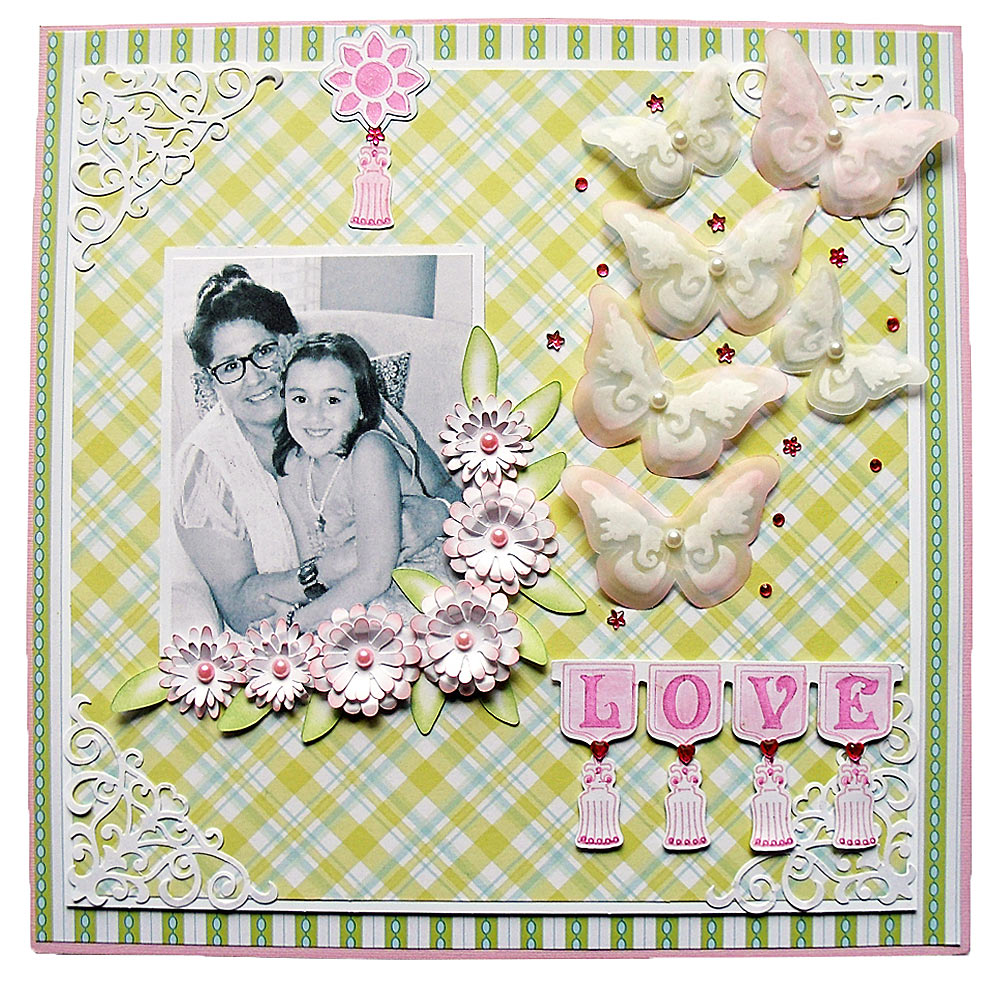
Thanks for joining us today as we celebrate this fun collaboration between Spellbinders and Pazzles. Our first project today is by Pazzles Design Team Member Melin Beltran. Melin's Blog This gorgeous layout shows how you can combine the Pazzles Tools with the Spellbinders Digital Dies to create completely different looks. Melin used the Embossing Tool on the vellum butterflies and then used the Pen Tool to draw in the lines of the Banner Basics Two file before cutting around the drawn image.
Who's ready to get this party started? We’ve added a new group of Spellbinders Digital Cutting Collections to the Pazzles Store. Check them out here! Every hour for the next four hours we will share a project with you using the Spellbinders Digital Die Lines. I’m certain the Pazzles Design Team will spark your inspiration with these creations! Join Klo and Michelle in the Member Chat Area from 11-1 MDT. You need a Craft Room Membership or Free Forum Account to participate, so if you haven’t already, go get signed up. We’ll be announcing a huge Spellbinders giveaway at the end of the party here on the blog. You will have a week to get entered. There is no need to be present today to be eligible to win. We’ll be posting our first project shortly, but in the meantime we’ve created a video to help explain how the Spellbinders Digital Die Lines can be used for endless creations.
I will be showing you the editing tool bar and learning each of the tools on it, so you can create and clean up your own files. We will be showing beginning through advanced techniques. Join us starting Sunday Morning at 5am, 1pm and 7pm(all times are USA Central, Chicago Time). If you are not sure what time that is in your location, go to the World Time Conversion site to see what time you will join us. To join, simply go to Klo’s Classroom, then Enter Classroom and sign in as a guest.Join us starting Sunday Morning at 5am, 1pm and 7pm(all times are USA Central, Chicago Time). If you are not sure what time that is in your location, go to the World Time Conversion site to see what time you will join us. To join, simply go to Klo’s Classroom, then Enter Classroom and sign in as a guest.