
Gearing Up Valentine
This fun and easy valentine is great for that child that loves to work with anything that has gears, like bikes, machines, cars, etc.
This fun and easy valentine is great for that child that loves to work with anything that has gears, like bikes, machines, cars, etc.
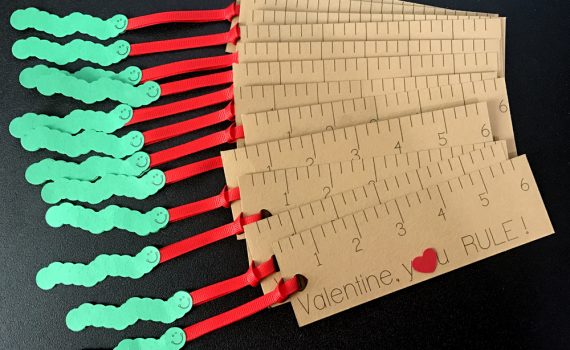
This valentine is immeasurably cute and so quick to make. Make a ruler out of paper or add a real ruler with this card for a really nice classroom valentine
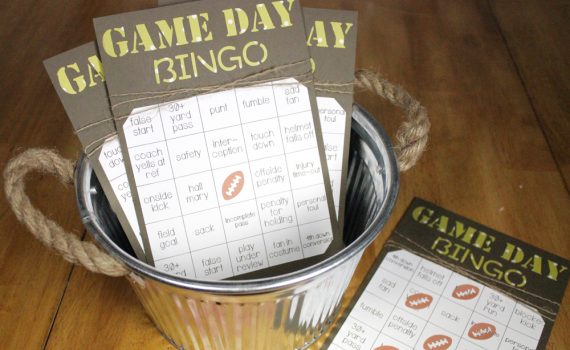
Let everyone get involved in game day with these easy and fun bingo cards. Make commercial themed, game play themed, and mixed themed cards. Then let your guests choose how they would like to play!

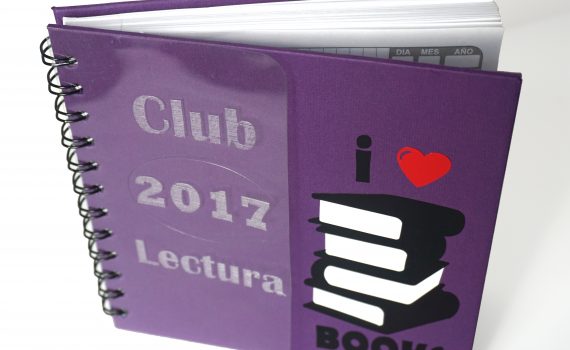
Belong to a book club? Make a notebook to keep record of the books and write down notes about the characters, author, quotes or everything you consider interesting. This idea can be used also with the planners and you can make monthly or section separator using this technique on acetate or metallic paper.
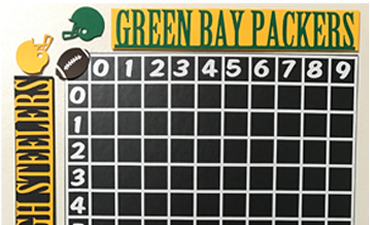
Use chalkboard and vinyl or the pen tool to create this Football Pool Chart. You can use the different chalk pens available to fill in the squares. Whether you are watching the playoffs or just watch the big game, this is super fun to do with friends and family.
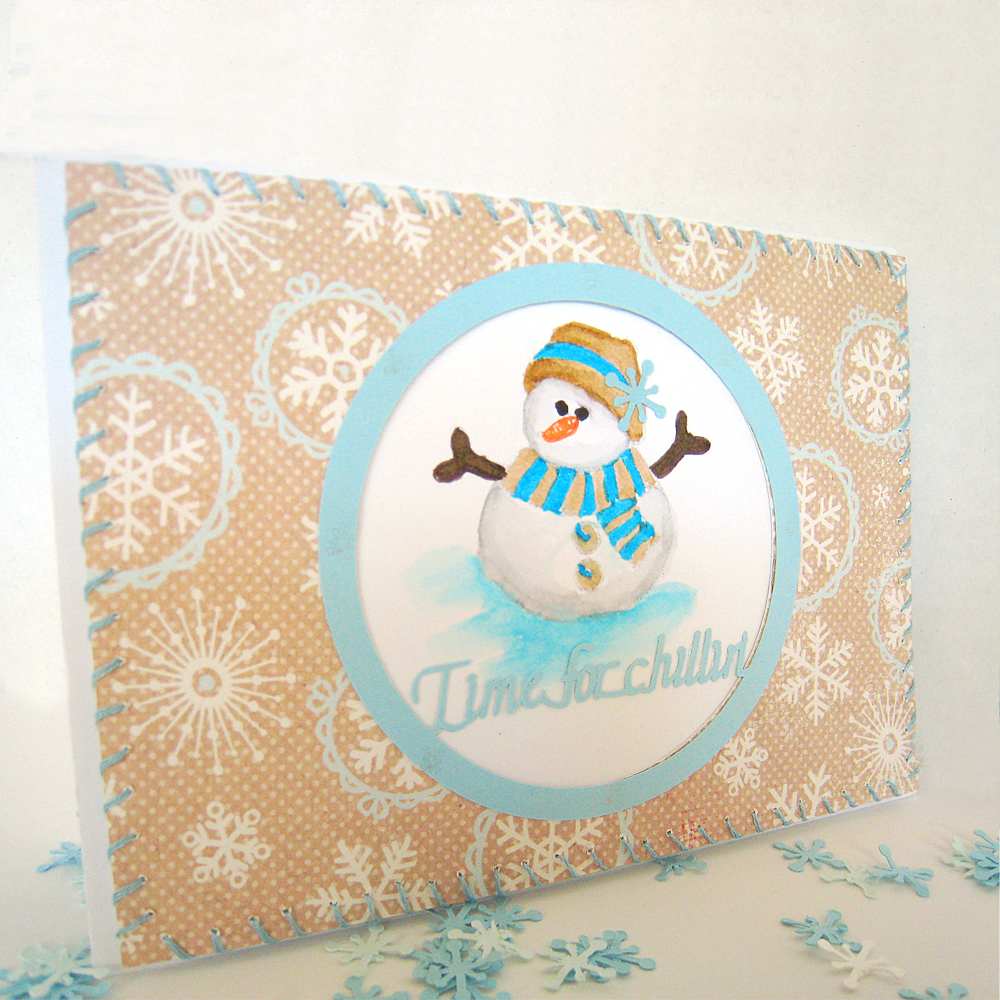
A cozy birthday snowman card using the piercing tool for those who celebrate during the winter months.
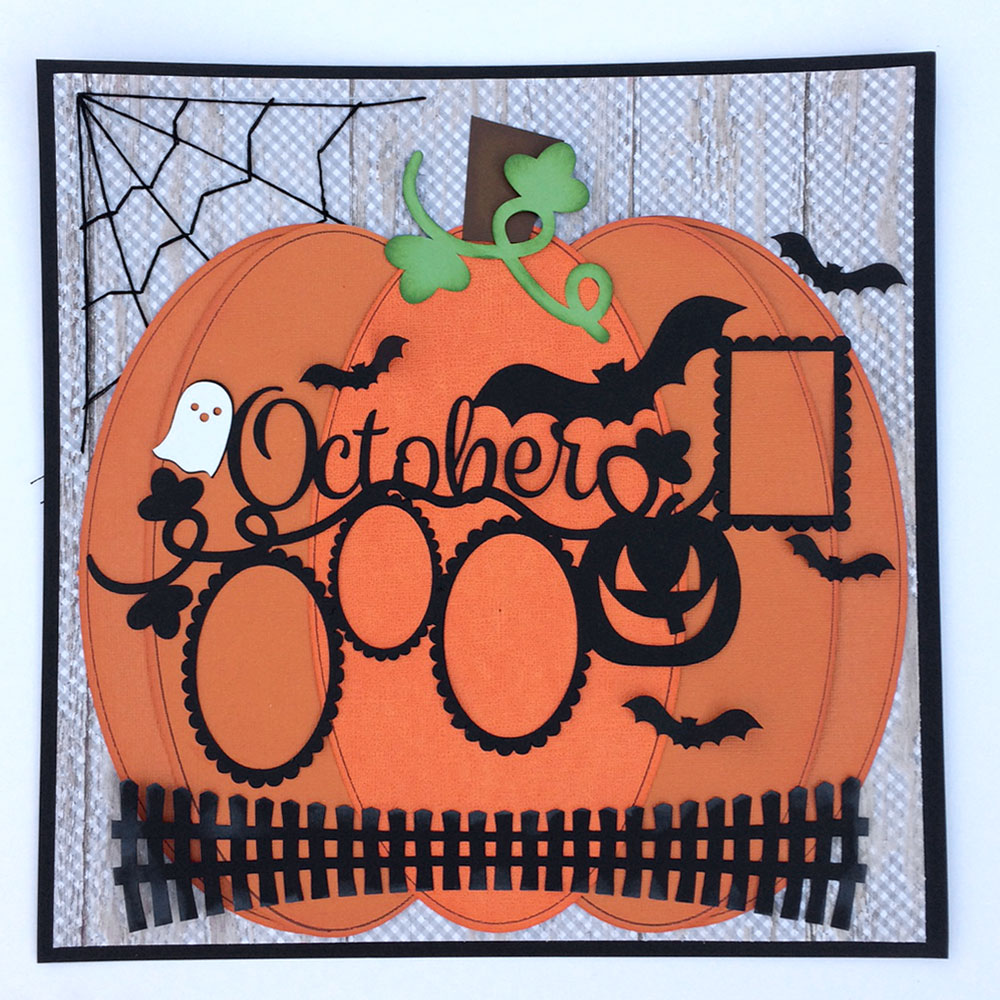
October is all about Halloween and the cute costumes and spooky décor mean lots of photos will be taken. Although it will be hard to do, choose your favorites for this October calendar page.
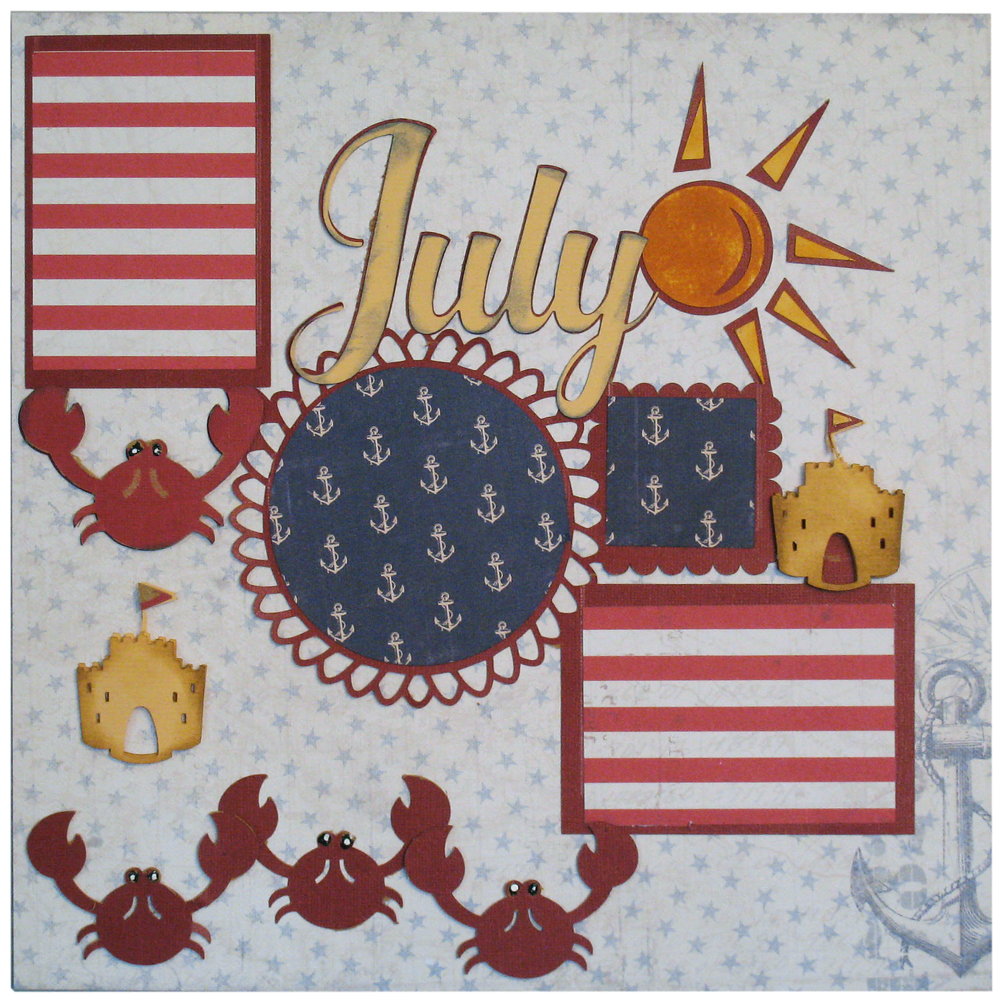
July is so lovely, so perfect for vacations on the beach, building sand castles, catching crabs and celebrating Independence Day. This vintage look page features a title, with spots for your wonderful photos.
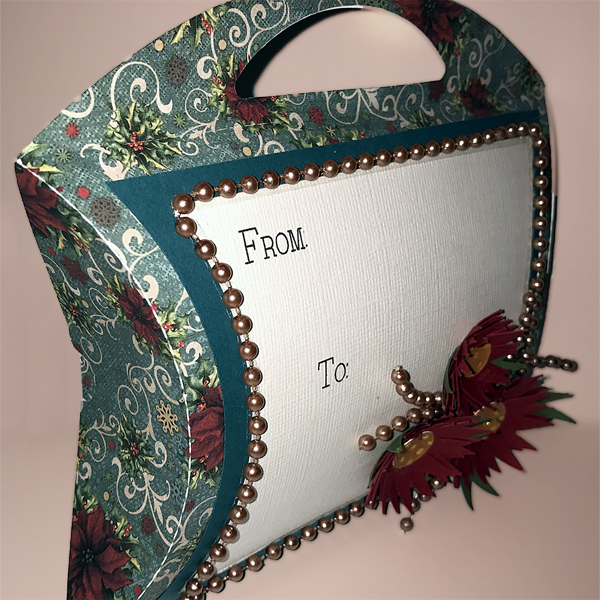
I hope you enjoy this Poinsettia Pillow Purse. This is so quick and easy to cut and assemble. It is the perfect gift box for smaller items that you may have trouble wrapping.
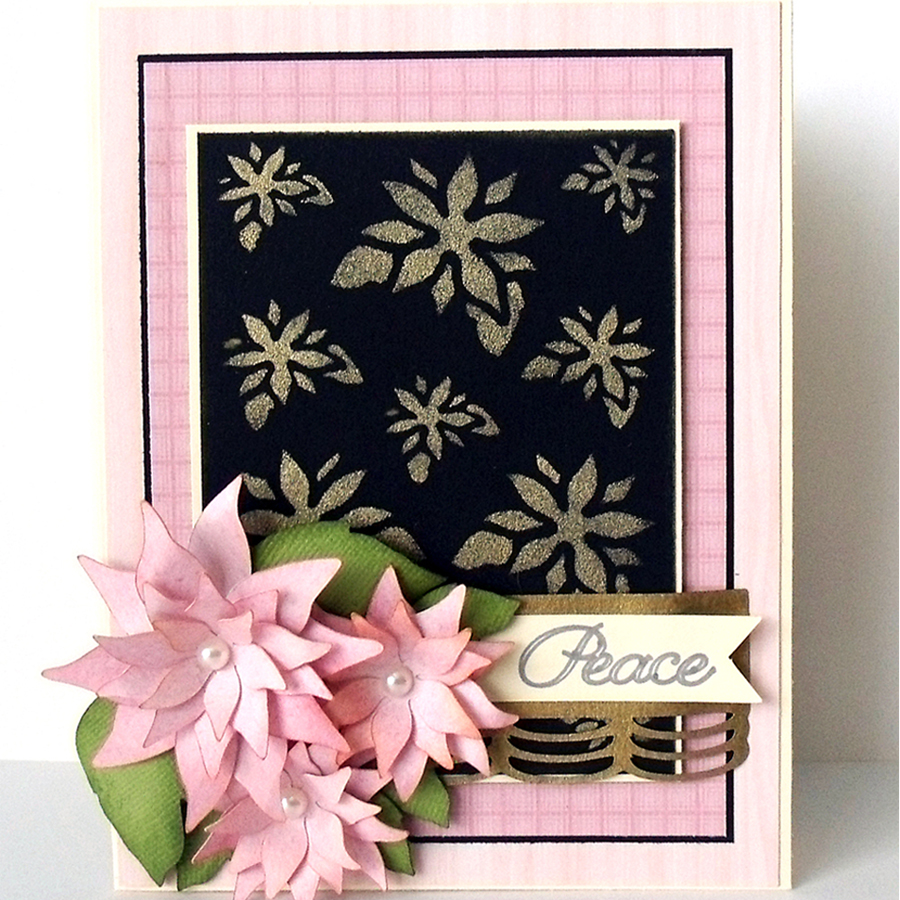
It is that time of year again. Time to create some one-of-a-kind special cards for those few special people. I used Pazzles Stencil Material and the files I created from the Poinsettia Stencil card file exclusively in the Pazzles Craft Room.

A pretty and simple home decor item made with paper and the pen tool!
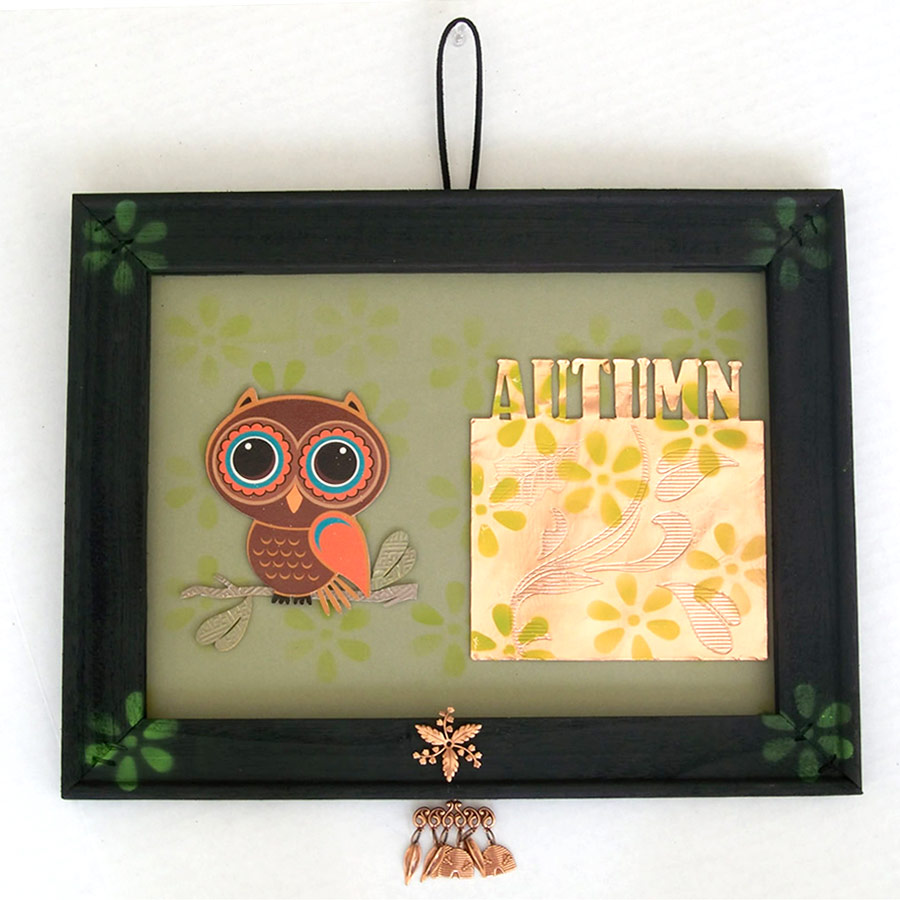
I’ve lived in a few places while in the Air Force and I have to say that fall in Georgia is the best I’ve seen. The colors are just beautiful, but green is still present, which is one of my favorite colors. For this project I used an old canvas frame. I took the fabric off and painted the frame black. I must admit I couldn’t decide what color I wanted to make the frame, but the black does make the copper metal pop. The frame I used is approximately 11” x 14” from side to side and top to bottom.
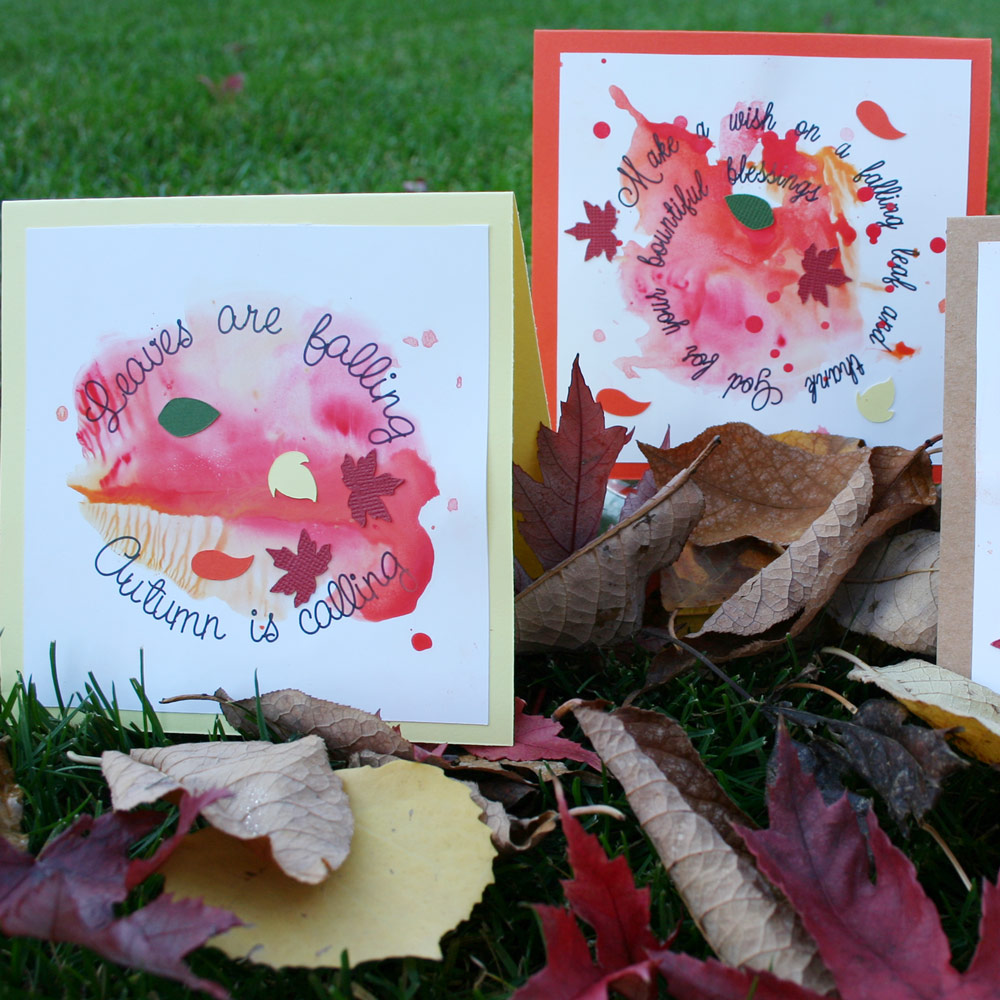
Making and sending cards is one of my favorite things! Although judging by the pile of handmade cards sitting on my desk and spilling out of every drawer, I must love making them more than I love sending them. I need to get on that! Today I'm adding a few more cards to my bulging stash with these spiral text ink spot cards. They are super easy to make, but pack a punch of autumn with the pretty colors and tiny leaves. I must admit, the tiny leaves are my favorite part.
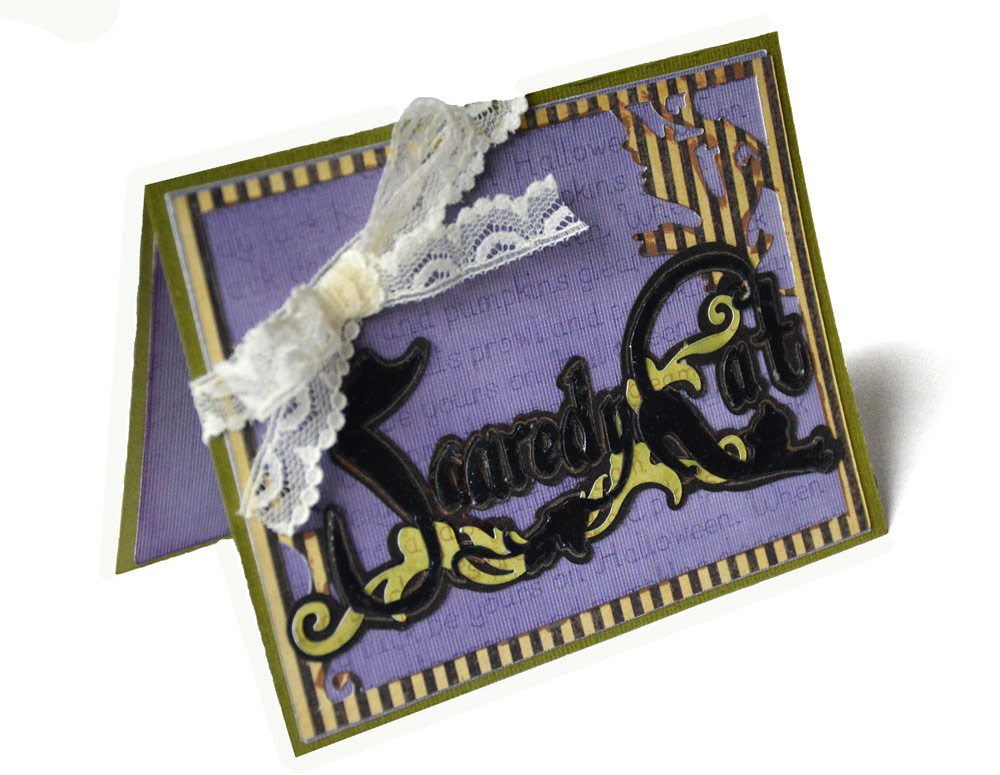
A classy and spooky collection of Halloween images themed around a pretty black cat. Complete Halloween card project included!
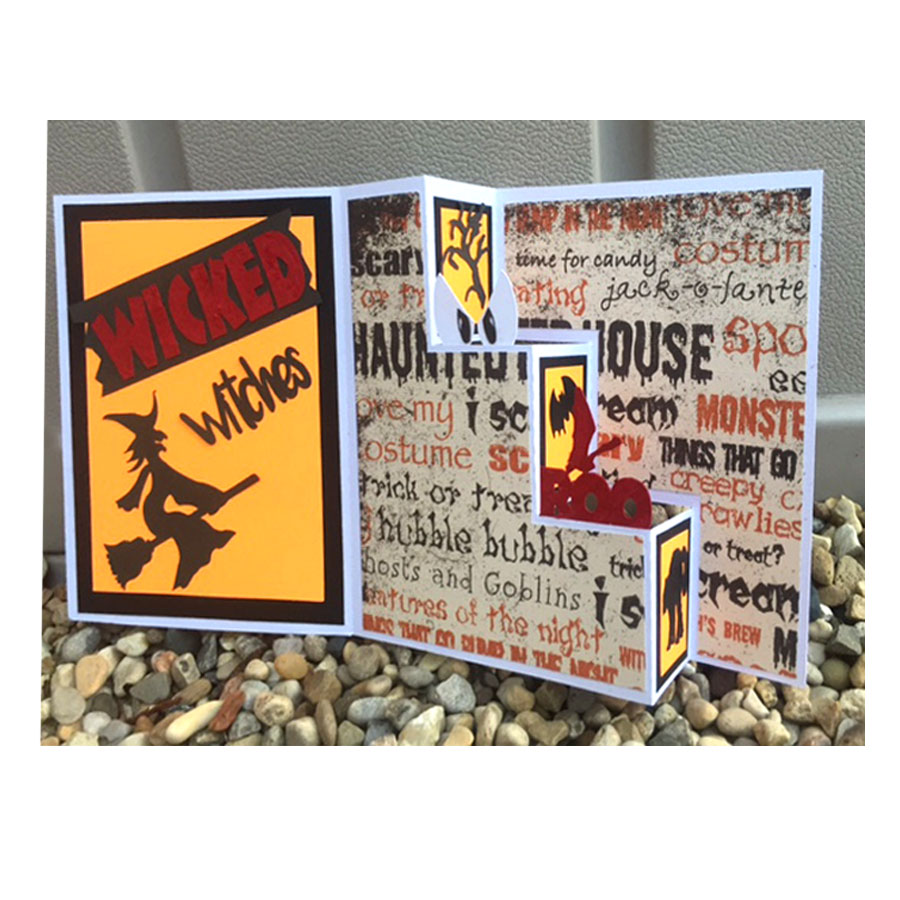
For this project I used the Card Template Fun Folds Stair Steps from the Pazzles Library and the Pazzles Distressing Tool.
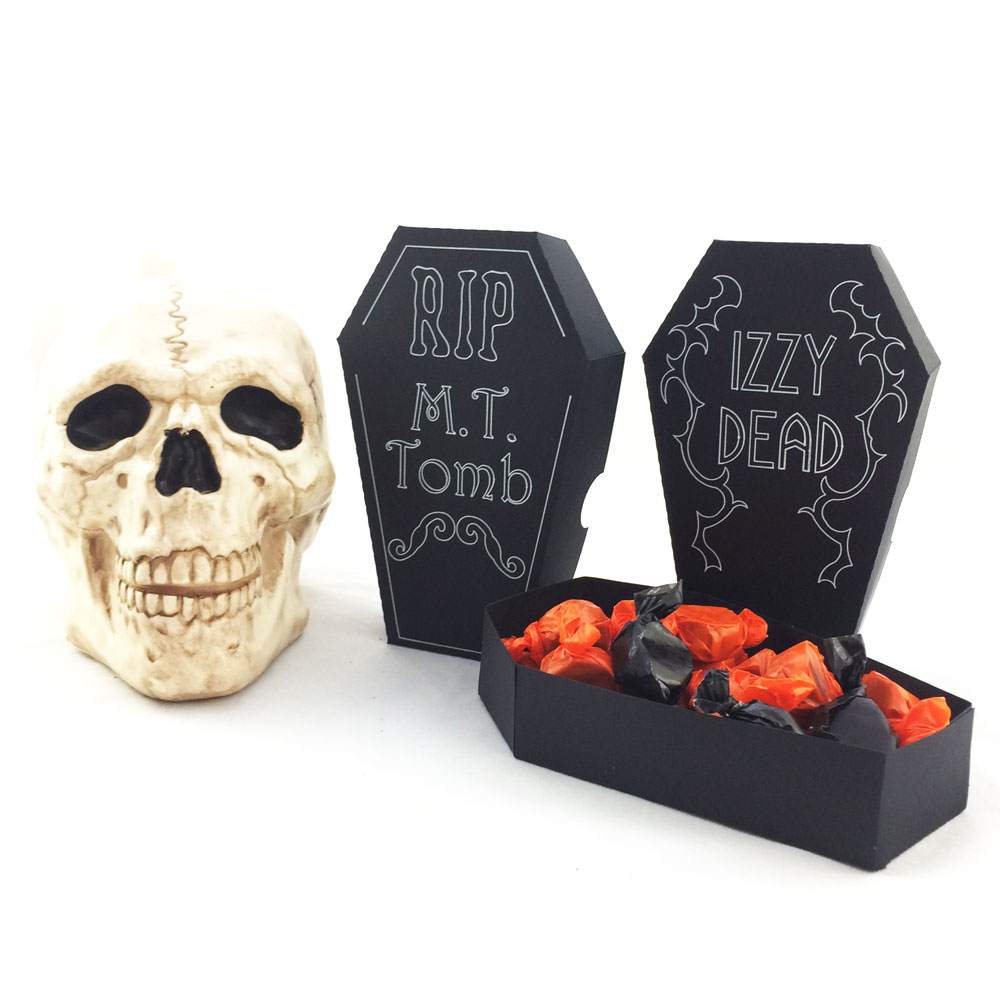
Mini sized paper tombstones that you can fill with spooky figures or delicious treats!
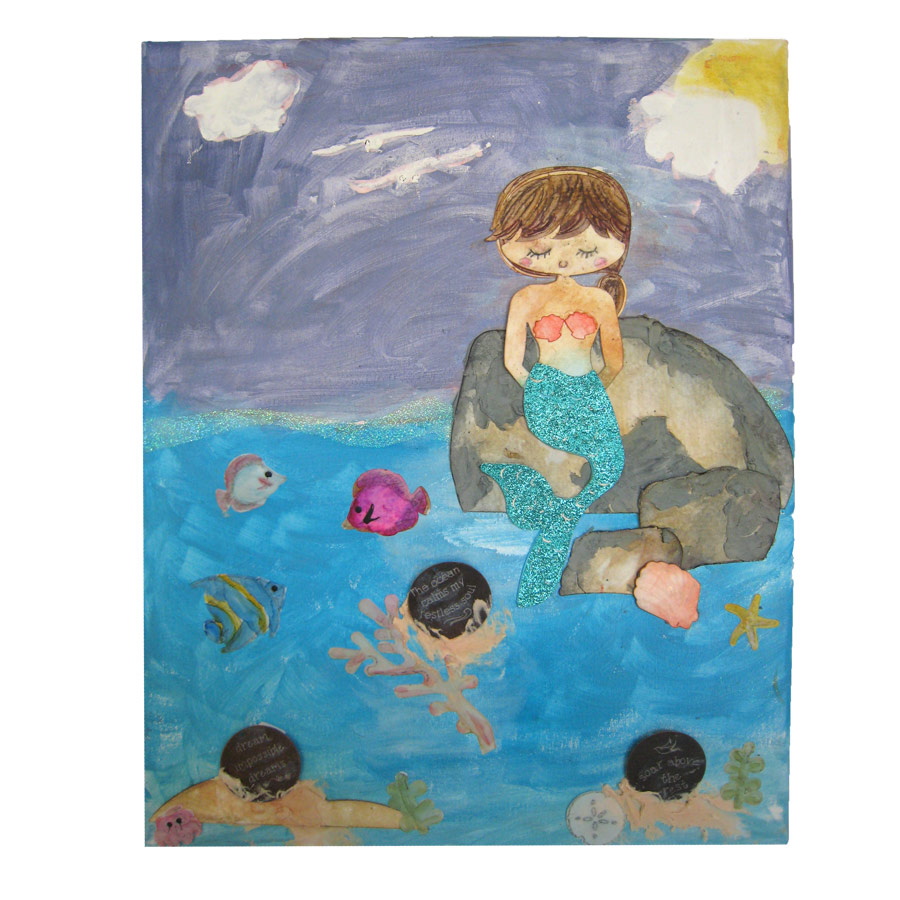
I recently enjoyed being a student in the Tim Holtz Creative Chemistry 103. I had taken courses 101 and 102 previously, each time immensely enjoying the process and play involved, and learning about how to mix various products and colors so as to not “create mud,” but to create something wonderful. I find the process of creating to be most therapeutic, and my Pazzles Creative Cutter certainly brings me to the next level, combining a variety of techniques, tools and Pazzles Craft Room designs to create art to decorate my home. My Ocean Treasures piece was inspired by the latest mermaid design in the Pazzles Craft Room, created by Miss Kate. This cute mermaid caught my eye, however I wanted her sitting on a rock, so I needed to perform a little “surgery” in my InVue software. Using the scissors tools, I could swap the body of a seated mermaid with the head and arms of the one I preferred. I also found a wonderful assortment of rocks and ocean themed designs in the Pazzles Craft Room. Engraving round metal jewelry blanks with appropriate quotes seemed like a good solution for my vision of golden treasures, thanks to the Engraving On Sequins video in the Craft Room, I was able to do this with ease. To make the letters stand out, white picket fence distress crayon was smeared over the letters, the excess rubbed off with a finger. The smudged appearance gave the illusion of being made old by sand and water. The rocks, sand, mermaid and scalloped shell were cut from watercolor paper, using the Pen Tool with drawing pencil for the mermaid’s face. Various distress inks and texture paste colored with distress ink created the look of the rocks and sand. Watercolor pencils were used to color the hair and face of the mermaid, with ink blended in the background for the skin colors.
Quickly make a card using just one sheet of paper, enjoy them just as they are or embellish with extras for the perfect easy, quick card!
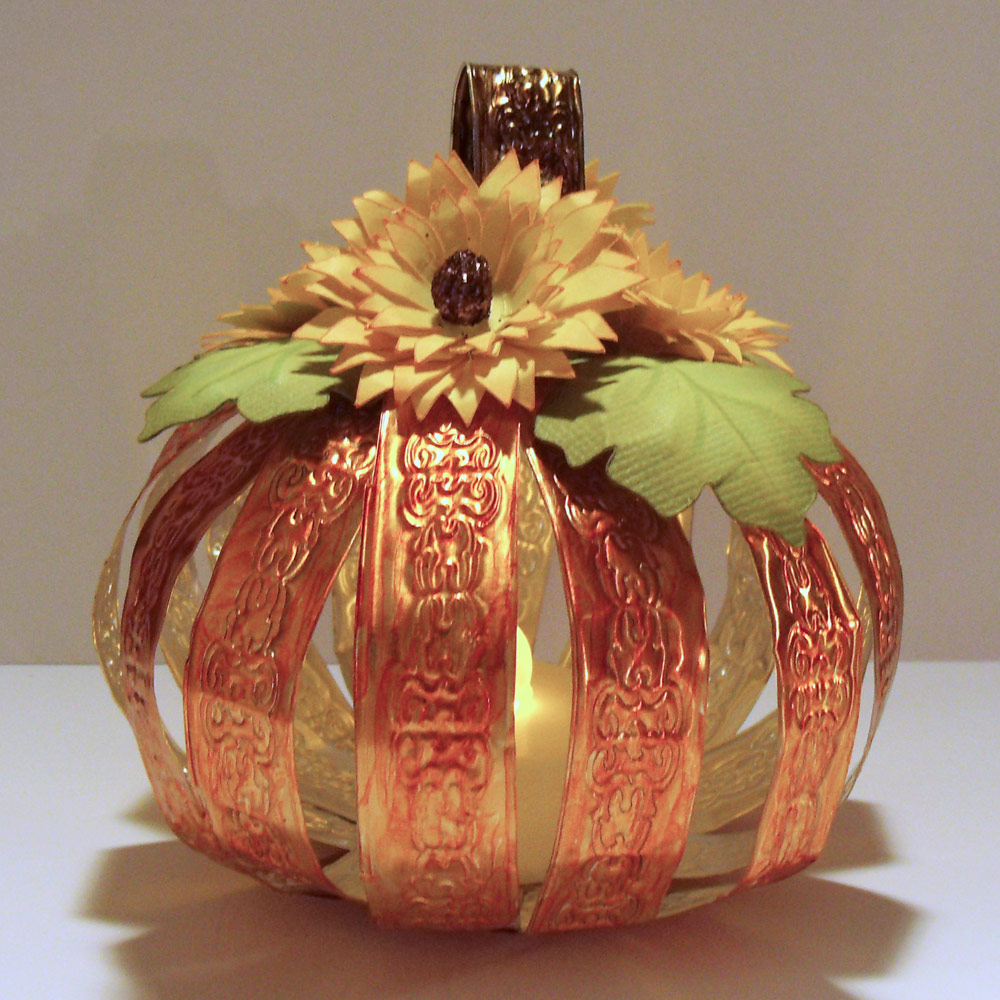
Hello crafty friends, Melinda here with you today, and I have a super fun project to share with you. As I looked around my craft room, I spied some of that fun metal craft I had used on a previous project. I decided that I wanted to do something with it, but what? I headed over to Pinterest to see what would spark my creative juices. I was going through some pins….Like most crafty hearts….I can really get lost down the rabbit…err Pinterest hole! But then it hit…inspiration. I saw these wonderful little “pumpkins” made out of mason jar lids….HERE. I didn’t have the Mason jar lids, but I had my craft metal and my Pazzles!!! So I went to work designing the pattern for the embossing. I didn’t just want to cut the metal into strips. Once I finished designing the strips, I used the Pazzles Embossing Tool and embossed the pattern and then cut them out. I cut out a total of 8 strips. You can find the file for this project here: Pazzles Craft Room 3D Pumpkin File.
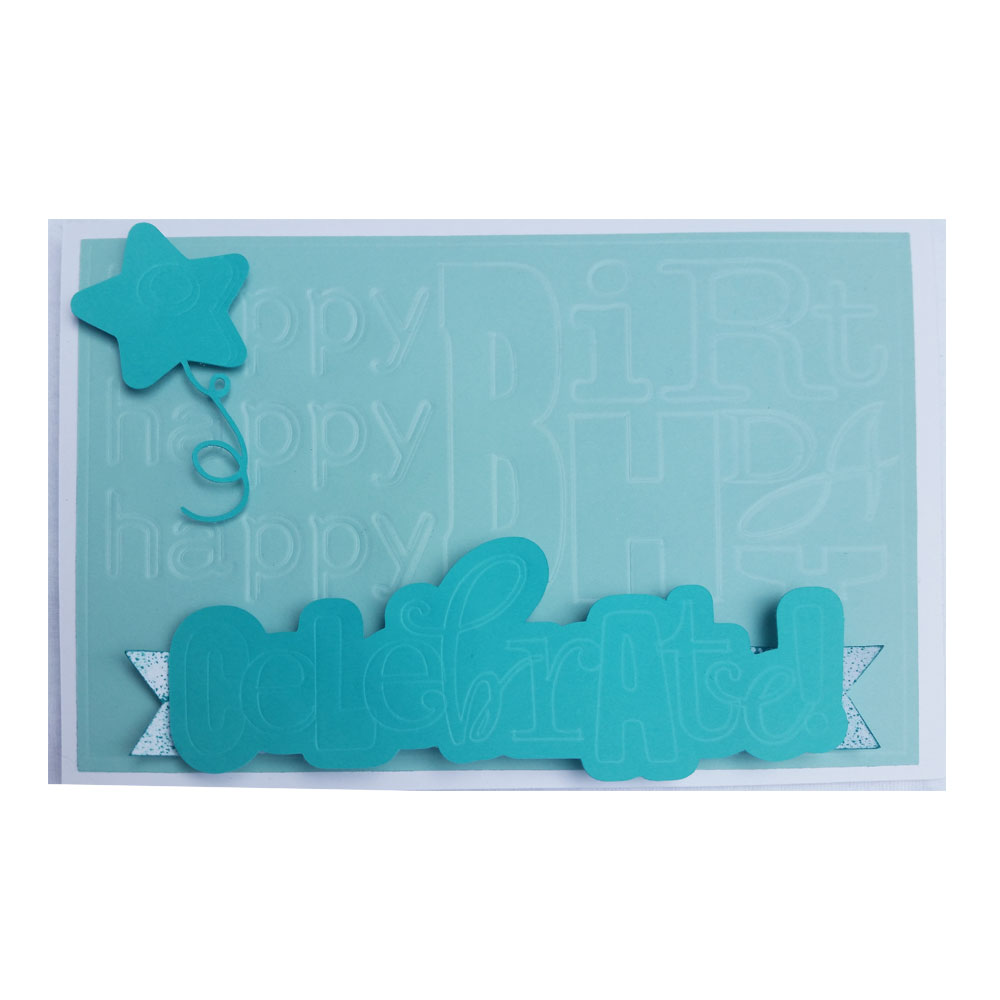
In keeping with the statistics, August is filled with lots of birthdays for my family and friends, so I decided to use the large end of the Pazzles Embossing Tool and some cute files from the Pazzles Craft Room Library to create a debossed birthday card in the Inspiration Studio Pro 2014 software. The 5x7 inch landscape-oriented card is in five pieces: 1-The 10x7 inch card base (on white cardstock) which folds to 5x7 inch with a kiss cut line. 2-The card front (on sea green cardstock) which is a 0.20 inline of a 5x7 rectangle, debossed with a 0.10 inline and with happy happy happy BiRtHDAY (fonts list at end), 3-The banner mount (on white cardstock), which is the straight banner from the Ribbon-Banners file sized to about 6.6 inches wide by dragging the corner handle, and modified by moving the left pair of kiss cuts a bit to the right to make them the same distance from the left tails as the right kiss cut pair is from the right tails 4-The dimensional sentiment (on teal cardstock) from the Miss Kate Cuttables Celebrate Title, with debossed letters and cut around the whole word (on the largest outline of the word which is darker gray), 5-A star balloon (on teal cardstock) from the Miss Kate Cuttables New Years Balloons file, debossed on the circles and edge accents and cut out with its string.
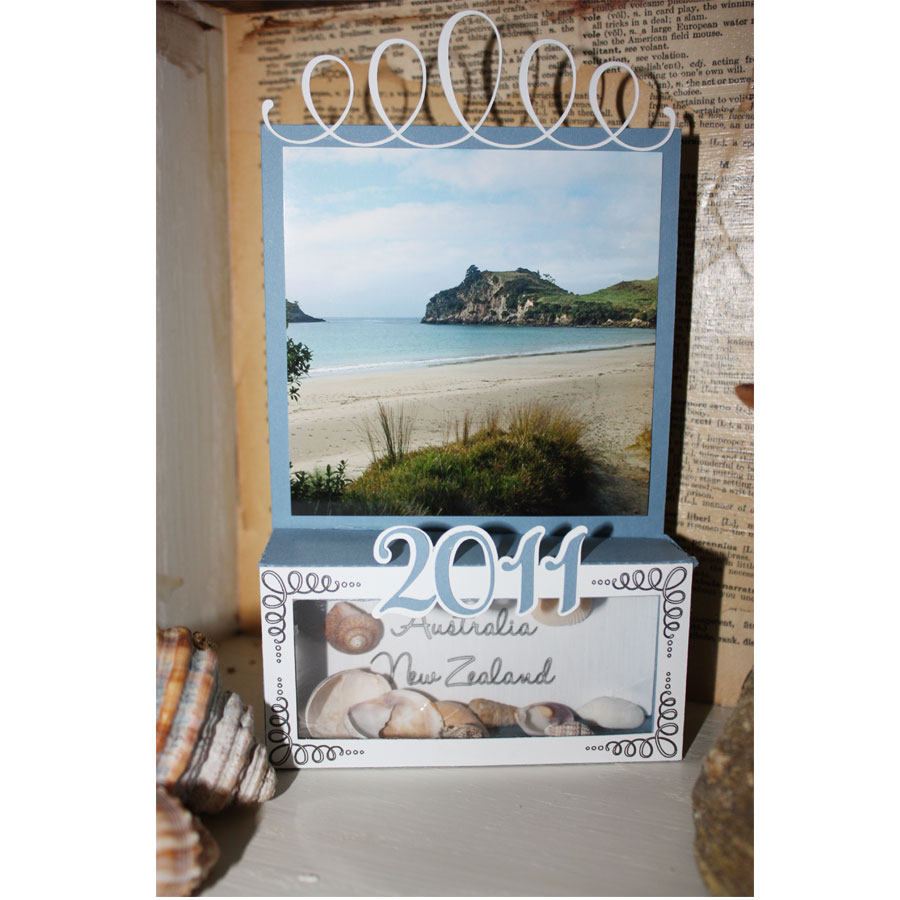
Have you ever had something like sand, seashells or any other very small piece of memorabilia that you didn't know how to share? This week's project was created with just this in mind. While on vacation, Jeff and I picked up some very tiny seashells that were perfectly shaped, but too small for basic display, so I began thinking of ideas of how to display them. I thought of shaker cards, but that was just not going to work. That is when I realized I could do a simple frame with a shaker box on it. This would allow me to put the year, location, add a photo, and have the memorabilia all in one place.
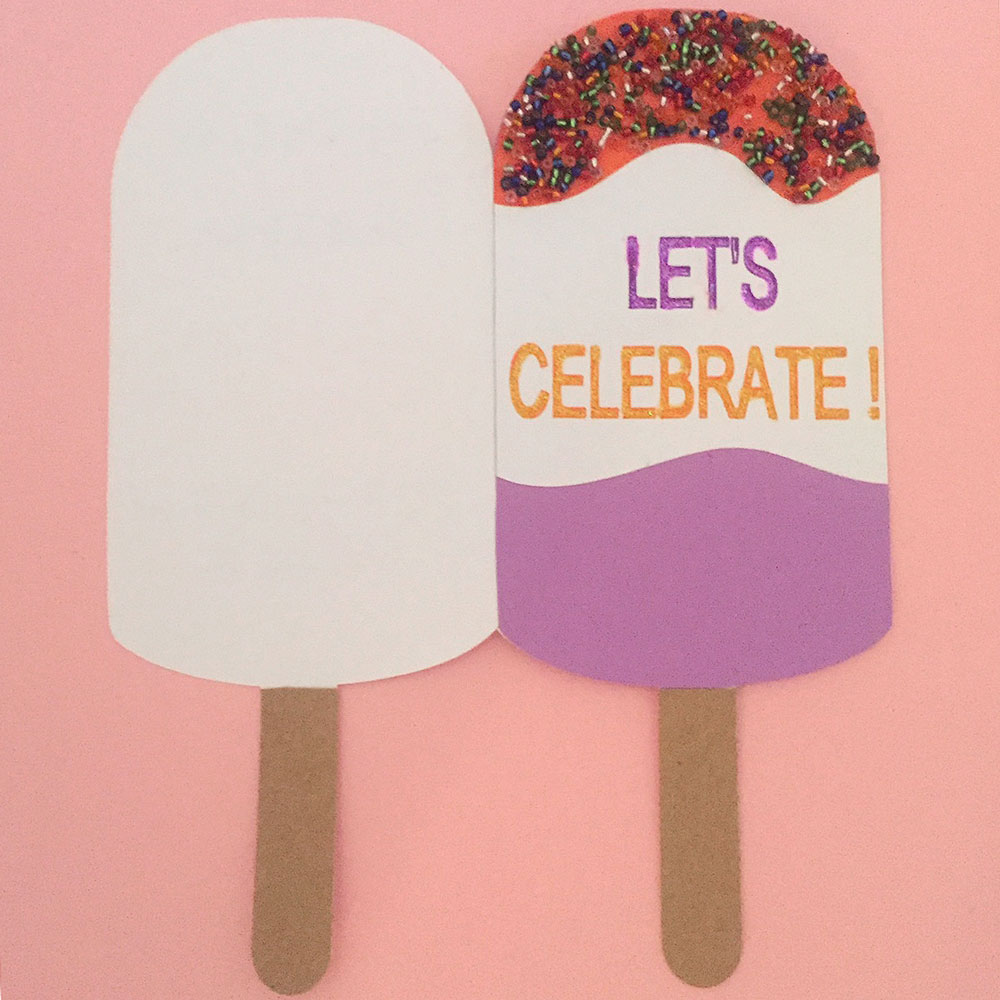
Summer time is always a good time for a cool treat. Why not have a party and invite people over to enjoy? If you are not using your Pen Tool this is a great time to pull it out and have fun. For this project I used the Popsicles file in the Craft Room then created a duplicate and welded the two together to make the card shape. The outside of the card I used purple card stock for the base and layered the orange and white on top. I used my Pen Tool to draw the letters for 'Let's Celebrate' and the inside of the card.

Did you know that the InVue software has built in templates for card making? If you have not looked at these templates you are missing out on some good resources for quickly creating a card. Here is a video to show you more about the Document Templates. I have created a quick 15 minute project for you.

The embellishments are an important part of any project. I have seen stitched cards and beautiful string art pieces and I wanted to do something like that, so I decided use this inspiration to do some embellishments using my Piercing Tool. I started, looking for some images to use with my Pazzles Piercing Tool. I also watched the Klo's Classroom videos about using the tool. These videos are available for Pazzles Craft Room members. It was my first time using the tool, and I felt in love with it. There are a lot of possibilities to try. I did some trial and error to get the correct space between the holes.