Design Team


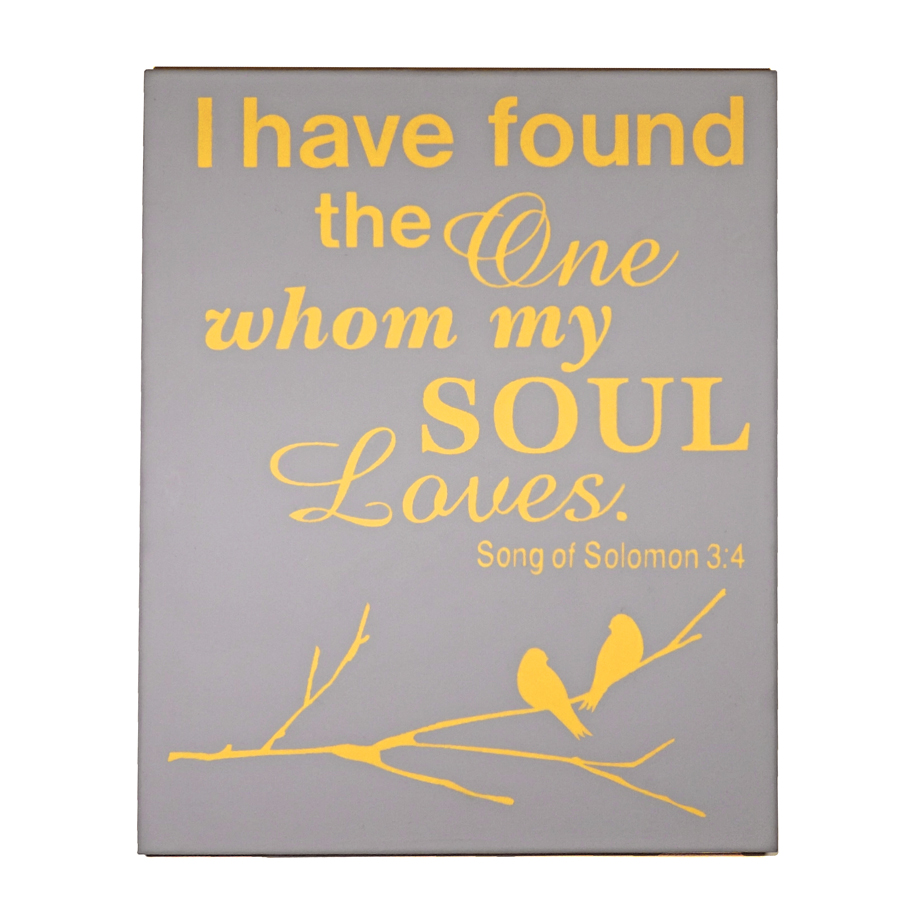
Vinyl Resist Home Decor Canvas

I could hardly wait to do this painting! We just redesigned our master bedroom and went with a totally different color scheme than we had before, so our previous wall hangings had to go. What is an owner of a Pazzles Creative Cutter to do? Well make your own of course! I have seen this type of art work on line and knew it was what I had envisioned for my bedroom. It was a pretty simple process and the possibilities are endless. I measured my surface (In my case a 20" x 16" canvas). Then I opened my Pazzles software and changed my page setting to 20" x 16" so I would know that my design would fit nicely on my canvas. I used the Bird On A Branch file. I altered it by copying the bird, mirroring it and adding it back to the branch next to the original bird. I then welded it all together so it would cut out all in one piece. I made my own word art using true type fonts. Make sure any cursive fonts are welded before cutting. Obviously our Pazzles will not cut a 20" x 16" design, so I had to break up the design and adhere to the canvas in parts. I was able to keep all the words together, but the branch did not fit in the same cutting area so I cut it separate from the word part of the design and lined it up manually on my canvas. It wasn’t hard to do, just an additional step. This will not be an issue if your surface is smaller than 12 x 24. I chose two paint colors that matched my color scheme, then painted the canvas in one of the colors using a small paint roller. I tried it with a foam brush and got not so great results. The roller worked great and gave me an even coat of paint. While it was drying, I cut my design out using Pazzles REMOVABLE wall vinyl.


Teacher Appreciation Apple Treat Box

Here, in the UK we have several more weeks till the end of the school year! I thought I would make a cute gift box for my son’s teacher in appreciation for schooling my son this year. I work in a school myself and know that the teachers love to receive unique, homemade gifts. I have used the Tennis Box from the Sport Gift Boxes Collection. In addition, I selected the apple from the Apple Tree cutting file also found in the Craft Room Library. I resized the apple to sit on top of the circular tab and cut it out of Kraft card which I covered with red gingham paper. I added a twirled flower between the leaves of the apple using red cardstock and inked up the edges of the leaves and apple. I then added some numbers using fonts in my Pazzles software and cut them out of black cardstock.


Congrats Grad Card

Hands Down Best Dad Bag

June is quite busy for some of you. Are there grads and dads that you want to honor? Pazzles can help. The Craft Room makes celebrations quick. I found several great files that help me celebrate these to special occasions. First I made some simple graduation cards. I even used the Print & Cut method to make my sentiments. For the cards I used the 2014 Photo Booth Hat and the Grad Girl files Next I made a small gift bag for a boy graduating.


Congratulations Graduate Card

Congratulations Graduate Card

June is quite busy for some of you. Are there grads and dads that you want to honor? Pazzles can help. The Craft Room makes celebrations quick. I found several great files that help me celebrate these to special occasions. First I made some simple graduation cards. I even used the Print & Cut method to make my sentiments. For the cards I used the 2014 Photo Booth Hat and the Grad Girl files Next I made a small gift bag for a boy graduating.


Graduate Bag

June is quite busy for some of you. Are there grads and dads that you want to honor? Pazzles can help. The Craft Room makes celebrations quick. I found several great files that help me celebrate these to special occasions. First I made some simple graduation cards. I even used the Print & Cut method to make my sentiments. For the cards I used the 2014 Photo Booth Hat and the Grad Girl files Next I made a small gift bag for a boy graduating.


Nesting Birds Print & Cut ...

Recently, Pazzles has been providing us with some lovely sketches which include cutting files ready for download available in the Pazzles Craft Room. If you have not tried any of the Cut And Paste Sketches so far, I urge you to have a go. Once you have downloaded the sketch cutting file all you need to do is import the sketch cutting file into your Pazzles software. For my project I used the Circle Spotlight Card sketch. Now the difficult bit…….decisions! Choose your coordinating paper and cardstock and cut according to the design. You don’t even need to stick to the design and you can use all, some, or one element(s) of the design in your project.


DIY Scrapbook Embellishments: Pocket Cards

Twelve different adorable 3x4 cards. Not only do these make great pocket scrapping cards, they are the perfect size for creating quick and easy sentiments for your cards!


DIY Scrapbook Embellishments: Flowers

I have so many scraps left from all my projects. I’ve decided to use some of my scraps to make some flower embellishments. How fun to just make them ahead of time in different colors and sizes using all of our scraps. This way when we’re working on a project it will be much easier to just go and pull out what we need. There are so many beautiful flower cutting files in the Craft Room Library. I decided to start my embellishment collection with the Large Flower and the Flower Bunch cutting files which can all be found in the Library. I simply set the cutting file at the size I wanted. I added a dimensional square between each layer of a flowers to help give more dimension. I then chalked and embellished with either a rhinestone, brad, or pearl for the centers. Now I will have an assortment of flower embellishments to add to any project.


DIY Scrapbook Embellishments: Bicycles and ...

I love to bike ride. It’s so nice to breathe the fresh air. It makes me feel so carefree… until I have to pedal up a steep hill! I have always loved the novelty of tandem bikes and wished I had one…so someone else could pedal! I made five different embellishments to help me savor the feeling I get when I ride my bike! I hope they will inspire you and help you get your scrapbooking page or card put together in a snap. Though I chose a bike theme, these embellishments can be turned into any theme you can imagine. Instead of using the quote, "I would go anywhere with you. On a bicycle built for two”. You could say “If friends were flowers, I would pick you”. Then change the pictures of the bicycles to pictures of flowers. All the embellishments using images or quotes were cut out using the print and cut technique.


May Challenge Reminder

What have you been inspired by this month? Our May challenge is all about using the world around you as inspiration. You can find details about this month's challenge here. As part of this month's challenge you will need to post both the inspiration piece and the finished piece. Today we have some challenge inspiration from the two newest design team members, Belle Donaghey and Krista Petersen-Hong. They are sharing photos of their inspiration as well as the finished project. Belle was inspired by her grandfather's cap. She created a layout about him that was inspired by his life and the colors of the cap.


Graduation Shrinky Dink Charms

Graduation is a wonderful time in one’s life. I thought I would make it more special by adding a little something to the basic graduation cap, and what’s more fun than charms. Inspired by the Charms video in the Building on the Basics section, I knew dangles or charms would be just the ticket. I remembered playing with shrinky dinks as a child so this craft also brought back fond memories. First I found two files in the Craft Room Graduate Photo Booth Hat and Hashtag 2014. I then used the replace by segment tool to draw a line to finish the cap and eliminate the graduate part since I just wanted a simple cap. I then used the techniques I learned in the video to make the cap and the hashtag into charms. I resized them to about to 7" for the cap and 9" for the hashtag.


Mother’s Day Easel Card

Easel cards are some of my favorite cards to create with it. For my card I really wanted something delicate to create my base with, so I used the Petal Square cutting file which can be found in the Craft Room Library. To create my card base I sized the file to 5 ½" x 5 ½" and then went ahead and mirrored my image to create two exact files. I welded both images together and also created a third petal square which I used on top to give it the easel card effect. After I welded both files together, I scored right in the center to create my easel base. I then attached the top file to the bottom portion of the score line. To accent my card I used a small doily, as well as a flower bunch and some flower cabochons.


May Guest Designer: Adeline Brill

Please help us welcome our special Pazzles Guest Designer this month: Adeline Brill! My husband and I recently painted several rooms in our home.  While painting each room and using our ‘vintage’ ladders, I was inspired to document the life of these two ladders. My go-to source for design ideas is the Pazzles Craft Room. My first choice is the Cut and Paste Sketches and I selected the sketch,  A Day in the Life. I welded one of the photo mats to create the popular Polaroid frame and then sized them to fit my three photos. I smudged them with chalk to create the splotches of paint on the ladders. For the title of the page I used the Painted Title Block and added the lettering using the Pen Tool.


Sun And Cloud Gift Box

It’s Sunshine Week at Pazzles! All this week we are sharing sunshine inspired projects to warm your hearts and inspire some bright, cheerful crafting! Goodbye winter! Hello Sunshine! I am a sunshine kinda girl and I am glad winter is behind us in the US. I decided to celebrate the warmer weather with a sunny project. I made this sunshine box using the Sunshine Title, the Scallop Sunshine file, and the St. Patrick’s Day Pot of Gold Treat Box. I used vinyl for the lettering because I love the fact that you transfer all the letters at once and they are already lined up. No glue, no fuss. I followed the directions that are provided with the St. Patrick’s Day Pot of Gold Treat Box to assemble the box, but I moved the cloud to the left side and instead of using the pot of gold, I substituted the Scallop Sunshine file.


Sun and Clouds Shaped Card

It’s Sunshine Week at Pazzles! All this week we are sharing sunshine inspired projects to warm your hearts and inspire some bright, cheerful crafting! I really enjoy making shaped cards. It just adds so much more to a card. With sunshine in mind, I decided to create a sunshine shaped card. For this card I used the Cloud and Sunshine Border file. I simply sized the sun to 6", mirrored and duplicated the sun, and then joined and welded the two sides together. I then went ahead and cut a circle to fit on the inside as well as on the outside. For the outer circle I used dimensional squares to add dimension. I created a sentiment with the Ribbon Banners cutting file and used my printer to print. I also embossed the circle and added some clouds along with some stickles highlights. I finished off my card by adding some rhinestone accents. 


Filled With Sunshine Sunburst Card

It’s Sunshine Week at Pazzles! All this week we are sharing sunshine inspired projects to warm your hearts and inspire some bright, cheerful crafting! Everyone’s birthday should be filled with sunshine! I made this birthday card with the Sun Ray Card 2 file from the Craft Room Library. First of all I used a premade card base that measures 5.5" x 4". Then I used two different shades of yellow for the rays to make it bright and cheerful.


Sunshine Shaped Card

It's Sunshine Week at Pazzles! All this week we are sharing sunshine inspired projects to warm your hearts and inspire some bright, cheerful crafting! Hello Pazzles friends, Melin here today, sharing a super easy and fun card with you. I used the new Spellbinders Digital Die Small Octagon Collection to create this card. I used some pretty paper from the DCWV Baby Girl Stack. It was so bright and cheery and was just the right color palette for a cheerful and “sunshiny” card. I started by welding the two bases together to create the card base. I cut that layer in plain white cardstock. I then cut the next layer in the patterned paper and then the next layer in some tangerine Bazzill cardstock.


Bee Happy Print & Cut ...

It is that time of the year when the birds are singing, the sun is shining and the flowers are blooming……..so we should all try and “Bee Happy”. I made my shaped card using one of the elements from the Banner Box cutting file in the Pazzles Library. As you know I love making shaped cards and if you follow the Video Tutorial called Making Shaped Cards, you also will find them easy and fun to make.


Easter Candy Toppers

Easter toppers for treats, bags, cake and cupcakes, or just as tags! All made with files from the craft room!


Build A Bouquet: Lily of ...

It’s Build A Bouquet week here on the blog. All this week we are sharing dimensional paper flowers. A few designs will be featured each day and by the end of the week you will have a full bouquet perfect for Mother’s Day festivities. Design Team member Heidi Edwards is joining me today as we build our bouquet. She created this beautiful Lily of the Valley, which is perfect for Easter too, by the way! I'm excited to create this bouquet for my mom for Mother's Day. I think sometimes as paper crafters we take for granted how cool it is to make a dimensional object out of paper. People not involved in this paper world are absolutely blown away when they see what we can make out of a flat piece of paper. Give a bouquet away to someone and let them think you are a paper magician!


Upcycled Truffle Gift Box

More recently, I have found that I am looking at packaging and thinking how I can use it for my projects. At Christmas we received a lovely box of truffles and I immediately thought how I could decorate it, when all the chocolates had been eaten. I measured the dimensions of the box and laid my patterned paper onto my cutting mat. I cut the pieces for the wrap around the box, the inside and top of the lid. It was so easy using the Transformation Menu in my Pazzles software to create the exact measurements for my paper piecing. The video tutorial in the Pazzles Craft Room called How to Resize Images helps you understand the capabilities of the Transformation Menu.


Easter Serving Tray

Turn a plain white tray in to an Easter serving tray with a little vinyl and these bunnies from the craft room library!


Pazzles Design Team 2014

The Pazzles Design Team has been inspiring us for over a year now and it is time to say goodbye to one and welcome our newest designers. Tara Brown has wowed us with her projects again and again, but she has decided to step down from the Design Team. We will miss her elegant vintage design in the Craft Room, but be sure and stop by her blog to say hello to her now and then. Thank you Tara! Please help me welcome our newest Pazzles Design Team Members:


Spellbinders Digital Dies Launch Party: ...

As we finish up our chat in the Member Chat Area, we have our last inspiring Design Team project by Angie Contreras. Stop by the blog in 1 hour (2pm MDT) to see the Spellbinders giveaway and get your entry in. Giveaway will close Friday April 11, 2014 at midnight MDT. Angie's Blog In need of a quick card? Layer the Spellbinders Digital Die files as you'd like them to appear on the screen and select the colors for each piece. Then simply print them out as images on your home printer. Use the technique in our Print And Cut video to cut around your printed image and you have a beautiful card. Use glitter glue, rhinestones and other embellishments to dress up your card.


Page 13 of 17« First...1112131415...Last »