Design Team


Spellbinders Digital Dies Launch Party: ...

Pazzles designer Heidi Edwards makes the coolest dimensional projects and this is no exception! Heidi's Blog This sweet little duck pull toy would make the cutest baby shower decoration. Filled with treats it can serve as a functioning candy bowl as well. Heidi created this fun piece by using the technique taught in our Making Shaped Bags Video.


Easter Cross Card

An elegant Easter card made by layering the individual layers of the Cross Collection from Spellbinders digital dies.


Spellbinders Digital Die Launch Party: ...

Thanks for joining us today as we celebrate this fun collaboration between Spellbinders and Pazzles. Our first project today is by Pazzles Design Team Member Melin Beltran. Melin's Blog This gorgeous layout shows how you can combine the Pazzles Tools with the Spellbinders Digital Dies to create completely different looks. Melin used the Embossing Tool on the vellum butterflies and then used the Pen Tool to draw in the lines of the Banner Basics Two file before cutting around the drawn image.


Spring Tulip Layout And Card

Hello crafty friends, Melin here, and today I wanted to share a layout I created with a spring theme. The layout is pretty straight forward. I cut the flowers and leaves and inked their edges for a little dimension. I like laying out everything before I cut and print so I know exactly what size everything needs to be. I used the DCWV Butterfly Garden paper for the background. I used the following craft room files: Frame With Oval And Lattice, Spring Tulips, Spring Daffodils, Tulip Flourish, Fancy Circle Frame.


Spring Prom Paper Boutonniere and ...

Spring is in the air and that means lots of beautiful flowers, a visit from the Easter Bunny, and lots of fun filled spring dances! I created this wrist corsage and boutonniere so you and your sweetie can look fabulous at your spring fling. They are both completely made out of paper with the exception of the elastic lace band on the wrist corsage. Just think, by the end of the night your corsage and boutonniere will still look wonderful while others will be wilting away. They can be kept forever so you never forget the terrific night you had!


Spring Party Banner

I love this cute spring banner that can easily be adapted for any event! Made with files from the Craft Room Library!


Strawberry Jam Jar Gift Tags

I remember when I was about 10, being in the kitchen with my great grandmother. We called her "Granna". I remember the smell of fresh strawberry jam and helping her to mash the berries. It’s a memory that has stayed with me forever, and so every year I make my house smell just like hers. Fresh strawberry jam is something my family has always loved, and for a few lucky people they get to live that memory with me as I give out the jam. This year I used my Inspiration to make my labels. I first cut three 3" circles for the tops out of a plaid pattern paper. Then I used the Deckled Edge Classic Ovals from the Spellbinders Cutting Collections.


Best Buds Layout

Melin here and today and I am sharing a super quick and easy layout. I chose the DCWV Neon Chic paper stack for all the patterned papers. The only other paper used is some black cardstock. I started by using my software to “layout” my page. This alone is a huge time saver. You can determine what sizes you need your elements to be before you make a single cut. I will even import my picture into the page so that I know exactly what size I want to print the image out once I am done designing. The additional benefit to doing this is, you can “save" this layout in your library and you can “reuse” this base layout again and again!


Milk Jug Necklace

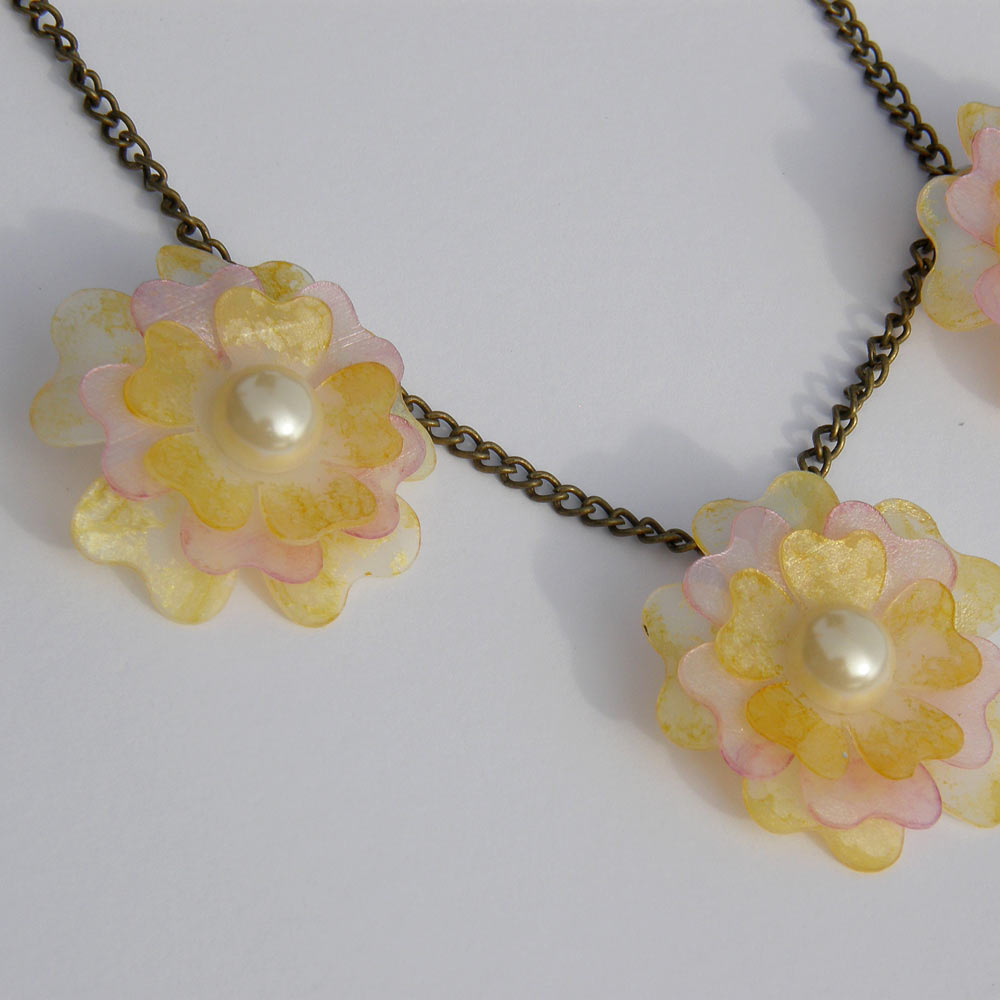
I was inspired by a necklace I saw Erin Madsen from DCWV wearing in a video for paper stacks. It looked kind of like iridescent shells, but being a crafter I saw milk jug material. I waited for my family to finish the gallon of milk in the fridge, then I rinsed it out and cut the flat side off. I used the Flower Bunch file from the Craft Room Library. That file really seems to be my go to file for spring projects. I chose a flower with defined petals and duplicated it until I had nine flowers, then resized three each to 1.5", 1.25" and 1". I thought at this point it might get tricky, but it didn’t. I put the milk jug pieces on a new conditioned mat, as I did not want them to move during cutting. Just to make sure they didn't slip, I taped them with painters tape also. I cut them on the stencil material setting and did 2 passes, first on a blade depth of 2 and then on 2.5. It cut beautifully.


Apron Pocket Card

I love apron cards because of their unique and fun shape. The pocket allows the wonderful opportunity to include fun recipes. They're always a great hit for wedding showers or housewarming parties. I changed this Apron Recipe Card file up a bit in that I didn’t make the pocket that was included in the cutting file. Instead, I used the shaped pocket from the Star Pocket Card cutting file. This way, I could add lace around the pocket. Insert Kitchen Utensils into the pocket to add to the effect and then add your favorite recipes. I put seam binding at the waist to make the apron even more realistic.


Butterfly Pops Party Favor

Today I have made a quick 15 minute project, a Butterfly Lollipop Holder using my Pazzles Inspiration. I love butterflies and when I saw this 3-D Butterfly in the Craft Room Library, I just knew I would be using it for one of my projects. I imported the file into my Pazzles software and deselected some of the layers, as I wanted to use a combination of different patterned papers. I duplicated the butterfly and set it to one side. Taking the first imported butterfly I deleted all the layers except the largest base layer.


Customized Rhinestone Spirit Wear

School spirit day is every Friday at my daughter’s school. Red is the color and their mascot is an owl. I must say though I’m not too fond of their t-shirt designs. She is very girly and loves bling , so I decided to customize a tank top for her using the Pazzles Rhinestones Kit. I love that we can transform our images into something custom , unique and blingy. Watching the Creating Rhinestone Designs video has really made it easy to understand the process of creating with rhinestones.


Make A Wish Birthday Card

Winter reminds me of snowflakes and mittens. With this in mind I got an idea to create a winter birthday card. I started with a 5" x 7" base card,  and then went ahead and created a scalloped border using the making scallops video. The video makes it so easy to create any size scalloped borders. I used the Mittens cutting file found in the Craft Room Library and created an outline for the mittens. I also created two basic circles and printed the Make A Wish sentiment.


February Challenge Reminder

Have you had a chance to play along with our February challenge? I'll admit the Bendi card idea was new to me and now I cannot wait to try it. As a reminder the February challenge is to use the Bendi Card Large or Bendi Card Small files in the Craft Room to create a card. In the January 5, 2014 Klo's Classroom, Klo showed how to create a bend-fold base from written instructions. She also showed how to change lines and have a little more fun with the file. We have a few beautiful samples to share with you from the Pazzles Design Team. Melin Beltran


Coffee Cup Circle Card

I wanted to create a special birthday card for a friend who loves coffee. I decided to create her card using the coffee theme. I used the Scallop Sunshine cutting file, Coffee Cup and the Let It Snow file, all of which can be found in the Craft Room Library. I enlarged the sunshine cutting file to 6 inches and mirrored and welded it to create a shaped card.


Customized Patterned Paper Valentines

One of my favorite things to do with my Inspiration Studio software is make my own custom patterned paper. I first change my mat size to 8.5 x 11 because that’s the size of my printer. I then import files I'd like to use. The one I used here is Heart and Bow from the Craft Room Library. I removed the bow, leaving just the heart. I thickened my lines, duplicated it several times in different line colors and stacked them slightly askew. Then I grouped and duplicated them, made some bigger, and some smaller placing them all over the page and rotating a few in different directions. I then resized some hearts very small, multiplied them, filled them in the different colors, and added them to the spaces as filler. When my design was complete I just printed it out on white cardstock using the borderless option on my printer. I really enjoy being able to make my own custom paper designs.


Pazzles Design Team Call

It's time once again to search for the latest Pazzles talent! We are looking for fun, excited, easy going and creative individuals for our 2014-2015 Pazzles Design Team. The Design Team Members will enjoy a one year tenure from April 1, 2014 through March 31, 2015. Requirements: Own a Pazzles Inspiration Creative Cutter Have the time to be able to commit to the responsibilities listed below for the entire duration of the design term Have your own active blog, You Tube channel, or a crafting oriented Facebook group or page (not your personal profile but rather a group or page that you lead) Be able to take good photographs of your projects


Steampunk Card

Hello friends, Melin here with you today sharing a masculine Valentine card. I used some Gold to go along with this month’s challenge to use Gold in your Valentine Card. Here is what I came up with. I started by cutting out my card base in kraft cardstock. My finished card size is 5 x 6.5”. I then cut a black mat, and then a kraft mat. On top of that I used all designer papers from the DCWV Industrial Chic Stack. I cut the majority of the pieces out in plain white cardstock. Then I inked and colored in the pieces with my various inks as well as a gold marker.


Love Is In The Air ...

There are so many wonderful cutting files in the Craft Room Library that I have come to the conclusion that there are simply not enough hours in the day to play. But that doesn’t stop me trying! I love the themed cutting collections and this is where I found the adorable Hot Air Balloon shape for my Valentine card. Once I imported the Hot Air Balloon cutting file from the On the Move Collection, I began to choose my papers. Sometimes this is the hardest part of a project! I decided to replace the pennants with punched hearts, so I removed them from my design. I then duplicated the image and moved it to the side of my visual mat and I rotated the balloon slightly to give more interest to the card. I welded the elements and then made an outline. I drew a rectangle box below and welded together the top half of the balloon and the rectangle to create my shaped card. I duplicated, mirrored and welded my shape to create my folded base card. (See Making Shaped Cards video tutorial). I cut out and adhered my cloud patterned paper to my base card. I then cut out some clouds out of white cardstock using the Heart Cloud cutting file and inked the edges in blue. I assembled all the layers of my balloon to the card.


Valentine Gift Set

I keep hand sanitizer in just about every room of my house. I think the bottles are boring and stick out like a sore thumb so I decorated them for Christmas and that got me to thinking…why not do it for every holiday or season? I used the subtract weld technique to create these fun Valentine’s Day covers. I used vinyl so splatters would not ruin the design. Now the bottles are a part of the holiday decor instead of an eyesore.


Embossed Bells Wedding Card

Hello crafty friends. Melin here again. Today I am sharing a card I created with the awesome Pazzles Embossing Tool! I had some thin metal in my stash and was waiting for the right opportunity to use it. Here is what I came up with. I started by using the embossing tool to emboss the beautiful Victorian Frame File from the Craft Room Library onto some white cardstock. I lightly inked the edges of the cardstock. I wanted the embossing to really show up. I trimmed up my mats and patterned paper and then machine stitched them. I inked the edges to give them a shabby, vintage look and added the Fancy Corners file to the edges of my mats. Then it was on to using the embossing tool on the metal.


Game Controller Shaped Card

It ceases to amaze me that no matter how many times I look through the Craft Room Library, I invariably come across a file that I have never noticed before! I have two young boys and they love playing their electronic games. I thought this would be a perfect card, in particular for my 15 year old son, as he does not appreciate teddies or footballs on his birthday cards!


Page 14 of 17« First...1213141516...Last »