Design Team


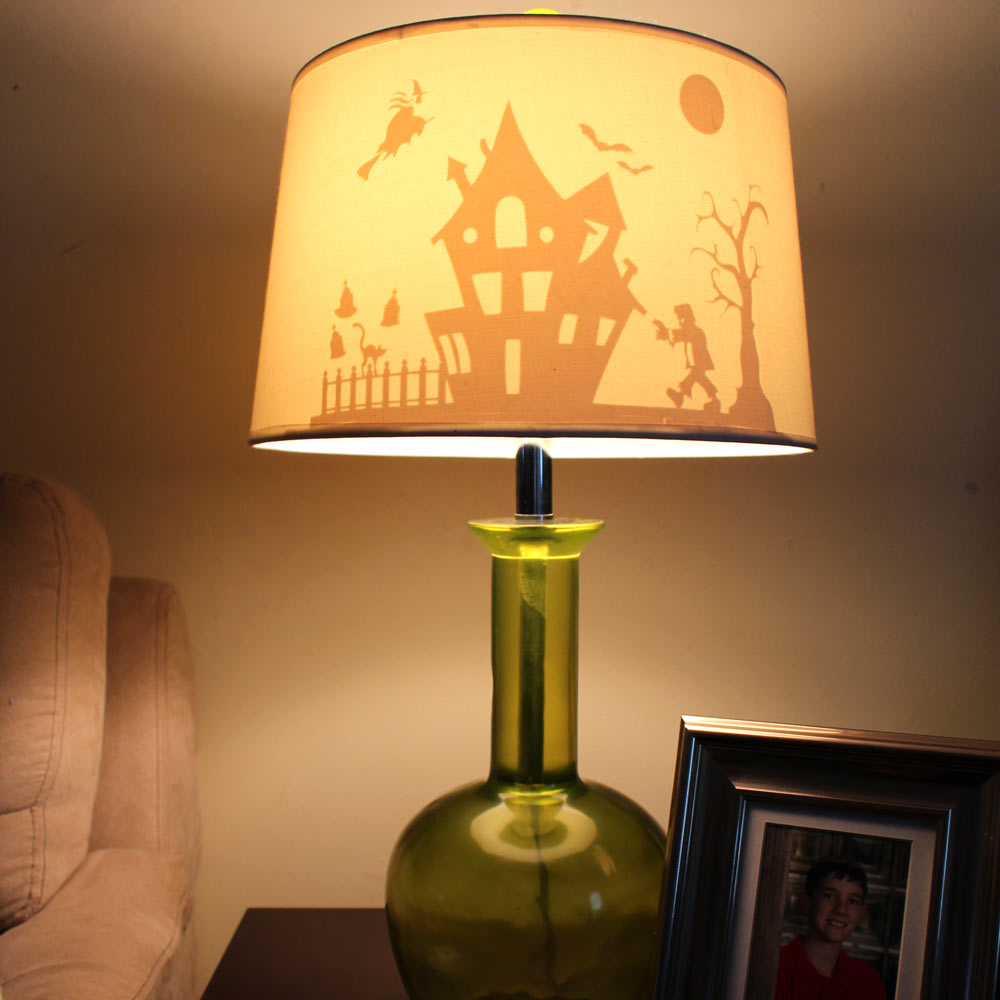
Halloween Lamp with Vinyl Silhouette

Halloween is right around the corner, and who doesn’t like to decorate for the holidays? This is a super easy project and it’s so much fun! When the lamp is off you can’t see the design. But when someone turns it on, POP, there it is! It is so fun to see their faces when they turn the lamp on! My son said, “It’s kinda like the Christmas tree. I just can’t stop looking at it.” I combined several Halloween files from the Craft Room Library to create this scene. Once I got my design the way I wanted it, I welded the elements together. (Make sure you reverse your design before cutting, especially if you are adding words.) I cut my design out using Pazzles Wall Vinyl in Cotton (White).


Halloween-Bat-Tube-Favors

Halloween Bat Tube Favors

Joanna here today, with a Halloween themed blog post. It’s that time of the year when we can go Batty at Halloween. It is such fun to make all those treat favors for the kids…….you can just let your imagination run! I have used an existing file in the Craft Room Library, using the Pillow Box Bat. I decided to tweak the file so that I could make a snug wrap around my plastic food safe tubes. I have included the file for you, so all the hard work has been done. If you use larger or smaller tubes you may need to resize the wrap.


Great Grandma Layout

Great Grandma Layered Floral Layout

Hello crafty friends, Melin here to share a fun and easy layout with you. I started by using my software to design the layout. I used the Autumn Bouquet file for the flowers and then used my software to create the circle, the scalloped border strip and the zig zag border. I then used the Flourish Sticks file for the flourish accents. I used the software and a free font to create the title. All of the patterned papers are from the Die Cuts With A View Whimsical World Stack.


Pumpkin Shadow Box

Pumpkin Shadow Box

This is a delightful, but quick creation that you can make with the assistance of your Inspiration Cutter as […]


Thanks Center Step Card

Thank You Center Step Card

Melin here today. Sharing a pretty and very easy card with you. I started by using the Fun Fold Center Step card for the base. I cut it in some Red Bazzil cardstock. For the panels I used some Die Cuts With A View The Botanicals Stack. I then cut the middle frame from the Fancy Circle Frame file. I broke that file apart and then used the inside oval and made a couple layers. I inked the edges of the middle layer with some Olive Ink and then stamped my sentiment with my Olive Ink Pad. I added a few bitty sparkles and used some foam tape to give it a little dimension. For the flourishes, I used the Flourish Sticks file and just cut one piece of that file to make these flourishes. I then used the Flower Bunch file for the little flowers. Lastly I added some ribbon and some Gold gems to the centers of the flowers. Super quick and such nice results.


Pen Tool Cards

Boost Your Card Stash with ...

Melin here with you today. I'm sharing some quick, easy and cute cards with you. All you need is your Pen Tool, some pens and a few files from the Craft Room Library. I started by using the Flower Frame, Flower 4, Flower 5 and Journaling Butterfly single stroke files from the Craft Room. I edited the frame just a bit, combined the flower files and added the butterfly to the top right corner.


Family Heart Wall Hanging

This wall hanging was inspired by a table top piece a friend of mine liked on Facebook, so I decided to make her one for her wall. I used the heart from the Heart and Bow file in the Craft Room Library and sized it to 7.5 inches. Then I used the Edwardian Script font to add the saying and added some holes to attach ribbon for hanging. After I cut it out, I inked all the edges and filled in some of the lettering. To decorate it I used a simple flourish, the Curlz file from the Craft Room and some bling. This was a really simple project and can be made in no time at all. I could see this as a name plate on a little girl's bedroom door or nursery, or just on the wall with your favorite saying like this one.


Mad Hatter Tea Party Invitation

My niece just had her wedding shower this month and asked me to create an invitation for her. The shower was Mad Hatter Tea Party themed. Of course I said yes, and this is what I created for her. I used the Panel Gate Fun Folds Card Base for the base of the card. I printed the Hearts Overlay and the Elegant Layered Frame with the words “Open Me” and “Pull Me” inside the frames onto an 8 1/2x11 piece of cream colored cardstock, then used the print and cut feature to cut the Gate fold card out.


Coffee Cup Gift Card Holder

Coffee Cup Gift Card Holder

Is it morning yet? Or should I say is it coffee time yet? Ok really, when is it not coffee time? This coffee cup box and gift card holder set would make a perfect gift for anyone on your list who likes coffee. You can fill the cup with biscotti or coffee flavored candy, specialty creamers or really any treat your recipient enjoys. I plan on giving this set to my husband, for a just because gift. I used the print and cut feature to print “I love you more than coffee” on the Gift Card Holder and then cut the Latte cup file out and attached it with an Action Wobble Spring.


Spellbinders Tea Pot

Spellbinders Digital Dies

Today we have a special weekend treat. A few of our Design Team Members have created some special projects for you using the Spellbinders Digital Dies. If you aren't familiar with the Spellbinders Digital Dies, you can view all of the available files in our online store and/or watch the Spellbinders Launch video showing how they can be used. And be sure and check back Monday for a brand new release of new dies. Design Team Member Belle Donaghey used the Spellbinders Label 9 Digital Collection to make this beautiful Happy Birthday card.


A Gift Tag Set to ...

I was so inspired by the new Inspiration Vue Print and Cut that I knew I had to do a project for you using it. On your way to a party? Running out the door and stopping at a store to get a gift? This happens to me way too many times to count, and being a crafter people expect a little more from your gift wrapping. Most of the time there is just no time to do all that extra stuff. So how about we fancy up our store bought gift bags with a ready made tag? They are so easy to make in the software.


Teacher Appreciation Gift Bag

Hi fellow crafters, Joanna here today with my Teacher Appreciation gift bag. I work in a school, as a Teaching Assistant, and I know that teachers love receiving little gifts of appreciation from their students. They don’t need to be expensive, but handmade gifts which include chocolate are always appreciated!!!! Firstly, I created my bag using Kraft Card and the box cutting file from the Teacher's Chair Valentine Project. I then used the Paper Clipboard cutting file which I resized to fit onto the front and back of my box. I layered the School Word Set Title cutting file to the front of the lined paper from the Paper Clipboard file. I then Print and Cut the lined paper with the colored title.


School Motto Vinyl Decals

School Mascot Vinyl Decals

It’s that wonderful time of the year when the kids go back to school and football practice starts. You know, the time of the year when you want to put stuff all over your car to support your child. The decals sold at my son's school are the ones that look like someone printed them out on clear plastic or white plastic and slapped it on their car. Not this Pazzles girl! My inspiration for my project today is our school shirt and our motto Pride Matters. I scanned my shirt and took the lion and vectorized it. With very little clean up and resizing it came out beautiful.


Bleach Resist T-shirt Tutorial

Bleach Resist T-Shirt Tutorial

Today DT member Heidi Edwards continues vinyl week with a cool bleach resist T-shirt. She has included instructions for this fun project so you can make your own. 1. First I found an image that I liked in the Pazzles Craft Room. Then I cut it out using Pazzles Permanent Vinyl. I used Vinyl Transfer Tape to transfer the cut out image to my shirt. I pressed it down really hard, to be sure it was stuck to the shirt, being sure I pressed all the edges down well. I peeled the transfer tape off and ran my finger firmly over the more detailed parts of the design, just to be sure. 2. I put the shirt on a platen so the bleach would not soak through to the back. A big piece of cardboard will work just as well. Then I just sprayed it with a bleach cleaner. I know you can use a mixture of water and bleach but the bleach cleaner was handy and worked great. I used a misting bottle. You can get one at Walmart in the travel section.


Butterfly Cupcake Decoration with the Pazzles Pastry Tool

Easy Cupcake Decoration with the ...

I love baking with my daughter and enjoy all those special memories we create while doing so. We decided to make some cupcakes and make some quick and easy cut outs for our cupcakes using Wilton Sugar Sheets and the Pazzles Pastry Starter Kit. For these cupcakes we used the Large Flower, Flower Bunch and the Butterfly cutting files which can all be found in the Pazzles Craft Room Library.


Celebrate Easel Card

Celebrate Your Day Easel Card

Easel cards are just so fun to create with it! For my card base I used a 6" x 6" base and scored at 3". To accent my card I used several cutting files from the Craft Room Library; Decorative Round Background, Layered Flower as well as a butterfly from the Inspiration Studio Pro 2014 image gallery. For the flowers I simply added dimensional dots to add dimension, a gem and a bit of stickles to the edges.


Pencil Homework Sign

Pencil Homework Sign

Today we are doing our homework! It is back to school time and everyone is getting prepared. I have created two quick back to school items using one file from the Pazzles Craft Room. I am using the School Pencil file to help both the teacher and student! A note "FOR" the teacher. I found an over-sized clothespin at the craft store. Mine measures just under 5 inches in length and over 1 inch in width. I used my Pazzles software to draw a rectangle representing the clothespin. Then I placed the rectangle on top of the pencil file, and re-sized the pencil to fit just around the clothespin.


Pen Paper Keeper

Pencil Homework Helpers

Today we are doing our homework! It is back to school time and everyone is getting prepared. I have created two quick back to school items using one file from the Pazzles Craft Room. I am using the School Pencil file to help both the teacher and student! A note "FOR" the teacher. I found an over-sized clothespin at the craft store. Mine measures just under 5 inches in length and over 1 inch in width. I used my Pazzles software to draw a rectangle representing the clothespin. Then I placed the rectangle on top of the pencil file, and re-sized the pencil to fit just around the clothespin.


Triple Tag Easel Card

Easel Menu Table Centerpiece

When the Easel Card Collection was released I was super excited. These are some of my most favourite cards to create and the Triple Tag Easel Card file was perfect to use as a centrepiece for an upcoming friend's 60th Birthday High Tea. Once you’ve chosen your colour theme and cut out all your pieces this comes together really easily. I used the fit text to path function for the banner text and printed a partial Miss Kate Cuttables Pretty Swirls at each end of the banner. Some foam squares and a couple of Kaisercraft blooms with glittered (KindyGlitz) petals finished off the front section.


Luau Beach Party Favor

Luau Beach Party Favor

Summer reminds me of luau parties, and fun beach days. With this in mind I created a purse party favor using the Purse Box Square and Island Flower Bunch files, which can all be found in the Craft Room Library. To add dimension on the flowers I used Ranger Stickles and dimensional foam dots and for the leaves I simply chalked them. I also added a plumeria flower that I purchased on Ebay.


Distress Tool Birthday Card

My Design Team project for this week was to use a Pazzles Tool. I use the Pen Tool all the time, so I decided to use a tool I have had for years but haven't used much, the Distress Tool. Now my hubby's birthday is coming so I figured I’d make his card. I found the Birthday Title file in the Craft Room Library and thought that it would be perfect. The first thing I did was ungroup and move the candle and flame off to the side. I then made a rectangle the size I wanted the topper to be. Then using the engraving fill with S sweep, I filled in the rest of the file. I then resized the whole file, candle and all, to fit within the square topper. I find it much easier to fill the file before making it smaller to fit my card. For a little extra I added zig zag lines with the scissors tool to the top and bottom.


By The Sea Glass Jar

Hi fellow Pazzlers, Joanna here sharing my Home Décor item for my DT project this month. I love how I can use just one cutting file from the Library, as an embellishment, accompanied with other materials from my stash and turn it into a treasured item. During the summer holidays I take the kids on lots of day visits to the beach. They love walking along the sea shore collecting the prettiest shells and on our return we have buckets of them! Unfortunately, they end up being stored in the garage where no one can see them, so I thought this year it would be nice to display them in a glass jar. I used a glass jar that I purchased recently, no preparation needed! I secured and wrapped some burlap material around the glass jar and overlaid it with some white Voile. I cut out some fishes from some patterned paper I bought last year and adhered them using Micro Dots around the base of the jar.


Ice Princess Party Favors

Snowflake Winter Party Favors

“Let it Go, Let It Go……” is sung in our household, and my car repeatedly! This movie is so loved in our household, that my almost 5 year old son has chosen it as his theme for his upcoming birthday party at the end of August. The Pazzles Party CD 51 holds many amazing files that can be tweaked as required for your chosen theme. I adore making party décor and favours, and these files give you an excellent base to work from. Most of the pieces of my party are taken from other themed parties on the Party CD and remade with my winter party theme. Circus Pinwheels to Ice Pinwheels These make the quickest little additions to a sweet table or to give as party favours. I plan to make more of these in coordinating colours, and adding a touch of glitter to the corners adds more festivity! They don’t have to spin either, fastening them to a paddle pop stick and used as a static display is quite okay.


Page 11 of 17« First...910111213...Last »