Design Team


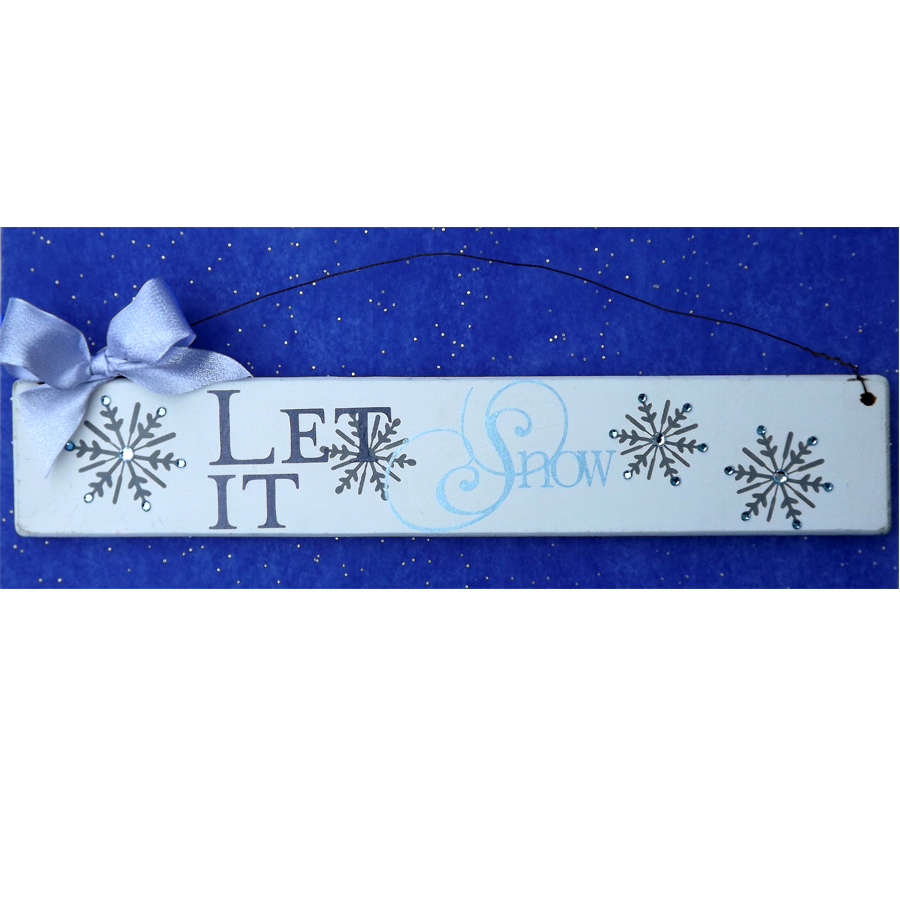
Upcycled Winter Home Decor Sign

One of my friends was going to throw out an old home décor sign and asked if I wanted it. I originally said no. The sign was funny but nothing I would use. Then I got to thinking about it and told her I had changed my mind and I would love to have it. The whole time I was thinking about how I was going to repurpose it. I decided to make a winter sign instead of a holiday sign, so I could use it throughout the season. I was going to sand the sign down and repaint it but then I decided to just flip the sign over and use the back, as the base coat was the exact color I needed.


New Years Wreath Door Decoration

New Years Wreath Door Decoration

Need a great door decoration for your New Years party? You know Pazzles can help you with that. Here I cut out a wreath form out of cereal boxes with my trusty Inspiration Vue. I cut a circle inside of a circle to create a wreath form. I did cut out three of them and glued them on top of each other to give my wreath more stability. Then I started collecting stuff for my wreath. I found I had some gold tulle and some gold star trim as well as some clear acetate. I wrapped the form in the tulle twice again to make it look fuller and then with the star garland. I found some great files in the Pazzles Craft Room to decorate. I then wrote Happy New Year 2015 and gave it an outline in black. I used Core’dinations Gold Pearls Paper to cut out the lettering. The champagne bottles are from the Craft Room Library, New Years Bursting Bottle file and the glasses were from the 2011 file.


Deer Tea Light Holders

Brrrr! Its cold outside and winter is in full swing. Soon all the holidays will be over, the Christmas décor will come down and we will be writing 2015 on our checks before we know it! I like to keep my house festive and fun during the winter months as they are usually the months we spend the most time inside. I created these little deer tea lights to add a little sparkle to my kitchen table winter scene. They are very simple to assemble and are a fun addition to my table.


Gingerbread Girl Gift Bag

Hi, Joanna here, sharing my Gingerbread Christmas Gift Bags created using my Pazzles Inspiration. I just love making presents for my friends, and using files from the Pazzles Craft Room makes it so easy to make them unique. I created these 2 different sized bags using the Cereal Box found in the Pazzles Library. I have altered it slightly, using my software. Gift Bag 1, I made tall and Gift Bag 2, much shorter, but I love both sizes. I cut the bags out of good quality double sided patterned paper which gave a good weight to the bag. I added a folded flap to the tops of the bags in red cardstock, using one of the files included in the Lunch Sack Gift Bags Collection, and resized them to fit the two sizes of bags. I inked around the scallop edges which gave the look of snow on the roof of a gingerbread house!


Pen Tool Ornament Bauble

Pen Tool Ornament Bauble

There are some great tools available to use with your Pazzles Inspiration or Vue. One my favourites is the Pazzles Pen Tool There is so much you can do with it. I like to use it to draw an outline of text in a fancy font and then free-hand colour in the rest of the design. This works particularly well with glitter pens. Today, I’ve chosen a simple, yet elegant Holiday Bulb file with lovely detail to be drawn in metallic blue pen on pale blue cardstock. I created an outline for the bulb too and then cut it out so it could be the feature for my holiday card. This file can be resized however you'd like it to fit your project, and would make a great file for a group of cards in the same design in different coloured card stock and metallic or glitter pen.


Christmas Print and Cut Sticker ...

Joanna here with a quick Print and Cut project for you to make your own Christmas sticker labels. I decided to make several sheets of stickers to add as decoration to my brown paper wrapping using my Pazzles Inspiration Vue. I have used several of Miss Kate Cuttables files which I imported into my software. On the larger present, to the front left of the photo I used the Be Merry Title. You just need to spend a few moments layering up the elements. I constantly referred to the image in the Pazzles Craft Room, to help align everything up correctly. I also used a selection of the Christmas Tags in the Pazzles Library and followed the same process. I removed the ribbon holes on some of the designs as they were not required for stickers. Once the title and tags were looking how I wanted, I made an outline of the outer cutting line. As I was putting my stickers onto brown wrapping paper, I thought a white outline would make the stickers stand out on my presents.


DIY Ornaments: Santa Box

I am excited to present to you this Jolly Santa Ornament. He went together quite quickly using the Tall Pyramid Box file. I used two files from the Pazzles Craft Room Library to make the white hat trim: Large Circle Scallops and Scallop Tag. With the InVue software, I layered the oval in front of the circle. Then I used Subtract Weld for the final look (deleting any extra pieces). You can use the same scallop for the ball on the pointed top of the hat. Santa’s moustache came from the Six Moustaches file.


Holly Jolly Holiday Hop Winner

Thank you to all of you who participated in the Pazzles Design Team Blog Hop. We had fun creating Christmas projects to share with you. Now it's time to pick a random winner from all of the comments! Congratulations to bzyPTmom who left the following comment on Joanna Wright's blog. bzyPTmom6 December 2014 at 23:43 This is a great idea--the reindeer is adorable--and who doesn't like treats?


DIY Ornaments: Jolly Character Faces

Christmas is here! I am so excited! It is the craftiest time of the year! So what better way to get started than to make ornaments for the tree! I made these three jolly ornaments using the Round Box file as the base. I love them because in addition to being an ornament they are a gift box too! You can hide small treasures in them like cash, lip balm, small toys, a key to a car…hint hint, etc. Hang them on your tree and surprise a family member with the prize inside.


DIY Christmas Ornaments: Victorian Baubles

Hello crafty friends, Melinda here today sharing my ornament project with you. These ornaments were super easy to make and very pretty. To start with I chose the Filigree Ornament file from the Craft Room. I proceeded to cut out 8 of these ornament files in white. I then created the solid "liner" piece by ungrouping the ornaments internal structure. I cut eight of these pieces out using some pretty paper from the Paper Studio Stack. Once I had all of my pieces cut out, I folded each piece in half. I did use my score board so that I could get a really good, clean score. You need to be careful with the filigree ornament when folding as there are a lot of little open pieces. Once all my pieces were folded, I glued one liner to one of the filigree pieces.


Gingerbread House Ornaments

DIY Christmas Ornaments: Gingerbread Houses

I’m excited to share with you my little gingerbread house ornaments today that you can re-create quite quickly and put your own twist on the decorations. These little houses can be used hanging on a Christmas tree, or from anywhere around the house. They can also be used on a mantel or table as cute decorations. I have even considered using them as place cards for Christmas Day with treats inside. The other thing you could do is pop a battery tea light candle inside for a nice glow. Using the Milk Carton House cutting file, I resized the entire file so I could fit two houses per 12" x 12" sheet of paper. This made them about 2" x 2" square at each face. The window, curtains and roof are all grouped together in this file, so resizing whilst these are included is essential to ensuring everything is the right size. Before I cut the files out, I ungrouped the files and then deleted one of the window sets to make room for the door file.


Pazzles Holly Jolly Holiday Blog ...

Thanks for joining us this morning! We've been busy little elves getting ready for today's hop. Each of the participating Design Team Members have created a Christmas project to share with you, and we are sharing them on our personal blogs. Grab a warm cup of cocoa and snuggle in for some Christmas craft inspiration! If you are new to blog hops, here is how it works. At the bottom of this post you will see a link to the next blog in the hop (Melin Beltran's Blog). Click the link, check out her project, leave a comment, and then follow the link at the bottom of her post to the next blog.


Christmas Tree Pieced Card Two ...

Do you have your Christmas cards done yet? I am still working on mine. Every year I try to design an easy card that I can duplicate pretty effortlessly so I can get them done on time. But then there are a few special people who mean the world to me and I want to send them a special card. Maybe something a little more creative. A card they will know I spent time on just for them! But during this time of year, who has time to design a whole different card? Not me! So instead I took my original design and vamped it up! On the simpler card I used the Tree, Squirrel and Ribbon Banner files from the Craft Room. The snowflake is in the Pro 2014 software image gallery and I used the drawing tool to create the star, then I assembled them in a pretty basic design.


Christmas Lamp Card Two Ways

Hello Pazzles friends, Melin here today sharing a fun way to make a fast simple card and or take it to the next level. For the main card base, I used the Side Step Fold file from the Craft Room. I cut them both in kraft cardstock. I then used my DCWV Performance stack and found some lovely cream note paper. So I cut a cream mat for the main area of the card and then cut the rest of the mats in the patterned paper. I then turned to the Craft Room Library and found the fun Christmas Lamp file. I cut them out in black cardstock. For the "fancier" version, I took it a step further and embossed it with black embossing powder. If you look at it, you can see how it makes the lamp look a little more "realistic". I then cut the flames out and inked them to give them a bit of a "glow". I then cut out the garland and cut extras to line the bottom two steps on each card.


Christmas Cards Set

Happy Holidays Christmas Cards Two ...

From CAS (clean and simple) to just a little more fancy, whichever you prefer, this card has you covered. Clean and Simple Christmas Card First I made a simple card by drawing a rectangle and giving it a ducktail (ribbon) end. I duplicated and then resized them, giving me a step effect. I cut out the banners in simple red and green paper. I then cut a piece of white to fit the front of my card and used my Pazzles Pen Tool to add Happy Holidays with the Alex Brush font. I added it all to a premade card base to create a very simple, and easily duplicated holiday card, which comes in handy if you have to make a lot of them.


Candy Cane Christmas Cards Two ...

Hi fellow Pazzlers, Joanna here with you to share two Christmas cards using my Pazzles Inspiration. One is a Print and Cut card that can be made in bulk and the other is using the same design but paper pieced. The second card is more time consuming to make, therefore you would possibly only wish to make these for your closest friends! I sized the cards exactly the same and used the rhinestone feature on both the base cards. Instead of using rhinestones which would be quite expensive I filled the rhinestone design with a red fill and red line colour, then Print and Cut my base card. Print & Cut Candy Cane Christmas Card I created my rectangle for the inside white card and made an outline for the red card. Check out the Video Tutorial on Creating an Outline, which will help you with this process. I imported the Candy Cane cutting file into my software, which I found in the Pazzles Library.


Thanksgiving Place Cards

Thanksgiving Place Cards

Busy, busy, busy. We are coming into the time of the year when we are so busy. We don’t have time to do elaborate projects, but still want the look of elaborate projects. Thanksgiving is one of those times. We want everything perfect on our dinner tables right down to the last detail including our place cards. Today I have a quick easy idea for place cards. I found these silver 3" x 2" frames at a yard sale for about buck but I have seen similar ones at the Dollar Tree and Michaels for next to nothing


Thanksgiving Table Decorations

Thanksgiving Table Decorations

I am decorating my Thanksgiving table with Pazzles vinyl. This was my very first attempt to cut vinyl. I do not know what I had been afraid of. It is so easy. I started with the Give Thanks phrase from the Craft Room Library to decorate a vase for a centerpiece. I was working with small pieces, so I did not use the transfer tape. I did however, print out the image, tape it to the inside of the glass vase and use that as a guide to lay down the layers of vinyl.


Advent Countdown Cards

Advent Countdown Calendar

Not a creature was stirring, not even a mouse…… Can you believe Christmas is just around the corner? I’m constantly reminded by the children and also the Christmas merchandise that seems to hit the stores at the start of October! I’m sharing my ‘countdown calendar’ with all of you today and hope I leave you with some inspiration for your own interpretation of one. I changed my mind so many times of how I was going to create this calendar, but I have to say I’m very pleased with the result, and I can still go a bit further with embellishments if I want to. We haven’t done a countdown calendar quite like this before, and so the thought of creating something with family activities built in sounded like fun. The main files I’ve used are the Gate Fold Card from the Fun Folds 1 Cutting Collection, Assembling Rosettes files, and Pocket Card. I used the print and cut method for the small discs with each number and also for the activity cards.


Fall Leaf Favor Boxes

Here in the UK, the leaves on the trees are changing color and it is a strong reminder that Autumn is here. I thought I would create some Thanksgiving Favor Boxes for my friends from a selection of cutting files found in the Pazzles Library. I used the Rounded Box Top file and decided to place some printed leaves on the front of the boxes. I used the Fall Leaves by Miss Kate Cuttables which includes 3 leaves in the set. I imported the Rounded Box Top onto my visual mat and placed one of the leaves in the center of the front panel. I then used my InVue software to print the leaf onto my cardstock. Once printed I placed my cardstock onto my Print and Cut mat and cut the box out. I repeated this two more times switching over the leaves.


Sunflower Bouquet in a French ...

Fall brings us beautiful colors, pumpkins, hay rides and flowers! I love the fall weather, just cool enough to wear a sweater and nice enough to sit on the front porch swing. Every time we go to the pumpkin patch they have cut sunflowers for sale in large French tin vases. I just love the way they look and smell! It’s one of my favorite spots to sneak off to while the kids are playing nearby with their dad. I just drink in the scent and beautiful blooms! I can’t resist touching the petals and I always bring a bunch home! Since pumpkin patch time has arrived, I got to thinking about all the fun and many memories we shared in the prior years of going. One of my fondest memories is of the sunflower bouquets in those tall silver flower pots lined up on hay bales just waiting to be scooped up! While thinking about these memories I decided I would fire up the Pazzles Vue and recreate those memories in a more permanent way. One of my favorite things about the Pazzles Inspiration Vue is that, if you can think it up you can create it! The projects I’ve made with my Pazzles have brought our family much joy, giggles, fun and lots of new traditions. This project will only add to those traditions and memories.


Book Inspired Fall Layout

Book Inspired Fall Layout

Fall/Autumn is my favourite season, and Anne of Green Gables is my favourite movie of all time. When Matthew and Anne are riding in the buggy together admiring the beauty of the fall countryside I wish I was there with them. My 8 year old daughter Charlotte chose to go to Book Week Theme Day this year dressed as Anne of Green Gables (Anne Shirley) and I couldn’t have been prouder that she’s fallen in love with the story as I did.


Star Shaped Gift Box

Star Shaped Baby Gift Box

Joanna here again, with a Star Shaped Gift Box. For those of you familiar with my projects you will know that I love making Print and Cut projects as well as 3D items. There are several colleagues at work who are expecting babies and these days they seemed to be so well prepared before the birth, and let everyone know the sex of the baby. Selfishly, this helps enormously when making new born gifts. The Star Shaped Gift Box is a simple cutting file, but I love the depth of the box and how the base of the box is cut out of one piece of paper. I cut the base of my box using Kraft cardstock to give it more strength. This enabled me to indulge in my pretty pink papers for the top of the box.


Halloween Bat Banner

Boo! Halloween isn’t so big here in Australia, so creating a Halloween project came with both excitement and nerves! My banner project uses the Cut and Fold Flower Medallion from the Cut and Fold Medallions Collection in the Craft Room. They look great whenever used, and I hadn’t thought about using them for a banner before, but they’re perfect. The file I chose had flower cut-outs, so I changed them out for witch hats to match the Halloween theme. When using the Cut and Fold Medallions I prefer to use double sided paper so that when you fold back your cut outs, you have a contrasting paper showing. I used two sheets from Kaisercraft’s 13th Hour Collection - Evening and Dusk. 'Evening' has the orange background with the black spots (top layer). The 'Dusk' sheet I used for underneath instead of plain black cardstock with the black pattern showing.


Page 10 of 17« First...89101112...Last »