Projects

Pazzles Projects


Electronic Key Fob/Ring Box

My daughter got her driver’s license this summer.  It’s an all new experience for me as she is my oldest. Of course she is having the time of her life, while I sit at home and worry about her safety…lol.  As you probably guessed she is going through gas like its water! I made this fun electronic key ring box to surprise her with a gas gift card.  You could also add a gift card for new tires or to a local repair/auto shop. Or, if you really want to surprise your recipient, you could put a key to a new car inside!


Apple Hershey Nugget Box for Back to School

Apple Nugget Box Card

Hello crafty friends, Melinda here with you today. It’s my turn to share here in the Craft Room. This month I was tasked with making a project with a school theme. I decided to make this super cute and fun treat card for my grandson for his first day of 4th grade! I used the Apple Nugget Box Card file I created for the Craft Room Library.  I started with some Kraft cardstock for the base. I then turned to the DCWV Edumacation Stack for the patterned papers. I also used some red cardstock for the outer apple shapes.


Embossing Tool: Birthday Card

In keeping with the statistics, August is filled with lots of birthdays for my family and friends, so I decided to use the large end of the Pazzles Embossing Tool and some cute files from the Pazzles Craft Room Library to create a debossed birthday card in the Inspiration Studio Pro 2014 software. The 5x7 inch landscape-oriented card is in five pieces: 1-The 10x7 inch card base (on white cardstock) which folds to 5x7 inch with a kiss cut line. 2-The card front (on sea green cardstock) which is a 0.20 inline of a 5x7 rectangle, debossed with a 0.10 inline and with happy happy happy BiRtHDAY (fonts list at end), 3-The banner mount (on white cardstock), which is the straight banner from the Ribbon-Banners file sized to about 6.6 inches wide by dragging the corner handle, and modified by moving the left pair of kiss cuts a bit to the right to make them the same distance from the left tails as the right kiss cut pair is from the right tails 4-The dimensional sentiment (on teal cardstock) from the Miss Kate Cuttables Celebrate Title, with debossed letters and cut around the whole word (on the largest outline of the word which is darker gray), 5-A star balloon (on teal cardstock) from the Miss Kate Cuttables New Years Balloons file, debossed  on the circles and edge accents and cut out with its string.


Penny Spinner Card

Back in 2013 we shared this card designed by Joanna Wright for National Scrapbook Day and the files were available for only a few short hours. It's such a cool idea, and we've had requests for the files ever since, so today we are re-releasing this project with the files for Craft Room Members. Download the files and start out by making this card. Once you have the concept down, use this idea with any number of files from the Craft Room for a WOW card that is sure to impress!


Home Decor Vacation Shaker Frame

Have you ever had something like sand, seashells or any other very small piece of memorabilia that you didn't know how to share?   This week's project was created with just this in mind. While on vacation, Jeff and I picked up some very tiny seashells that were perfectly shaped, but too small for basic display, so I began thinking of ideas of how to display them.  I thought of shaker cards, but that was just not going to work.  That is when I realized I could do a simple frame with a shaker box on it.  This would allow me to put the year, location, add a photo, and have the memorabilia all in one place.


Yurt Lantern

Yurt Shaped Lantern

Our family likes to go tent camping, so I started this project with the idea of a dome tent. I looked through the Pazzles Craft Room for a 3D project with a dome shape that I might use for the tent. I found the Hot Air Balloon Box design with a nice dome shape, so decided to use the top portion of that file for my tent. After I cut it out, my husband commented that it looked more like a Yurt. When I looked up Yurt, I learned that it is a portable, round tent, covered with skins or felt, and used as a dwelling.  The structure includes latticework for walls. That gave me the idea to add a section of lattice around the walls of my design to make a Yurt. You will find the resulting Yurt file in the Pazzles Craft Room.


Popsicle Shaped Card

Pen Tool: Popsicle Card

Summer time is always a good time for a cool treat.  Why not have a party and invite people over to enjoy?  If you are not using your Pen Tool this is a great time to pull it out and have fun.  For this project I used the Popsicles file in the Craft Room then created a duplicate and welded the two together to make the card shape. The outside of the card I used purple card stock for the base and layered the orange and white on top. I used my Pen Tool to draw the letters for 'Let's Celebrate' and the inside of the card.


Mixed Media Stencils Cutting Collection: ...

Today's collection is something totally different. This set of 12 Mixed Media Stencils can be used a number of different ways. Maybe you are a mixed media expert and you know just what you want to make with these, but maybe you are like me and are a little intimidated by this artsy style. This is a chance to try something new and fun. The files include a card sized stencil and a scrapbook border stencil. When you buy these stencils one at a time, they can get spendy, but you can make a dozen for just a few dollars with this collection.


Piano Box with Musical Rose

Digital Paper: Piano Box with ...

Recently I was crafting with six of our young grandchildren, ages two through 10, and wanted an easy project for them to make quickly.  I had made some musical roses from the Twirled Flower Rose file in the Pazzles Craft Room recently and needed to make more. After I made one, the children each wanted to make their own. I quickly printed some sheet music on both sides of regular printer paper, resized the Twirled flower file in the InVue software to 8” wide to fill the 8.5”x11” paper, and the children were dazzled as they watched the Vue cutter make swirls around the printed paper on the mat. I showed them how to start wrapping the outside end of the cut strip around a pencil, and keep wrapping until all of the paper was wrapped. We put some clear drying glue on the last inside bit of paper, set it on the table and let it unwrap until we liked the size.


InVue Project Pattern: Thank You ...

Writing thank you notes seems to be a long lost art.  It is so much easier to text or email, I guess. But if I really think about it, I do love getting those nice hand-written notes in the mail. What keeps me from writing thank you notes? If I am honest with myself, it is because I don’t keep handmade thank you notes on hand for when I need them. Yes, I have bunches of store bought ones but I just can’t seem to feel good about sending them. So I put it off until I have time to “create” one.


Mouse Birthday Card

Did you know that the InVue software has built in templates for card making? If you have not looked at these templates you are missing out on some good resources for quickly creating a card. Here is a video to show you more about the Document Templates. I have created a quick 15 minute project for you.


Piercing Tool: Stitched Embellishment/Adornos ...

The embellishments are an important part of any project. I have seen stitched cards and beautiful string art pieces and I wanted to do something like that, so I decided use this inspiration to do some embellishments using my Piercing Tool. I started, looking for some images to use with my Pazzles Piercing Tool. I also watched the Klo's Classroom videos about using the tool. These videos are available for Pazzles Craft Room members. It was my first time using the tool, and I felt in love with it. There are a lot of possibilities to try. I did some trial and error to get the correct space between the holes.


Wizard World Cutting Collection: WPC, ...

I've just recently fallen in love with the wizard world created in the Harry Potter series of books. All the little details are amazing and as I read I couldn't wait to make some of these fun little pieces and parts of the world created in the books come to life in paper. The Wizard World Cutting Collection is a few of my favorite things from the story! The collection includes 11 files perfect to give your wizard loving friends a customized one of a kind gift. If you are a fan of Harry Potter you'll recognize these pieces and you can share them with other wizard loving friends. I've created the set to include a few invitation options, a few party decor options, and several party favor options. There's even a cauldron cupcake wrapper!


Paper Checkers and Chess Board

I love playing board games with my family. It’s a great way to spend time with them and have fun at the same time.  One of the games my kids love the most is checkers.  I created this checkers game to celebrate the fun we have playing it.  The neat thing about this checker board is that you can create it in any colors you like.  You can also add anything to the tops of the pieces instead of the traditional stars and crowns. Think, pink and purple with flowers and hearts, or maybe actual pictures of your families faces. You can use the crown file I’ve included and take a picture of them wearing the crown for the king side of the checker. 


Paper Flower Bouquets

I found a petal from the rose bush outside of my studio, and decided to fashion one with a similar shape out of a triangle using the Pazzles InVue software. You can find the cutting file for the resulting 3DRose in the Pazzles Craft Room Library. These files came in handy for creating paper bouquets for my son's wedding. Here's how I assembled the roses. The first layer formed the flower bud when the sides of one petal were hot glued to an opposite petal. The remaining 3 petals were hot glued about 1/3 of the way up from the base of each petal, and adhered to the forming bud. The back center of the next layer was hot glued to the first, with the petals positioned alternately to those of the first. A thin line of hot glue was applied to the base of each petal, which was folded up to adhere to the forming bud. The corners of each petal were curled away from the center of the bud using the small end of a small paint brush. This process was repeated with all of the layers except the last one. The last layer was simply glued in the center back, with no glue required at the base of the petals.


Pen Tool: Decorative Envelopes

Making envelopes is fun.  I have to be careful how I design them because sometimes I add too many decorations and forget I need to put them in the mail. For this project I chose to make a scalloped envelope named Deep Scallop Envelope located in the Craft Room Library.  You can make this envelope any size, but I chose to keep it small so I could add a small “Thank You” insert.


13 photo School Layout Sketch

New Document Template: 13 Photos ...

With school just around the corner, I realized it would be nice to have a template to be able to add school pictures too.  You can do one photo per year, or do a layout for each school year. Here are the instructions to put the Document Template file into your InVue software:


Sunshine House Mini Album

Today's project is back by popular demand! Our National Scrapbook Day Sunshine House Mini Album was available for only a few hours back in 2013 but we continue to get requests for the files. So today we are pulling these files out of the vault and giving them to Craft Room Members.


Hawaii Vacation Layout

Vacation Layout/ Layout de Vacaciones

This year my vacation happened sooner than I thought, because last April my husband won a prize at his company for his excellent results at the end of the year. The company planned an event for all of these employees around the world. This year the place for this amazing event was Hawaii. It was a dream. We went to The Ritz Carlton at Maui Island. The island is full of contrast; there are beaches, mountains, volcanoes and waterfalls.


Engraved Frame Box

Hello Pazzles Craft Room friends, Melinda here with you today.Today I am using the Pazzles Engraving Tool. I love that our machine has the ability to use several different tools to create various projects on all sorts of mediums.   I decided to create a memorial box for our beloved fur baby that crossed Rainbow Bridge almost a year ago. She was with us for many years and was my son’s childhood buddy, so it had to be special. I started by designing the project. I created the frame of the design and then used the engraving settings to create the “fill lines”.  I then used a chunky serif type font for her name letters and did the same. For her birth and death date, I used one of the single stroke fonts that is in the program. The frame file is available exclusively in the Craft Room Library.


Summer Style Pocket Cards Collection

Summer Style Pocket Cards Cutting ...

There's so much to love about lazy summer days on the beach and this collection captures it all. Each of these pocket cards has a little mini beach scene on it that reminds me of our last beach vacation and dreams of a trip to Hawaii.


Flying Paper Fish

These cute 'moveable' fish are made out of paper. Their slitted sides make them truly moveable for plenty of playtime fun!


Watermelon Ice Bucket, Planter and ...

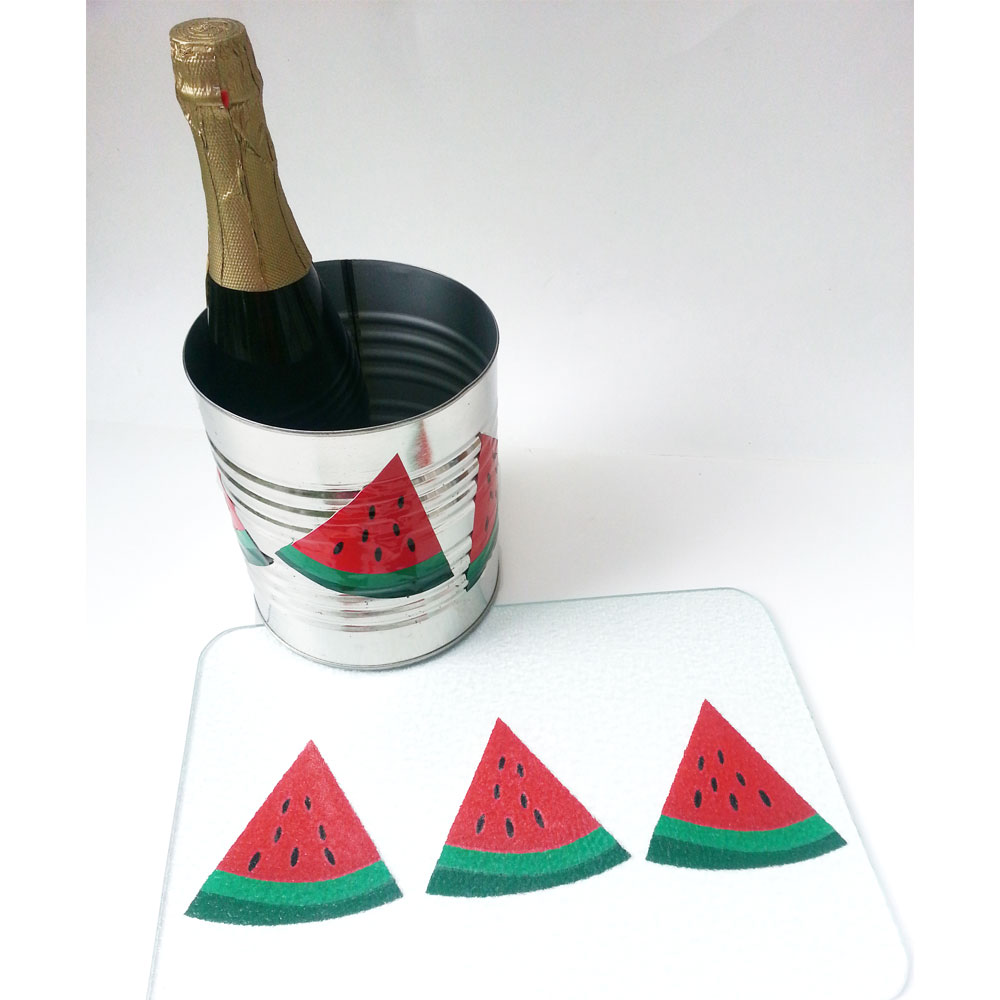
For this quick summer project I grabbed an empty #10 can (that never made it to being a stomper for my kids AND that was opened with a safety opener to avoid sharp edges!).  I also grabbed a glass cutting board that I got at a thrift store and have had for quite awhile and use regularly.  I washed them up, dried them, and spray painted the can only (inside and out) with clear Krylon to seal it so it won’t rust and any rust already present won’t get onto other things.  I used the new Backyard Summer Collection: Watermelon wedge to create layered vinyl embellishments for a shabby chic ice bucket (or plant pot, or plastic utensil/napkin holder, or vase, or throw some colored tissue inside and fill it with mini muffins for a housewarming or hostess gift. . .) and matching, washable cutting board. I resized the entire watermelon wedge to about 4 inches square, separated the parts and created a 0.02 inline of just the red wedge.  I then created a 0.04 inline of the new smaller red wedge and the light green rind piece and cut 3 sets of these from white vinyl to layer directly behind the red wedge and light green pieces on the can; the white pieces were only used on the can.  I cut six sets of the whole watermelon wedge (using the smaller red wedge, not the original) from the corresponding colors of vinyl and adhered them to the can in this order: white wedges, red wedges, dark green (outer) rind, white (of lighter green/inner rind piece), light green inner rind and the black seeds.


Page 46 of 95« First...102030...4445464748...607080...Last »