auntie_marg


DIY Suncatcher

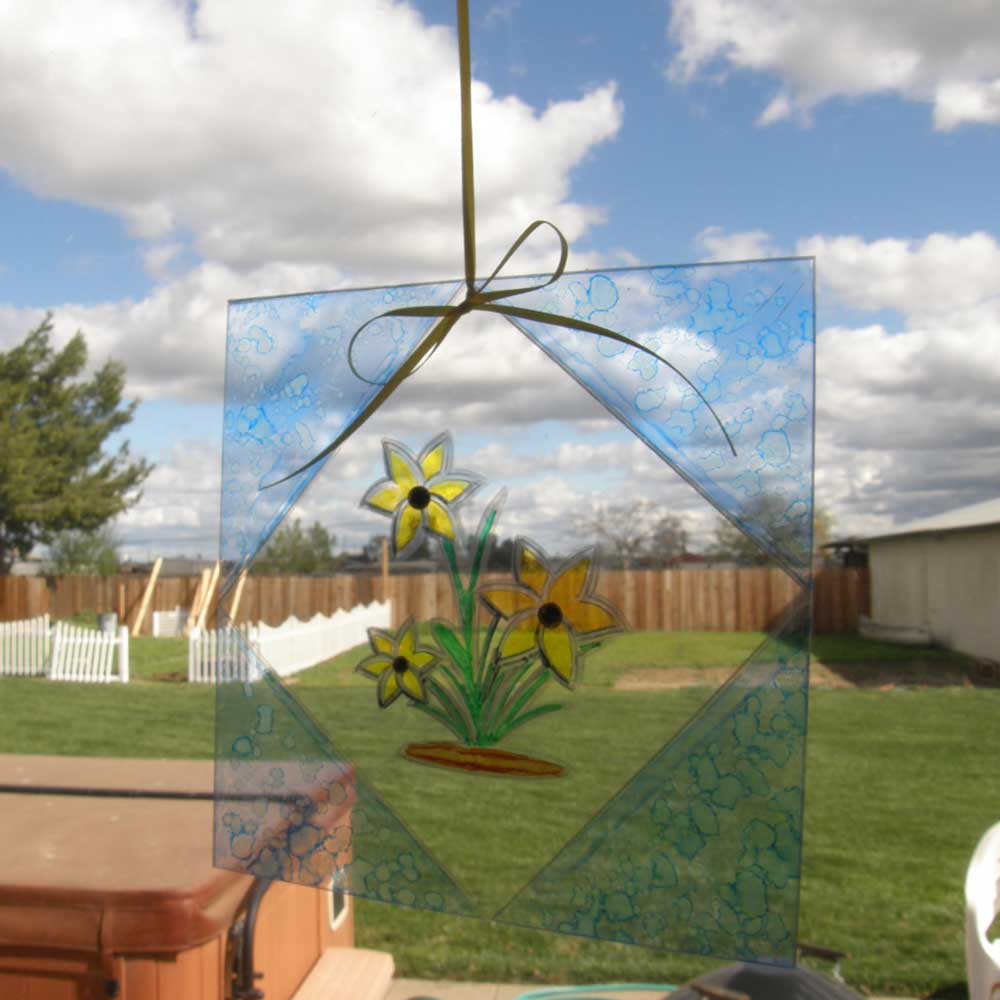
Make Your Own Spring Suncatcher

Spring is on the horizon, flowers are getting ready to bloom and the sun is ready to give all its warmth to the Earth. I love this time of year and one of my favorite things are sun catchers. I have been making them in one form or another since I was a little girl. For today’s project I’m using the Pen Tool and transparency film. In my InVue software I drew two squares turning one on end inside the other to form my design. Then I imported the Daffodils file from the Craft Room and with a little finessing was able to make the file so no lines overlapped.


Easter Peeps Printable Treats

I love sending treats to my Grandkids and using my InVue software makes it so easy to send personalized treats. First I started with a basic rectangle as wide as my sandwich baggie. I knew it was going to be a topper so I doubled the size so I could fold it over. Then, using the Spring Borders Set 2 file I choose the border I liked and sized it to fit my project.


Round Top Box Remake

I really love Tatum’s Rounded Top Lunch Box and I have a friend with a birthday coming who is always using those little cards for gift bags, so I thought I would make her some and use Tatum’s box to hold them. Then she can also set it out on a shelf. I didn’t do a lot of changing to the original file. I decided I didn’t want the handle. I did want it to say Cards somewhere on the box, so I got rid of the silhouette, then turned the oval sideways and used my Pazzles Pen Tool to add my word.


Typography Based Layout

Giant Number Scrapbook Overlay

I’m always looking for different ways to set up my scrapbook layouts. While walking through the Expo I always see cute word frames that cost a lot of money. Well, you know and I know, it’s just paper. I started with my Inspiration Studio Pro software and found a font that had a little chunk to it. I typed a number 1 and then drew lines to give some separation for pictures. Then I added an outline and thickened all the lines. With a quick push of the WYSIWYG button I had a file which I then saved in a WPC format.


Organization Week: Garden Stakes

It’s that time of the year. The holidays are over, all the decorations are safely packed away, and the family has all gone home. If you are anything like me you have probably already broken half of your New Year’s resolutions. Now its time to organize, and this year I’m going to organize my garden. Every year my hubby plants my garden and always throws away the plant tags before I can get to them. This year with the help of the new InVue software and the Pazzles Craft Room I made these cute garden stakes.


New Years Wreath Door Decoration

New Years Wreath Door Decoration

Need a great door decoration for your New Years party? You know Pazzles can help you with that. Here I cut out a wreath form out of cereal boxes with my trusty Inspiration Vue. I cut a circle inside of a circle to create a wreath form. I did cut out three of them and glued them on top of each other to give my wreath more stability. Then I started collecting stuff for my wreath. I found I had some gold tulle and some gold star trim as well as some clear acetate. I wrapped the form in the tulle twice again to make it look fuller and then with the star garland. I found some great files in the Pazzles Craft Room to decorate. I then wrote Happy New Year 2015 and gave it an outline in black. I used Core’dinations Gold Pearls Paper to cut out the lettering. The champagne bottles are from the Craft Room Library, New Years Bursting Bottle file and the glasses were from the 2011 file.


Christmas Cards Set

Happy Holidays Christmas Cards Two ...

From CAS (clean and simple) to just a little more fancy, whichever you prefer, this card has you covered. Clean and Simple Christmas Card First I made a simple card by drawing a rectangle and giving it a ducktail (ribbon) end. I duplicated and then resized them, giving me a step effect. I cut out the banners in simple red and green paper. I then cut a piece of white to fit the front of my card and used my Pazzles Pen Tool to add Happy Holidays with the Alex Brush font. I added it all to a premade card base to create a very simple, and easily duplicated holiday card, which comes in handy if you have to make a lot of them.


Thanksgiving Place Cards

Thanksgiving Place Cards

Busy, busy, busy. We are coming into the time of the year when we are so busy. We don’t have time to do elaborate projects, but still want the look of elaborate projects. Thanksgiving is one of those times. We want everything perfect on our dinner tables right down to the last detail including our place cards. Today I have a quick easy idea for place cards. I found these silver 3" x 2" frames at a yard sale for about buck but I have seen similar ones at the Dollar Tree and Michaels for next to nothing


Halloween Wall Hanging

Halloween Wall Canvas

As most of you know I went on the Pazzles Cruise. I was so inspired by the canvas project that Klo taught us that I wanted to share it with all of you. So first of all I got a 12 x 12 canvas. In the class we used the Pazzles Stencil Material but I didn’t have any of that on hand, so I took a trip to the hardware store. I found one of those 11 x 11 no trespassing signs and figured "it's plastic, so why not give it a try". While I was there I also picked up some joint compound and some glow in the dark spray paint, but that’s for a later project.


Family Heart Wall Hanging

This wall hanging was inspired by a table top piece a friend of mine liked on Facebook, so I decided to make her one for her wall. I used the heart from the Heart and Bow file in the Craft Room Library and sized it to 7.5 inches. Then I used the Edwardian Script font to add the saying and added some holes to attach ribbon for hanging. After I cut it out, I inked all the edges and filled in some of the lettering. To decorate it I used a simple flourish, the Curlz file from the Craft Room and some bling. This was a really simple project and can be made in no time at all. I could see this as a name plate on a little girl's bedroom door or nursery, or just on the wall with your favorite saying like this one.


A Gift Tag Set to ...

I was so inspired by the new Inspiration Vue Print and Cut that I knew I had to do a project for you using it. On your way to a party? Running out the door and stopping at a store to get a gift? This happens to me way too many times to count, and being a crafter people expect a little more from your gift wrapping. Most of the time there is just no time to do all that extra stuff. So how about we fancy up our store bought gift bags with a ready made tag? They are so easy to make in the software.


School Motto Vinyl Decals

School Mascot Vinyl Decals

It’s that wonderful time of the year when the kids go back to school and football practice starts. You know, the time of the year when you want to put stuff all over your car to support your child. The decals sold at my son's school are the ones that look like someone printed them out on clear plastic or white plastic and slapped it on their car. Not this Pazzles girl! My inspiration for my project today is our school shirt and our motto Pride Matters. I scanned my shirt and took the lion and vectorized it. With very little clean up and resizing it came out beautiful.


Distress Tool Birthday Card

My Design Team project for this week was to use a Pazzles Tool. I use the Pen Tool all the time, so I decided to use a tool I have had for years but haven't used much, the Distress Tool. Now my hubby's birthday is coming so I figured I’d make his card. I found the Birthday Title file in the Craft Room Library and thought that it would be perfect. The first thing I did was ungroup and move the candle and flame off to the side. I then made a rectangle the size I wanted the topper to be. Then using the engraving fill with S sweep, I filled in the rest of the file. I then resized the whole file, candle and all, to fit within the square topper. I find it much easier to fill the file before making it smaller to fit my card. For a little extra I added zig zag lines with the scissors tool to the top and bottom.


Baby Shower Rattle Invitation

Baby Week: Baby Rattle Shower ...

It’s Baby Week and who doesn’t love babies? So for you I have created a shower invitation using the Baby Rattle file. The first thing I did was to resize it to fit in a standard invitation envelope. I then added two circles, one for the front and one for the back. The front one was for information (i.e. who, when, rsvp) which I did with the Pazzles Pen Tool. I used Edwardian script font and then hand wrote the information, but you could do the whole thing with the Pen Tool. The back circle was for decorative paper. I added some inking and a bow and it turned out great. It's very simple and very fast. You could do a lot of these in no time at all and you can get six out of one piece of 12" x 12" cardstock. Tip: make sure you make an extra one for the mom to keep in the baby book.


Daytona Beach Scrapbook Layout

We go to Daytona Beach once a year. This year I got a fantastic family picture to scrapbook. I knew I wanted the picture to be as large on the layout as possible, so I printed it at home at the biggest size possible which is 8.5" x 11". Next I went to the Craft Room and found tons of beachy files to play with. I used Beach Chair, Bikini Starfish, Sandy Bucket, Simple Shells, Tropical Christmas and Sand Dollar cutting files. The really neat thing about this layout is that I was able to design it in the software complete with picture, so I would know what it would look like when it was all done.


Graduation Shrinky Dink Charms

Graduation is a wonderful time in one’s life. I thought I would make it more special by adding a little something to the basic graduation cap, and what’s more fun than charms. Inspired by the Charms video in the Building on the Basics section, I knew dangles or charms would be just the ticket. I remembered playing with shrinky dinks as a child so this craft also brought back fond memories. First I found two files in the Craft Room Graduate Photo Booth Hat and Hashtag 2014. I then used the replace by segment tool to draw a line to finish the cap and eliminate the graduate part since I just wanted a simple cap. I then used the techniques I learned in the video to make the cap and the hashtag into charms. I resized them to about to 7" for the cap and 9" for the hashtag.


Filled With Sunshine Sunburst Card

It’s Sunshine Week at Pazzles! All this week we are sharing sunshine inspired projects to warm your hearts and inspire some bright, cheerful crafting! Everyone’s birthday should be filled with sunshine! I made this birthday card with the Sun Ray Card 2 file from the Craft Room Library. First of all I used a premade card base that measures 5.5" x 4". Then I used two different shades of yellow for the rays to make it bright and cheerful.


Hot Tamale Treat Topper

I was so inspired by Amanda’s So Lucky To Have You Treat Topper that I turned it into a treat for my hubby. With just a few changes and his favorite candy it came out so cute. First, I changed the Lucky wording to Hot Tamale and then changed the Pen Tool writing to read "You are one". I added a couple of hearts and hot tamale candies, then some stickles to fancy it up a bit. He’s going to love it!


Spring Party Banner

I love this cute spring banner that can easily be adapted for any event! Made with files from the Craft Room Library!


Strawberry Jam Jar Gift Tags

I remember when I was about 10, being in the kitchen with my great grandmother. We called her "Granna". I remember the smell of fresh strawberry jam and helping her to mash the berries. It’s a memory that has stayed with me forever, and so every year I make my house smell just like hers. Fresh strawberry jam is something my family has always loved, and for a few lucky people they get to live that memory with me as I give out the jam. This year I used my Inspiration to make my labels. I first cut three 3" circles for the tops out of a plaid pattern paper. Then I used the Deckled Edge Classic Ovals from the Spellbinders Cutting Collections.


Milk Jug Necklace

I was inspired by a necklace I saw Erin Madsen from DCWV wearing in a video for paper stacks. It looked kind of like iridescent shells, but being a crafter I saw milk jug material. I waited for my family to finish the gallon of milk in the fridge, then I rinsed it out and cut the flat side off. I used the Flower Bunch file from the Craft Room Library. That file really seems to be my go to file for spring projects. I chose a flower with defined petals and duplicated it until I had nine flowers, then resized three each to 1.5", 1.25" and 1". I thought at this point it might get tricky, but it didn’t. I put the milk jug pieces on a new conditioned mat, as I did not want them to move during cutting. Just to make sure they didn't slip, I taped them with painters tape also. I cut them on the stencil material setting and did 2 passes, first on a blade depth of 2 and then on 2.5. It cut beautifully.


Customized Patterned Paper Valentines

One of my favorite things to do with my Inspiration Studio software is make my own custom patterned paper. I first change my mat size to 8.5 x 11 because that’s the size of my printer. I then import files I'd like to use. The one I used here is Heart and Bow from the Craft Room Library. I removed the bow, leaving just the heart. I thickened my lines, duplicated it several times in different line colors and stacked them slightly askew. Then I grouped and duplicated them, made some bigger, and some smaller placing them all over the page and rotating a few in different directions. I then resized some hearts very small, multiplied them, filled them in the different colors, and added them to the spaces as filler. When my design was complete I just printed it out on white cardstock using the borderless option on my printer. I really enjoy being able to make my own custom paper designs.


Page 1 of 212