Design Team


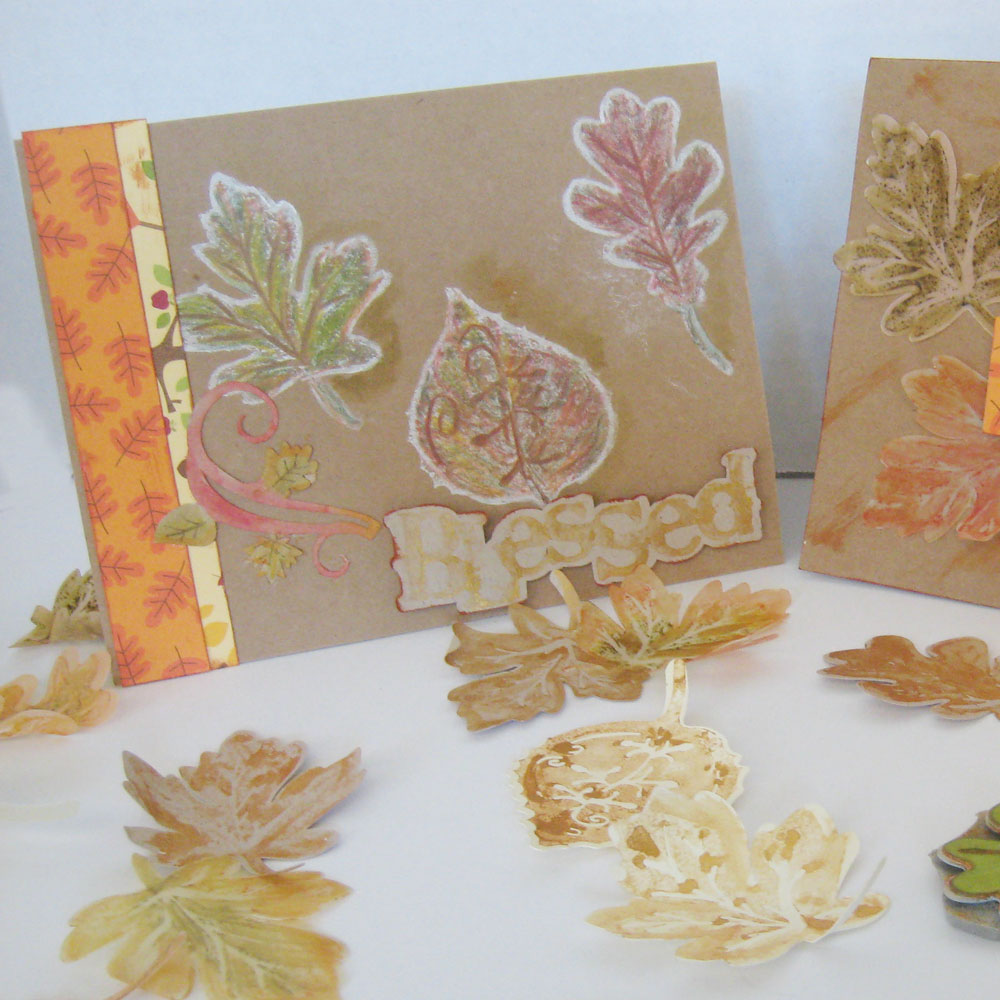
Rubber Stamp Kit: Falling ...

Autumn is my favorite season of the year, with cooler temperatures and gorgeous fall colors. The leaves with their multiple colors, shapes and textures always garner my attention.  This month I wanted to try my hand at making stamps with my Pazzles Inspiration Vue, inspired by the wonderful fall leaves. Pazzles stamp kit contains everything you need to create stamps—two different thicknesses of special rubber, cling mounting foam, a sanding block and acrylic block to mount your stamps.  The Pazzles Craft Room has a video  that clearly explains the entire process from finding an appropriate design to putting the stamp together. The Pazzles Craft Room Library has a collection of Falling Autumn leaves, and unable to decide which one to use, I chose three--Falling Autumn Oak, Falling Autumn Sugar Maple  and Falling Autumn Swirl Aspen.  Fall Word Titles contained the word “Blessed” which is perfect for a word stamp. It may be used for many projects and cards throughout the year, so I eliminated the leaf tail for the stamp.


Autumn Window Cling Scarecrow

Window Cling: Scarecrow Wreath

When I was a girl I played with paper dolls. When our daughter was young, instead of using paper dolls, she played with die-cut vinyl pieces called Colorforms. Today we can cut our own shapes from vinyl cling material and create designs for placing on our windows, smooth surfaces, or for using in building creative designs on a vinyl covered board, much as our children did. Today, I had the opportunity to play with Pazzles Vinyl Cling material to make a cute fall decoration for my sliding glass door. I found a nice Scarecrow design and a Grapevine Wreath in the Pazzles Craft Room to adapt for this project.  Since the vinyl I was using was 9” wide, I resized the wreath to about 9” wide. Then I selected parts of the Scarecrow with pumpkin design that I needed. I wanted the scarecrow to be sitting on the edge of the wreath instead of standing, so I transformed the britches portion of the design into a banner. I resized the scarecrow pieces to fit nicely inside of the wreath.  I typed the text using the InVue software, with the Brightside Typeface, and thickened it by shadowing at .02”.


Fall in Love Apple Harvest ...

This project was created from the Early Fall Harvest themed files from the Pazzles Craft Room. I have noticed that ombre is very in and thought it would be fun to make a sign celebrating all the wonderful apple varieties we are blessed with, especially here in the Evergreen State. I had an ombre acid-free cardstock paper pad titled “Paint Chip” from Craft Smith with some of the colors already coordinated for me. I added the rest of the colors from card stock in my stash. Components: Backing - two 10 by 7.5 pieces of cardboard (like from a small shipping or moving box, or a cereal box will do)


Paper Purse

Scallop Flower Purse

Isn’t this a cute little purse?  I found this purse in the Pazzles Craft Room and thought it would be perfect for a 15-minute project. This little purse would be nice for party favors, money, or a gift card.  As usual though, I’ll be filling mine with wrapped candy, especially the Cherry and Apple Jolly Ranchers I love to eat! There’s only two pieces for the purse.  The sides of the purse are folded inward.  All you have to do is fold along the scored lines and you’ll be finished with assembly in a jiffy.


Engraving Tool: Mixed Media Ocean ...

I recently enjoyed being a student in the Tim Holtz Creative Chemistry 103.  I had taken courses 101 and 102 previously, each time immensely enjoying the process and play involved, and learning about how to mix various products and colors so as to not “create mud,” but to create something wonderful.  I find the process of creating to be most therapeutic, and my Pazzles Creative Cutter certainly brings me to the next level, combining a variety of techniques, tools and Pazzles Craft Room designs to create art to decorate my home. My Ocean Treasures piece was inspired by the latest mermaid design in the Pazzles Craft Room, created by Miss Kate. This cute mermaid caught my eye, however I wanted her sitting on a rock, so I needed to perform a little “surgery” in my InVue software.  Using the scissors tools, I could swap the body of a seated mermaid with the head and arms of the one I preferred. I also found a wonderful assortment of rocks and ocean themed designs in the Pazzles Craft Room. Engraving round metal jewelry blanks with appropriate quotes seemed like a good solution for my vision of golden treasures, thanks to the Engraving On Sequins video in the Craft Room, I was able to do this with ease. To make the letters stand out,  white picket fence distress crayon was smeared over the letters, the excess rubbed off with a finger. The smudged appearance gave the illusion of being made old by sand and water. The rocks, sand, mermaid and scalloped shell were cut from watercolor paper, using the Pen Tool with drawing pencil for the mermaid’s face.  Various distress inks and texture paste colored with distress ink created the look of the rocks and sand. Watercolor pencils were used to color the hair and face of the mermaid, with ink blended in the background for the skin colors.


Music Bag and Binder

Music Book Bag and Binder

As school is starting, it is a great time to help our students get organized with book bags and notebooks. Creating custom decorations for them using our Pazzles cutters and Duct tape adds a special touch which is simple. I purchased a bag to decorate from Joann.com in the 13” wide size, perfect for holding music books. Walmart had binders on sale, so I picked up a black one. The Pazzles Craft Room has so many wonderful cutting designs that could be used to  decorate these item with any theme. I decided to decorate mine with a simple keyboard design. I had white Duct tape on hand which made experimentation easy. The attached file worked well for cutting the keys from strips of Duct tape that is 1.9” wide.


Embossed Metal Pumpkin

Embossing Tool: Fabulous 3D Pumpkin ...

Hello crafty friends, Melinda here with you today, and I have a super fun project to share with you.  As I looked around my craft room, I spied some of that fun metal craft I had used on a previous project. I decided that I wanted to do something with it, but what? I headed over to Pinterest to see what would spark my creative juices. I was going through some pins….Like most crafty hearts….I can really get lost down the rabbit…err Pinterest hole! But then it hit…inspiration. I saw these wonderful little “pumpkins” made out of mason jar lids….HERE.  I didn’t have the Mason jar lids, but I had my craft metal and my Pazzles!!!  So I went to work designing the pattern for the embossing. I didn’t just want to cut the metal into strips. Once I finished designing the strips, I used the Pazzles Embossing Tool and embossed the pattern and then cut them out. I cut out a total of 8 strips. You can find the file for this project here: Pazzles Craft Room 3D Pumpkin File.


Nautical Theme Party Favors

The invitations have already gone out and now it's time for some party favors. Using the Stationary Box file, create an inline box to the front, sides and the inside of the box to add dimension to the box. Use the Print and Cut method for the Life Saver, then cut around it.  Use the Pazzles Pen Tool to draw the "You're a Life Saver" onto the Tag file prior to cutting the tag out. I also cut out some Anchors for tags.


Electronic Key Fob/Ring Box

My daughter got her driver’s license this summer.  It’s an all new experience for me as she is my oldest. Of course she is having the time of her life, while I sit at home and worry about her safety…lol.  As you probably guessed she is going through gas like its water! I made this fun electronic key ring box to surprise her with a gas gift card.  You could also add a gift card for new tires or to a local repair/auto shop. Or, if you really want to surprise your recipient, you could put a key to a new car inside!


Apple Hershey Nugget Box for Back to School

Apple Nugget Box Card

Hello crafty friends, Melinda here with you today. It’s my turn to share here in the Craft Room. This month I was tasked with making a project with a school theme. I decided to make this super cute and fun treat card for my grandson for his first day of 4th grade! I used the Apple Nugget Box Card file I created for the Craft Room Library.  I started with some Kraft cardstock for the base. I then turned to the DCWV Edumacation Stack for the patterned papers. I also used some red cardstock for the outer apple shapes.


Embossing Tool: Birthday Card

In keeping with the statistics, August is filled with lots of birthdays for my family and friends, so I decided to use the large end of the Pazzles Embossing Tool and some cute files from the Pazzles Craft Room Library to create a debossed birthday card in the Inspiration Studio Pro 2014 software. The 5x7 inch landscape-oriented card is in five pieces: 1-The 10x7 inch card base (on white cardstock) which folds to 5x7 inch with a kiss cut line. 2-The card front (on sea green cardstock) which is a 0.20 inline of a 5x7 rectangle, debossed with a 0.10 inline and with happy happy happy BiRtHDAY (fonts list at end), 3-The banner mount (on white cardstock), which is the straight banner from the Ribbon-Banners file sized to about 6.6 inches wide by dragging the corner handle, and modified by moving the left pair of kiss cuts a bit to the right to make them the same distance from the left tails as the right kiss cut pair is from the right tails 4-The dimensional sentiment (on teal cardstock) from the Miss Kate Cuttables Celebrate Title, with debossed letters and cut around the whole word (on the largest outline of the word which is darker gray), 5-A star balloon (on teal cardstock) from the Miss Kate Cuttables New Years Balloons file, debossed  on the circles and edge accents and cut out with its string.


Popsicle Shaped Card

Pen Tool: Popsicle Card

Summer time is always a good time for a cool treat.  Why not have a party and invite people over to enjoy?  If you are not using your Pen Tool this is a great time to pull it out and have fun.  For this project I used the Popsicles file in the Craft Room then created a duplicate and welded the two together to make the card shape. The outside of the card I used purple card stock for the base and layered the orange and white on top. I used my Pen Tool to draw the letters for 'Let's Celebrate' and the inside of the card.


Piano Box with Musical Rose

Digital Paper: Piano Box with ...

Recently I was crafting with six of our young grandchildren, ages two through 10, and wanted an easy project for them to make quickly.  I had made some musical roses from the Twirled Flower Rose file in the Pazzles Craft Room recently and needed to make more. After I made one, the children each wanted to make their own. I quickly printed some sheet music on both sides of regular printer paper, resized the Twirled flower file in the InVue software to 8” wide to fill the 8.5”x11” paper, and the children were dazzled as they watched the Vue cutter make swirls around the printed paper on the mat. I showed them how to start wrapping the outside end of the cut strip around a pencil, and keep wrapping until all of the paper was wrapped. We put some clear drying glue on the last inside bit of paper, set it on the table and let it unwrap until we liked the size.


Mouse Birthday Card

Did you know that the InVue software has built in templates for card making? If you have not looked at these templates you are missing out on some good resources for quickly creating a card. Here is a video to show you more about the Document Templates. I have created a quick 15 minute project for you.


Piercing Tool: Stitched Embellishment/Adornos ...

The embellishments are an important part of any project. I have seen stitched cards and beautiful string art pieces and I wanted to do something like that, so I decided use this inspiration to do some embellishments using my Piercing Tool. I started, looking for some images to use with my Pazzles Piercing Tool. I also watched the Klo's Classroom videos about using the tool. These videos are available for Pazzles Craft Room members. It was my first time using the tool, and I felt in love with it. There are a lot of possibilities to try. I did some trial and error to get the correct space between the holes.


Paper Checkers and Chess Board

I love playing board games with my family. It’s a great way to spend time with them and have fun at the same time.  One of the games my kids love the most is checkers.  I created this checkers game to celebrate the fun we have playing it.  The neat thing about this checker board is that you can create it in any colors you like.  You can also add anything to the tops of the pieces instead of the traditional stars and crowns. Think, pink and purple with flowers and hearts, or maybe actual pictures of your families faces. You can use the crown file I’ve included and take a picture of them wearing the crown for the king side of the checker. 


Paper Flower Bouquets

I found a petal from the rose bush outside of my studio, and decided to fashion one with a similar shape out of a triangle using the Pazzles InVue software. You can find the cutting file for the resulting 3DRose in the Pazzles Craft Room Library. These files came in handy for creating paper bouquets for my son's wedding. Here's how I assembled the roses. The first layer formed the flower bud when the sides of one petal were hot glued to an opposite petal. The remaining 3 petals were hot glued about 1/3 of the way up from the base of each petal, and adhered to the forming bud. The back center of the next layer was hot glued to the first, with the petals positioned alternately to those of the first. A thin line of hot glue was applied to the base of each petal, which was folded up to adhere to the forming bud. The corners of each petal were curled away from the center of the bud using the small end of a small paint brush. This process was repeated with all of the layers except the last one. The last layer was simply glued in the center back, with no glue required at the base of the petals.


Pen Tool: Decorative Envelopes

Making envelopes is fun.  I have to be careful how I design them because sometimes I add too many decorations and forget I need to put them in the mail. For this project I chose to make a scalloped envelope named Deep Scallop Envelope located in the Craft Room Library.  You can make this envelope any size, but I chose to keep it small so I could add a small “Thank You” insert.


Hawaii Vacation Layout

Vacation Layout/ Layout de Vacaciones

This year my vacation happened sooner than I thought, because last April my husband won a prize at his company for his excellent results at the end of the year. The company planned an event for all of these employees around the world. This year the place for this amazing event was Hawaii. It was a dream. We went to The Ritz Carlton at Maui Island. The island is full of contrast; there are beaches, mountains, volcanoes and waterfalls.


Engraved Frame Box

Hello Pazzles Craft Room friends, Melinda here with you today.Today I am using the Pazzles Engraving Tool. I love that our machine has the ability to use several different tools to create various projects on all sorts of mediums.   I decided to create a memorial box for our beloved fur baby that crossed Rainbow Bridge almost a year ago. She was with us for many years and was my son’s childhood buddy, so it had to be special. I started by designing the project. I created the frame of the design and then used the engraving settings to create the “fill lines”.  I then used a chunky serif type font for her name letters and did the same. For her birth and death date, I used one of the single stroke fonts that is in the program. The frame file is available exclusively in the Craft Room Library.


Flying Paper Fish

These cute 'moveable' fish are made out of paper. Their slitted sides make them truly moveable for plenty of playtime fun!


Watermelon Ice Bucket, Planter and ...

For this quick summer project I grabbed an empty #10 can (that never made it to being a stomper for my kids AND that was opened with a safety opener to avoid sharp edges!).  I also grabbed a glass cutting board that I got at a thrift store and have had for quite awhile and use regularly.  I washed them up, dried them, and spray painted the can only (inside and out) with clear Krylon to seal it so it won’t rust and any rust already present won’t get onto other things.  I used the new Backyard Summer Collection: Watermelon wedge to create layered vinyl embellishments for a shabby chic ice bucket (or plant pot, or plastic utensil/napkin holder, or vase, or throw some colored tissue inside and fill it with mini muffins for a housewarming or hostess gift. . .) and matching, washable cutting board. I resized the entire watermelon wedge to about 4 inches square, separated the parts and created a 0.02 inline of just the red wedge.  I then created a 0.04 inline of the new smaller red wedge and the light green rind piece and cut 3 sets of these from white vinyl to layer directly behind the red wedge and light green pieces on the can; the white pieces were only used on the can.  I cut six sets of the whole watermelon wedge (using the smaller red wedge, not the original) from the corresponding colors of vinyl and adhered them to the can in this order: white wedges, red wedges, dark green (outer) rind, white (of lighter green/inner rind piece), light green inner rind and the black seeds.


Page 3 of 1712345...10...Last »